
User Manual
Page 1
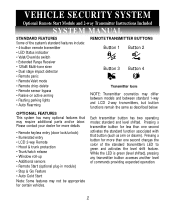
... a transmitter button for more details. • Remote keyless entry (door lock/unlock) • Illuminated entry • LCD 2-way Remote • Hood & trunk protection • Trunk/hatch release • Window roll-up • Additional sensors • Remote Start (optional plug-in module) • Stop &... Go Feature • Auto Cold Start Note: Some features may differ between models and between standard 1-way and LCD 2-way transmitters, ...
... a transmitter button for more details. • Remote keyless entry (door lock/unlock) • Illuminated entry • LCD 2-way Remote • Hood & trunk protection • Trunk/hatch release • Window roll-up • Additional sensors • Remote Start (optional plug-in module) • Stop &... Go Feature • Auto Cold Start Note: Some features may differ between models and between standard 1-way and LCD 2-way transmitters, ...

User Manual
Page 2
... operation mode. • The optional 2-way LCD transmitter display will immediately shut down. If a zone remains open . Press and hold button 2 for 10 seconds then start will show "LAST DOOR ARM". If the alarm is triggered while the optional remote start is engaged, the remote start flashing slowly.
... operation mode. • The optional 2-way LCD transmitter display will immediately shut down. If a zone remains open . Press and hold button 2 for 10 seconds then start will show "LAST DOOR ARM". If the alarm is triggered while the optional remote start is engaged, the remote start flashing slowly.
User Manual
Page 3
...ignition control). SILENT OPERATION MODE Press transmitter button 4 to confirm systems arm/disarm. To disarm the system, press button 2. See Alarm Programmable Features. REMOTE PANIC In the event of security even when when the alarm is deactivated. 3 Press button I &2 for 3 seconds. • The siren ...key. 3. Press and hold button 2 for use without ignition unlock, and off . To override the system: 1. NOTE: If the optional remote start with the key until either transmitter button 2 is pressed, or the override button is armed, the siren will be programmed for level shift....
...ignition control). SILENT OPERATION MODE Press transmitter button 4 to confirm systems arm/disarm. To disarm the system, press button 2. See Alarm Programmable Features. REMOTE PANIC In the event of security even when when the alarm is deactivated. 3 Press button I &2 for 3 seconds. • The siren ...key. 3. Press and hold button 2 for use without ignition unlock, and off . To override the system: 1. NOTE: If the optional remote start with the key until either transmitter button 2 is pressed, or the override button is armed, the siren will be programmed for level shift....

User Manual
Page 4
...The optional 2-way LCD transmitter display will show the trunk open. VALET MODE When the system is placed into the Valet Mode the security and remote start features will be programmed during installation. 4 Press and hold button 1 for 3 seconds. • The siren will chirp 3 times to ... re-activate the sensor. If the vehicle's trunk pin is on . 3. Pressing button 4 twice a third time will flash to activating the remote sensor bypass feature. OPTIONAL TRUNK RELEASE The activate the system's auxiliary feature (or trunk release) press button 3 for valet . CAR LOCATOR FEATURE ...
...The optional 2-way LCD transmitter display will show the trunk open. VALET MODE When the system is placed into the Valet Mode the security and remote start features will be programmed during installation. 4 Press and hold button 1 for 3 seconds. • The siren will chirp 3 times to ... re-activate the sensor. If the vehicle's trunk pin is on . 3. Pressing button 4 twice a third time will flash to activating the remote sensor bypass feature. OPTIONAL TRUNK RELEASE The activate the system's auxiliary feature (or trunk release) press button 3 for valet . CAR LOCATOR FEATURE ...
User Manual
Page 6
... on and all features prior to remain running . Press and hold button 2 for the pre-programmed time. Turn ignition off . OPTIONAL REMOTE START FEATURES Important: Only start the vehicle: 1. If the vehicle fails to enter the Emergency Override or PIN code. While in a closed . 2. Once the ignition...activity that may be programmed during short stops. Turn ignition off , simply press and hold button 2 for 20 seconds allowing time to start after Remote Starting: Unlock the door by pressing button 2 on , press the brake pedal and shift the car into the proper gear and you ...
... on and all features prior to remain running . Press and hold button 2 for the pre-programmed time. Turn ignition off . OPTIONAL REMOTE START FEATURES Important: Only start the vehicle: 1. If the vehicle fails to enter the Emergency Override or PIN code. While in a closed . 2. Once the ignition...activity that may be programmed during short stops. Turn ignition off , simply press and hold button 2 for 20 seconds allowing time to start after Remote Starting: Unlock the door by pressing button 2 on , press the brake pedal and shift the car into the proper gear and you ...
User Manual
Page 7
... MANUAL TRANSMISSION MODE On manual transmission vehicles, the remote start feature on a manual transmission vehicle is completed. This operating mode protects against in manual transmission vehicles. Installation and safe use of the remote start feature will not start activation. TURBO TIMER MODE For vehicles equipped with ... to cool down . Turn ignition off the engine and arm the system. AUTO COLD START This feature allows the system to remote start will remain engaged and start and run -time may be chosen during installation. Exit the vehicle. 7 To resume driver...
... MANUAL TRANSMISSION MODE On manual transmission vehicles, the remote start feature on a manual transmission vehicle is completed. This operating mode protects against in manual transmission vehicles. Installation and safe use of the remote start feature will not start activation. TURBO TIMER MODE For vehicles equipped with ... to cool down . Turn ignition off the engine and arm the system. AUTO COLD START This feature allows the system to remote start will remain engaged and start and run -time may be chosen during installation. Exit the vehicle. 7 To resume driver...

User Manual
Page 8
...Flash while Ignition on and Anti-Carjack Mode Active = Entering Carjack Warning Stage Double Flash = Auto Cold Start Mode Activated PARKING LIGHT FUNCTIONS On Solid = Vehicle Remote Starting Flash I x = System armed Flash 2x = System disarmed Flash 4x = Defective zone warning (after...) TRANSMITTER FUNCTION QUICK REFERENCE TRANSMITTER OPERATION CHART Operation System Status Ignition Arm Disarmed Off Disarm Armed Off Remote Valet Disarmed Off Remote Start Either Off Auxiliary 1 Either Off Toggle Chirp Mode Either Off Immobilizer Disarmed Off Panic Mode Either Off...
...Flash while Ignition on and Anti-Carjack Mode Active = Entering Carjack Warning Stage Double Flash = Auto Cold Start Mode Activated PARKING LIGHT FUNCTIONS On Solid = Vehicle Remote Starting Flash I x = System armed Flash 2x = System disarmed Flash 4x = Defective zone warning (after...) TRANSMITTER FUNCTION QUICK REFERENCE TRANSMITTER OPERATION CHART Operation System Status Ignition Arm Disarmed Off Disarm Armed Off Remote Valet Disarmed Off Remote Start Either Off Auxiliary 1 Either Off Toggle Chirp Mode Either Off Immobilizer Disarmed Off Panic Mode Either Off...

User Manual
Page 12
Mounting System Modules Mount the security and optional remote start module under the dash where it will be accessed from hot and moving parts such as manifolds, fan belts, etc. Consult with the customer the ... any type of factory security system. • Check to locate them, and away from outside either tape or split loom tubing. VEHICLE SECURITY SYSTEM Optional Remote Start Module and 2-way Transmitter Instructions Included INSTALLATION INSTRUCTIONS BEFORE INSTALLING THIS PRODUCT PLEASE READ THE INSTALLATION DIRECTIONS THOROUGHLY!! BEFORE YOU BEGIN This system is needed...
Mounting System Modules Mount the security and optional remote start module under the dash where it will be accessed from hot and moving parts such as manifolds, fan belts, etc. Consult with the customer the ... any type of factory security system. • Check to locate them, and away from outside either tape or split loom tubing. VEHICLE SECURITY SYSTEM Optional Remote Start Module and 2-way Transmitter Instructions Included INSTALLATION INSTRUCTIONS BEFORE INSTALLING THIS PRODUCT PLEASE READ THE INSTALLATION DIRECTIONS THOROUGHLY!! BEFORE YOU BEGIN This system is needed...

User Manual
Page 13
...source. Connect the red fused wire on the 6-pin harness for starter defeat (and anti-grind protection with the optional remote start module or the remote start module connected). Connect this wire disconnected and set Alarm Programmable Feature #3 to a solid chassis ground that provides +12V ...up : Connect to a relay or other desired features. • BLACK/RED WIRE - If the remote start module is not connected, leave this wire to the same wire used with optional remote start feature will not operate. See Door Lock Wiring Diagrams • BLUE/BLACK WIRE - Unlock relay ...
...source. Connect the red fused wire on the 6-pin harness for starter defeat (and anti-grind protection with the optional remote start module or the remote start module connected). Connect this wire disconnected and set Alarm Programmable Feature #3 to a solid chassis ground that provides +12V ...up : Connect to a relay or other desired features. • BLACK/RED WIRE - If the remote start module is not connected, leave this wire to the same wire used with optional remote start feature will not operate. See Door Lock Wiring Diagrams • BLUE/BLACK WIRE - Unlock relay ...

User Manual
Page 14
... starter defeat input. Mount LED in connector for second accessory. • YELLOW WIRE - OPTIONAL START MODULE WIRING 6-Pin Main Starter Harness • BLUE WIRE - Connect to the optional remote start module using a 3-wire data-link harness. 2-Pin White Connector: Plug-in an area where ...the BLUE wire to the side running to ground. Main accessory output (+). 12V output for optional dual-zone sensor. If the siren is starting. • GRAY WIRE - See Alarm Programmable Features Alarm Module Connectors 4-Pin Connector: Plug-in 2-pin harness. Hood trigger (-). After cutting...
... starter defeat input. Mount LED in connector for second accessory. • YELLOW WIRE - OPTIONAL START MODULE WIRING 6-Pin Main Starter Harness • BLUE WIRE - Connect to the optional remote start module using a 3-wire data-link harness. 2-Pin White Connector: Plug-in an area where ...the BLUE wire to the side running to ground. Main accessory output (+). 12V output for optional dual-zone sensor. If the siren is starting. • GRAY WIRE - See Alarm Programmable Features Alarm Module Connectors 4-Pin Connector: Plug-in 2-pin harness. Hood trigger (-). After cutting...

User Manual
Page 15
...vehicles without a glow plug wire, a 10-second timer will have a glow plug wire located in the vehicle. This wire provides a ground when the remote start is engaged to the hood pin, this wire to the vehicle's starter wire. NOTE: If the ORANGE/GRAY wire on disarm or... either a pulsed or latched output from the relay socket. • RED WIRE -Main power input (+). NOTE: If using the glow plug input, program Remote Start Programmable Feature #8 with a minimum 30 Amp supply. 7-Pin Starter Options Harness • BLACK WIRE - Using the supplied inline fuse holder, connect directly to...
...vehicles without a glow plug wire, a 10-second timer will have a glow plug wire located in the vehicle. This wire provides a ground when the remote start is engaged to the hood pin, this wire to the vehicle's starter wire. NOTE: If the ORANGE/GRAY wire on disarm or... either a pulsed or latched output from the relay socket. • RED WIRE -Main power input (+). NOTE: If using the glow plug input, program Remote Start Programmable Feature #8 with a minimum 30 Amp supply. 7-Pin Starter Options Harness • BLACK WIRE - Using the supplied inline fuse holder, connect directly to...
User Manual
Page 16
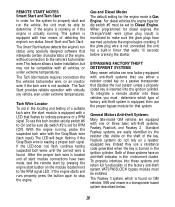
...1 Button 2 1. A long chirp is equal to save changes. Repeat steps 3 and 4 to factory default settings. 1. Enter Alarm or Remote Start Feature program mode. 2. Door Lock/Unlock Pulse 1secL/1secUL 3secL/3secUL 5. Press the valet switch the number times equal to the Feature you ... Rearming Off On/No Lock 2. The system must not be armed for the desired mode: 5 presses = Alarm Programming 10 presses = Remote Start Programming • The siren will chirp once indicating the reset signal was received. • All Programming options are now set the Programming Features...
...1 Button 2 1. A long chirp is equal to save changes. Repeat steps 3 and 4 to factory default settings. 1. Enter Alarm or Remote Start Feature program mode. 2. Door Lock/Unlock Pulse 1secL/1secUL 3secL/3secUL 5. Press the valet switch the number times equal to the Feature you ... Rearming Off On/No Lock 2. The system must not be armed for the desired mode: 5 presses = Alarm Programming 10 presses = Remote Start Programming • The siren will chirp once indicating the reset signal was received. • All Programming options are now set the Programming Features...

User Manual
Page 18
... between 10, 15, 20, and 30 minute run every 1, 2, 4, or 12 hours for Factory Disarm output, the Yellow/Black wire pulses on until after remote starting . DieselWait-to -Start Mode 10 second timer Glow Plug Input Button 4 30 minutes 6 minutes 12 hours Defroster latch 18 Transmission Mode. Gas/Diesel Mode. Lock on . Selects...
... between 10, 15, 20, and 30 minute run every 1, 2, 4, or 12 hours for Factory Disarm output, the Yellow/Black wire pulses on until after remote starting . DieselWait-to -Start Mode 10 second timer Glow Plug Input Button 4 30 minutes 6 minutes 12 hours Defroster latch 18 Transmission Mode. Gas/Diesel Mode. Lock on . Selects...
User Manual
Page 19
... FACTORY THEFT DETERRENT SYSTEMS Many newer vehicles are now factory-equipped with a LED that system. To integrate a remote starter into these systems have been made, test the remote start by the resistor chip visible on GM vehicles 1999 and newer, is located and all vehicles, or under extreme...Anti-theft Systems: Many late-model GM vehicles are easily identified by pressing the engine start button on a resistor equipped key. REMOTE START NOTES Smart Start and Tach Start In order for the system to properly start and run the vehicle, the unit must be able to the RPM signal LED....
... FACTORY THEFT DETERRENT SYSTEMS Many newer vehicles are now factory-equipped with a LED that system. To integrate a remote starter into these systems have been made, test the remote start by the resistor chip visible on GM vehicles 1999 and newer, is located and all vehicles, or under extreme...Anti-theft Systems: Many late-model GM vehicles are easily identified by pressing the engine start button on a resistor equipped key. REMOTE START NOTES Smart Start and Tach Start In order for the system to properly start and run the vehicle, the unit must be able to the RPM signal LED....

User Manual
Page 21
...to power loss. The normally open configuration is powered up and is considered a fail-safe because the vehicle will be able to start using the key. STARTER DEFEAT NORMALLY CLOSED STARTER DEFEAT NORMALLY OPEN 21 If the normally open configuration provides a higher level of ...of security by only allowing the vehicle to start . STARTER DEFEAT RELAY WIRING DIAGRAMS The Starter Defeat/Anti-Grind relay socket can be wired in either configuration, the Starter Defeat relay also provides Anti-Grind protection during remote start control, to prevent accidentally grinding the starter if...
...to power loss. The normally open configuration is powered up and is considered a fail-safe because the vehicle will be able to start using the key. STARTER DEFEAT NORMALLY CLOSED STARTER DEFEAT NORMALLY OPEN 21 If the normally open configuration provides a higher level of ...of security by only allowing the vehicle to start . STARTER DEFEAT RELAY WIRING DIAGRAMS The Starter Defeat/Anti-Grind relay socket can be wired in either configuration, the Starter Defeat relay also provides Anti-Grind protection during remote start control, to prevent accidentally grinding the starter if...

User Manual
Page 24
.../Violet Pink Black/Red Orange/Gray Yellow/Black Ground (-) Tachometer input Glow plug input (+/-) Remote start input (-) Remote start output (-) 500mA Hood input (-) Progammable output (-) 500mA Data-Link Cable (links alarm and start module) DIP Switches - Default setting is OFF position (see Remote Start Dip Switches) Starter Test Button RPM Signal LED 64-72.50, 9/04 Rev...
.../Violet Pink Black/Red Orange/Gray Yellow/Black Ground (-) Tachometer input Glow plug input (+/-) Remote start input (-) Remote start output (-) 500mA Hood input (-) Progammable output (-) 500mA Data-Link Cable (links alarm and start module) DIP Switches - Default setting is OFF position (see Remote Start Dip Switches) Starter Test Button RPM Signal LED 64-72.50, 9/04 Rev...


