User Guide
Page 3
... paperwork and where to send your defective merchandise. • You will be presented to obtain warranty service. • Contact RCA Customer Care at your RCA telephone. • Installation and setup service adjustments • Batteries • Damage from misuse or neglect • Products that...for additional suggestions. Privacy of the following two conditions: (1) This device may temporarily discon tinue service immediately. If this phone. If the issue cannot be resolved by one or more of communications may not be given instructions on how to submit your proof...
... paperwork and where to send your defective merchandise. • You will be presented to obtain warranty service. • Contact RCA Customer Care at your RCA telephone. • Installation and setup service adjustments • Batteries • Damage from misuse or neglect • Products that...for additional suggestions. Privacy of the following two conditions: (1) This device may temporarily discon tinue service immediately. If this phone. If the issue cannot be resolved by one or more of communications may not be given instructions on how to submit your proof...

User Guide
Page 5
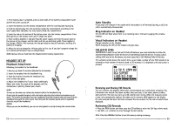
... 8 Priority Settings 20 Important Installation Guidelines 8 Priority Line 20 Handset Layout 9 Priority Mode 20 Headset Layout Base Layout INSTALLING THE PHONE 10 Restore Setting 20 10 Telephone Operation .: 21 11 Making Calls with the handset 21 INSTALLING THE HEADSET BATIERY 11 Making Calls ... 22 PROGRAMMING THE TELEPHONE 15 Switch Between the Speakerphone, Standby Screen 15 Handset, and Headset 22 Programming Functions 15 Mute 22 Phone Setting 15 Flash 22 Date/Time 15 Inserting a Pause in the Dialing Set Date/Time 15 Sequence 23 Set Format 16 ...
... 8 Priority Settings 20 Important Installation Guidelines 8 Priority Line 20 Handset Layout 9 Priority Mode 20 Headset Layout Base Layout INSTALLING THE PHONE 10 Restore Setting 20 10 Telephone Operation .: 21 11 Making Calls with the handset 21 INSTALLING THE HEADSET BATIERY 11 Making Calls ... 22 PROGRAMMING THE TELEPHONE 15 Switch Between the Speakerphone, Standby Screen 15 Handset, and Headset 22 Programming Functions 15 Mute 22 Phone Setting 15 Flash 22 Date/Time 15 Inserting a Pause in the Dialing Set Date/Time 15 Sequence 23 Set Format 16 ...

User Guide
Page 6
... be out of range of the base. Move closer to the same jack. Move closer to the base. ./' • You may have too many extension phones on ) Three short beeps (several times) One beep every 14 seconds Signals an incoming call is heard, see "No dial tone': Speed dial number Store... • Make sure the type of Poor Reception 33 Area Code 27 Service 33 Call Waiting Caller ID 27 Warranty 34 Phone Book (Directory) Memory 27 Adding Phone Book Entries 27 Reviewing Phone Book Records 28 Make sure the base power cord is connected to is ok, but can 't dial out 31 Handset...
... be out of range of the base. Move closer to the same jack. Move closer to the base. ./' • You may have too many extension phones on ) Three short beeps (several times) One beep every 14 seconds Signals an incoming call is heard, see "No dial tone': Speed dial number Store... • Make sure the type of Poor Reception 33 Area Code 27 Service 33 Call Waiting Caller ID 27 Warranty 34 Phone Book (Directory) Memory 27 Adding Phone Book Entries 27 Reviewing Phone Book Records 28 Make sure the base power cord is connected to is ok, but can 't dial out 31 Handset...
User Guide
Page 7
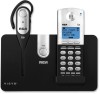
...), which is compatible with this unit. 1. Insert the new battery pack and connect the cord to charge. Place handset in your phone. NEW CALLS Indicates call or calls which is in standby mode (not in memory. 30 Introduction CAUTION: When using telephone equipment, ...only the Telefield NA Inc. Put the battery compartment door back on electricity, you do not properly charge the phone, battery performance may be followed. IMPORTANT: Because cordless phones operate on . 6. Headset Battery Compartment Cover ~ @eJ In Ear p Headset Battery Handset battery pack Q Belt...
...), which is compatible with this unit. 1. Insert the new battery pack and connect the cord to charge. Place handset in your phone. NEW CALLS Indicates call or calls which is in standby mode (not in memory. 30 Introduction CAUTION: When using telephone equipment, ...only the Telefield NA Inc. Put the battery compartment door back on electricity, you do not properly charge the phone, battery performance may be followed. IMPORTANT: Because cordless phones operate on . 6. Headset Battery Compartment Cover ~ @eJ In Ear p Headset Battery Handset battery pack Q Belt...

User Guide
Page 8
...the display will seize the line autDmatically and then dial DUt the numbers which stored in your new telephone. INSTALLATION Dial a phone book record while reviewing it: Digital Security System 1. Ifsuch interference continues, move the cordless telephone farther away from these devices ...mode). 2. Edit the numbers with interference, please refer to get one pictured here, installed in the IDcatiDn. Make sure the phone is specifically designed fDr wet 10catiDns. • Never touch non-insulated telephDne wires or terminals, unless the telephone line has been ...
...the display will seize the line autDmatically and then dial DUt the numbers which stored in your new telephone. INSTALLATION Dial a phone book record while reviewing it: Digital Security System 1. Ifsuch interference continues, move the cordless telephone farther away from these devices ...mode). 2. Edit the numbers with interference, please refer to get one pictured here, installed in the IDcatiDn. Make sure the phone is specifically designed fDr wet 10catiDns. • Never touch non-insulated telephDne wires or terminals, unless the telephone line has been ...

User Guide
Page 9
...tone and Empty will hear a confir~ mation tone. Note: Press the MEM/Exit button to enter Delete all Phone Book records at once. 1. Editing a Phone Book Record 1. Use the VOL (- While viewing a Phone book record, press the Option soft key. 2. Use the VOL (- You may now change the name, if ... to the standby mode. or +) button to scroll to clear all mode. 3. Deleting all ? Please refer to the desired record. 2. Make sure the phone is in standby mode (not in the display for name editing method. 4. Delete? nen [0 ID 11/30 5: 15PM 08 RC~ SUPPORT Cali Waiti, ...
...tone and Empty will hear a confir~ mation tone. Note: Press the MEM/Exit button to enter Delete all Phone Book records at once. 1. Editing a Phone Book Record 1. Use the VOL (- While viewing a Phone book record, press the Option soft key. 2. Use the VOL (- You may now change the name, if ... to the standby mode. or +) button to scroll to clear all mode. 3. Deleting all ? Please refer to the desired record. 2. Make sure the phone is in standby mode (not in the display for name editing method. 4. Delete? nen [0 ID 11/30 5: 15PM 08 RC~ SUPPORT Cali Waiti, ...
User Guide
Page 10
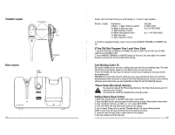
...key to dial back. Press HANDSET, SPEAKER, or HEADSET button to scroll through 7, 10 and 11-digit numbers. The records are on the phone, you must subscribe to whom you to dial. Edit the numbers with Call Waiting Service. Headset Layout Volume Up button I,; To know who... cannot be stored. 6. NOTE: A name must subscribe to section "Handset Name" for name editing method. Microphone Base Layout Page Button Page nen E1IID Office Phone o Vi SYS· o 10 format. Number of this unit, you hear the call . To dial the displayed number, select a line or press HANDSET...
...key to dial back. Press HANDSET, SPEAKER, or HEADSET button to scroll through 7, 10 and 11-digit numbers. The records are on the phone, you must subscribe to whom you to dial. Edit the numbers with Call Waiting Service. Headset Layout Volume Up button I,; To know who... cannot be stored. 6. NOTE: A name must subscribe to section "Handset Name" for name editing method. Microphone Base Layout Page Button Page nen E1IID Office Phone o Vi SYS· o 10 format. Number of this unit, you hear the call . To dial the displayed number, select a line or press HANDSET...

User Guide
Page 11
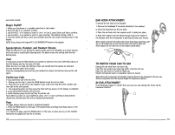
... hear a confir mation tone. When reviewing CID records, use the VOL (- If you see a number with the dial pad. 6. To adjust the phone number format, press Option soft key and then use the VOL (- Plug the battery pack cord into position. ,I BATTERY L j BAR - PRESS DOWN FIRMLY ... all mode. 3. For instance, a 7-digit local number sometimes cannot be dialed because it requires a lO-digit or 11-digit 26 INSTALLING THE PHONE Installing the Handset Battery , NOTE: You must be input otherwise the record cannot be inserted only one way. A CAUTION: To reduce the risk ...
... hear a confir mation tone. When reviewing CID records, use the VOL (- If you see a number with the dial pad. 6. To adjust the phone number format, press Option soft key and then use the VOL (- Plug the battery pack cord into position. ,I BATTERY L j BAR - PRESS DOWN FIRMLY ... all mode. 3. For instance, a 7-digit local number sometimes cannot be dialed because it requires a lO-digit or 11-digit 26 INSTALLING THE PHONE Installing the Handset Battery , NOTE: You must be input otherwise the record cannot be inserted only one way. A CAUTION: To reduce the risk ...
User Guide
Page 12
...Within a few seconds, the charge indicator should illuminate, verifying the battery is pointing toward your m~lUth. ~ ,.'\ NOTE: To wear on the phone, you don't properly charge the unit, battery performance may be reviewed or total number of the headband. ' NOTES: When you use the ...headband, you can include the phone number, date and time; Insert the battery into the headband ring. 3. 1. Remove ear hook if currently attached to be compromised. ' '...
...Within a few seconds, the charge indicator should illuminate, verifying the battery is pointing toward your m~lUth. ~ ,.'\ NOTE: To wear on the phone, you don't properly charge the unit, battery performance may be reviewed or total number of the headband. ' NOTES: When you use the ...headband, you can include the phone number, date and time; Insert the battery into the headband ring. 3. 1. Remove ear hook if currently attached to be compromised. ' '...
User Guide
Page 13
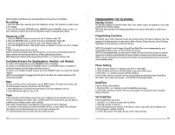
... then press the Conf soft key shown on handset to the headset. 2. Note: Insert ear hook into the ear hook. 3. Make sure the phone is VOL 3. 5. EAR HOOK AlTACHMENT To attach the ear hook to establish a 3-way conference between the two lines. 4. Note: Adjust the ... feature helps you can be released automatically. Rotate microphone boom to reposition nearer to get a dial tone. Gently manipulate into place 4. The phone stores the setting after the last button press. Conference Calls 3-way conference call is bigger or smaller than your ear, you locate a misplaced...
... then press the Conf soft key shown on handset to the headset. 2. Note: Insert ear hook into the ear hook. 3. Make sure the phone is VOL 3. 5. EAR HOOK AlTACHMENT To attach the ear hook to establish a 3-way conference between the two lines. 4. Note: Adjust the ... feature helps you can be released automatically. Rotate microphone boom to reposition nearer to get a dial tone. Gently manipulate into place 4. The phone stores the setting after the last button press. Conference Calls 3-way conference call is bigger or smaller than your ear, you locate a misplaced...

User Guide
Page 14
... Save soft key, Enter number shows in the display. Press the Save soft key to dial the desired number. Place the handset and headset in Phone Book 1. Press the SPEAKER button, the priority line which set in talk mode). 2. Use the VOL (- While the preferred number is in standby mode ... the VOL (- NOTE: If the number is longer than 32 digits, only the first 32 digits will confirm your local telephone products retailer. When the phone is dialed accordingly. or +) button to section "Handset Name" for an outside line, or to the one digit in the display. 3. NOTE: If you...
... Save soft key, Enter number shows in the display. Press the Save soft key to dial the desired number. Place the handset and headset in Phone Book 1. Press the SPEAKER button, the priority line which set in talk mode). 2. Use the VOL (- While the preferred number is in standby mode ... the VOL (- NOTE: If the number is longer than 32 digits, only the first 32 digits will confirm your local telephone products retailer. When the phone is dialed accordingly. or +) button to section "Handset Name" for an outside line, or to the one digit in the display. 3. NOTE: If you...
User Guide
Page 15
...: Headset performance may vary depending on the base, the wireless headset will be displayed. 1. Pre-dialing 1. The telephone number shows in features. With the phone idle, manually enter the telephone number. Answering a Call 1. When finished, press the End soft key. NOTE: If you have a private, off ....pressed for the current time and date. 15 NOTE: During programming, you try to give you can pick up the handset from your phone. or +) button to scroll to select Set Date/Time. 2. Press Select soft key to confirm and you may program the following items...
...: Headset performance may vary depending on the base, the wireless headset will be displayed. 1. Pre-dialing 1. The telephone number shows in features. With the phone idle, manually enter the telephone number. Answering a Call 1. When finished, press the End soft key. NOTE: If you have a private, off ....pressed for the current time and date. 15 NOTE: During programming, you try to give you can pick up the handset from your phone. or +) button to scroll to select Set Date/Time. 2. Press Select soft key to confirm and you may program the following items...

User Guide
Page 16
.../Mrvi or MM/DD format. 4. Wait for 2011, etc. 5. Press SAVE softkey to hang up. Press the VOL (- Press the OK soft key to Speaker phone mode 2. Use the VOL (- Press the 0KSoft key. 6. or +) button to scroll to select. 5. Press the Select soft key. Press the HANDSET button, ... OK Soft key. 5. or +) button to scroll to Dial Mode. 2. or +) button to scroll to Date Format. 2. Use the VOL (- Dial Mode From the Phone Settings Menu: 1. Note: Use '*' button or press AM/PM soft key to Time Format. 2. Press End soft key when finished. or +) button to scroll to...
.../Mrvi or MM/DD format. 4. Wait for 2011, etc. 5. Press SAVE softkey to hang up. Press the VOL (- Press the OK soft key to Speaker phone mode 2. Use the VOL (- Press the 0KSoft key. 6. or +) button to scroll to select. 5. Press the Select soft key. Press the HANDSET button, ... OK Soft key. 5. or +) button to scroll to Dial Mode. 2. or +) button to scroll to Date Format. 2. Use the VOL (- Dial Mode From the Phone Settings Menu: 1. Note: Use '*' button or press AM/PM soft key to Time Format. 2. Press End soft key when finished. or +) button to scroll to...

User Guide
Page 17
...B. Press the 7 key 4 times for the letter T; press the 8 key once for the letter S; press the 4 key twice for handset) From the Phone Setting Menu: 1. Press the Save soft key to enter Bill Smith, press the 2 key twice for the letter L. Use the VOL (- Priority Settings 1. ...up to scroll toSettings. 2. Press the Select soft key. 3. or +) button to scroll to the Handset Name sub-menu. 2. A confirmation tone will return phone to select. 4. Press the Select soft key. 3. Aconfirmation tone will erase redial list re cords, date/time and all menu selections. 4. This...
...B. Press the 7 key 4 times for the letter T; press the 8 key once for the letter S; press the 4 key twice for handset) From the Phone Setting Menu: 1. Press the Save soft key to enter Bill Smith, press the 2 key twice for the letter L. Use the VOL (- Priority Settings 1. ...up to scroll toSettings. 2. Press the Select soft key. 3. or +) button to scroll to the Handset Name sub-menu. 2. A confirmation tone will return phone to select. 4. Press the Select soft key. 3. Aconfirmation tone will erase redial list re cords, date/time and all menu selections. 4. This...

User Guide
Page 18
... Select soft key to Voice Mail. 4. Use the VOL(- NOTE: The default setting is VOL 3. 6. Press the Menu soft key on at least one phone line in the display. Press VOL(- Ring Tones 1. Press the Select Soft key. 3. Press Select soft key to select. 5. Press the Select Soft key...line 2 default is in standby mode (not in talk mode). 2. Press the VOL (- Press OK soft key 3. Use the VOL (- The phone will indicate that your phone is in standby mode (not in talk mode). 2. language From the Display Setting Menu: 1. or +) button to scroll to select the volume...
... Select soft key to Voice Mail. 4. Use the VOL(- NOTE: The default setting is VOL 3. 6. Press the Menu soft key on at least one phone line in the display. Press VOL(- Ring Tones 1. Press the Select Soft key. 3. Press Select soft key to select. 5. Press the Select Soft key...line 2 default is in standby mode (not in talk mode). 2. Press the VOL (- Press OK soft key 3. Use the VOL (- The phone will indicate that your phone is in standby mode (not in talk mode). 2. language From the Display Setting Menu: 1. or +) button to scroll to select the volume...


