

English Manual
Page 1
If you have questions, or if parts are damaged or missing, DO NOT CONTACT THE STORE; please contact Customer Care. MT Sat. 8 a.m.–-4 p.m. www.reebokfitness.com Model No. Serial Number Decal QUESTIONS? USER’'S MANUAL MT ON THE WEB: www.reebokservice.com CAUTION Read all precautions and instructions ... Customer Care. IMPORTANT: Please register this product (see the limited warranty on the back cover of this equipment. CALL TOLL-FREE: 1-877-994-4999 Mon.–-Fri., 6 a.m.–-6 p.m. RBTL60211.0 Serial No. Keep this manual for reference.
If you have questions, or if parts are damaged or missing, DO NOT CONTACT THE STORE; please contact Customer Care. MT Sat. 8 a.m.–-4 p.m. www.reebokfitness.com Model No. Serial Number Decal QUESTIONS? USER’'S MANUAL MT ON THE WEB: www.reebokservice.com CAUTION Read all precautions and instructions ... Customer Care. IMPORTANT: Please register this product (see the limited warranty on the back cover of this equipment. CALL TOLL-FREE: 1-877-994-4999 Mon.–-Fri., 6 a.m.–-6 p.m. RBTL60211.0 Serial No. Keep this manual for reference.

English Manual
Page 2
... 6 ASSEMBLY 7 OPERATION AND ADJUSTMENT 13 HOW TO FOLD AND MOVE THE TREADMILL 20 TROUBLESHOOTING 21 EXERCISE GUIDELINES 24 PART LIST 27 EXPLODED DRAWING 28 ORDERING REPLACEMENT PARTS Back Cover LIMITED WARRANTY Back Cover WARNING DECAL PLACEMENT This drawing shows the locations of Reebok. REEBOK and the Vector Logo are registered trademarks and service marks of...
... 6 ASSEMBLY 7 OPERATION AND ADJUSTMENT 13 HOW TO FOLD AND MOVE THE TREADMILL 20 TROUBLESHOOTING 21 EXERCISE GUIDELINES 24 PART LIST 27 EXPLODED DRAWING 28 ORDERING REPLACEMENT PARTS Back Cover LIMITED WARRANTY Back Cover WARNING DECAL PLACEMENT This drawing shows the locations of Reebok. REEBOK and the Vector Logo are registered trademarks and service marks of...

English Manual
Page 4
... power cord immediately after use, before performing the maintenance and adjustment procedures described in this treadmill in a commercial, rental, or institutional setting. 27. Inspect and properly tighten all parts of the power switch.) 21. Never remove the motor hood unless instructed to raise, ...lower, or move the treadmill until it is intended for the location of the treadmill regularly. If you feel faint or if you...
... power cord immediately after use, before performing the maintenance and adjustment procedures described in this treadmill in a commercial, rental, or institutional setting. 27. Inspect and properly tighten all parts of the power switch.) 21. Never remove the motor hood unless instructed to raise, ...lower, or move the treadmill until it is intended for the location of the treadmill regularly. If you feel faint or if you...

English Manual
Page 5
... number and the location of this manual. If you , note the product model number and serial number before you for selecting the new REEBOK® CHALLENGER 150 treadmill. Length: 6 ft. (183 cm) Width: 2 ft. 11 in the drawing below. To help us assist you have questions after... Cord Platform Cushion 5 Before reading further, please familiarize yourself with the parts that are shown on the front cover of features designed to make your benefit, read this manual. The CHALLENGER 150 treadmill provides an impressive selection of this manual carefully before contacting us. BEFORE ...
... number and the location of this manual. If you , note the product model number and serial number before you for selecting the new REEBOK® CHALLENGER 150 treadmill. Length: 6 ft. (183 cm) Width: 2 ft. 11 in the drawing below. To help us assist you have questions after... Cord Platform Cushion 5 Before reading further, please familiarize yourself with the parts that are shown on the front cover of features designed to make your benefit, read this manual. The CHALLENGER 150 treadmill provides an impressive selection of this manual carefully before contacting us. BEFORE ...
English Manual
Page 6
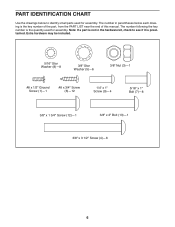
... for assembly. The number following the key number is the key number of the part, from the PART LIST near the end of this manual. Note: If a part is not in parentheses below to see if it is preattached. Extra hardware may be included. 5/16" Star Washer ...151;-1 #8 x 1/2" Ground Screw (1)—-1 #8 x 3/4" Screw (6)—-12 1/4" x 1" Screw (9)—-4 5/16" x 1" Bolt (7)—-8 3/8" x 1 3/4" Screw (12)—-1 3/8" x 2" Bolt (13)—-1 3/8" x 3 1/2" Screw (4)—-6 6 PART IDENTIFICATION CHART Use the drawings below each drawing is the quantity used for assembly.
... for assembly. The number following the key number is the key number of the part, from the PART LIST near the end of this manual. Note: If a part is not in parentheses below to see if it is preattached. Extra hardware may be included. 5/16" Star Washer ...151;-1 #8 x 1/2" Ground Screw (1)—-1 #8 x 3/4" Screw (6)—-12 1/4" x 1" Screw (9)—-4 5/16" x 1" Bolt (7)—-8 3/8" x 1 3/4" Screw (12)—-1 3/8" x 2" Bolt (13)—-1 3/8" x 3 1/2" Screw (4)—-6 6 PART IDENTIFICATION CHART Use the drawings below each drawing is the quantity used for assembly.
English Manual
Page 7
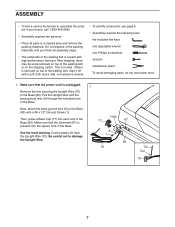
...on top of the walking belt, wipe it off with a soft cloth and a mild, non-abrasive cleaner. •• To identify small parts, see page 6. •• Assembly requires the following tools: the included hex keys one adjustable wrench one Phillips screwdriver scissors needlenose pliers To ... 70 Tie Cut 70 7 This is coated with a #8 x 1/2" Ground Screw (1). Do not dispose of the packing materials until you nish all parts in a cleared area and remove the packing materials. Make sure that the power cord is pressed into each end of the Base (80). Then, press...
...on top of the walking belt, wipe it off with a soft cloth and a mild, non-abrasive cleaner. •• To identify small parts, see page 6. •• Assembly requires the following tools: the included hex keys one adjustable wrench one Phillips screwdriver scissors needlenose pliers To ... 70 Tie Cut 70 7 This is coated with a #8 x 1/2" Ground Screw (1). Do not dispose of the packing materials until you nish all parts in a cleared area and remove the packing materials. Make sure that the power cord is pressed into each end of the Base (80). Then, press...

English Manual
Page 12
.... Keep the included hex key in a secure place; Fully tighten the six 3/8" x 3 1/2" Screws (4) (three on the treadmill decals, remove the plastic. Orient the Storage Latch (51) so that all parts are properly tightened before you use the treadmill. Attach the lower end of the Storage Latch (51) to the Base (80) with a 3/8" x 1 3/4" Screw... that the large barrel and the latch knob are sheets of the Storage Latch (51) to adjust the walking belt (see HOW TO LOWER THE TREADMILL FOR USE on page 20). 49 12 51 Large Barrel Latch Knob 13 80 3 12.
.... Keep the included hex key in a secure place; Fully tighten the six 3/8" x 3 1/2" Screws (4) (three on the treadmill decals, remove the plastic. Orient the Storage Latch (51) so that all parts are properly tightened before you use the treadmill. Attach the lower end of the Storage Latch (51) to the Base (80) with a 3/8" x 1 3/4" Screw... that the large barrel and the latch knob are sheets of the Storage Latch (51) to adjust the walking belt (see HOW TO LOWER THE TREADMILL FOR USE on page 20). 49 12 51 Large Barrel Latch Knob 13 80 3 12.
English Manual
Page 24
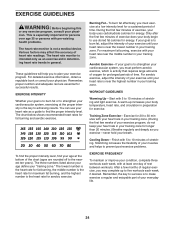
... to use your training zone. For aerobic exercise, adjust the intensity of your exercise until your heart rate is to make exercise a regular and enjoyable part of exercise does your body begin to strengthen your cardiovascular system, exercising at the bottom of rest between workouts. Remember, the key to five workouts...
... to use your training zone. For aerobic exercise, adjust the intensity of your exercise until your heart rate is to make exercise a regular and enjoyable part of exercise does your body begin to strengthen your cardiovascular system, exercising at the bottom of rest between workouts. Remember, the key to five workouts...
English Manual
Page 27
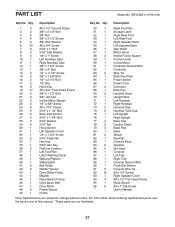
... Bar Bottom 91 2 Console Wire Tie 92 12 #3 x 1/4" Screw 93 1 Right Speaker Cover 94 4 #8 x 1/2" Pan Head Screw 95 1 Reed Switch 96 8 #8 x 1" Tek Screw * –- Description Key No. Qty. For information about ordering replacement parts, see the back cover of this manual. *These parts are subject to change without notice. RBTL60211.0 R0113A Key No...
... Bar Bottom 91 2 Console Wire Tie 92 12 #3 x 1/4" Screw 93 1 Right Speaker Cover 94 4 #8 x 1/2" Pan Head Screw 95 1 Reed Switch 96 8 #8 x 1" Tek Screw * –- Description Key No. Qty. For information about ordering replacement parts, see the back cover of this manual. *These parts are subject to change without notice. RBTL60211.0 R0113A Key No...

English Manual
Page 32
... implied warranty lasts. This warranty provides specic legal rights; ICON Health & Fitness, Inc., 1500 S. 1000 W., Logan, UT 84321-9813 Part No. 325567 R0113A Printed in their scope and duration to the terms set forth above is shipped to a service center, freight charges to and... You must be responsible for a minimal trip charge. Some states do not allow the exclusion or limitation of incidental or consequential damages. Parts and labor are shipped while the product is purchased or transported outside the USA, if all other consequential damages of any economic loss, ...
... implied warranty lasts. This warranty provides specic legal rights; ICON Health & Fitness, Inc., 1500 S. 1000 W., Logan, UT 84321-9813 Part No. 325567 R0113A Printed in their scope and duration to the terms set forth above is shipped to a service center, freight charges to and... You must be responsible for a minimal trip charge. Some states do not allow the exclusion or limitation of incidental or consequential damages. Parts and labor are shipped while the product is purchased or transported outside the USA, if all other consequential damages of any economic loss, ...


