

English Manual
Page 4
... to safely lift 45 lbs. (20 kg) to raise, lower, or move the treadmill until it is properly assembled. (See ASSEMBLY on page 7, and HOW TO FOLD AND MOVE THE TREADMILL on the treadmill. SAVE THESE INSTRUCTIONS 4 Always remove the key, unplug the power cord, and press the power switch into any opening on...
... to safely lift 45 lbs. (20 kg) to raise, lower, or move the treadmill until it is properly assembled. (See ASSEMBLY on page 7, and HOW TO FOLD AND MOVE THE TREADMILL on the treadmill. SAVE THESE INSTRUCTIONS 4 Always remove the key, unplug the power cord, and press the power switch into any opening on...

English Manual
Page 5
The CHALLENGER 150 treadmill provides an impressive selection of features designed to make your benefit, read this manual carefully before contacting ...decal are labeled in . (89 cm) Handrail Console Tray Heart Rate Monitor Key/Clip Walking Belt Foot Rail Idler Roller Adjustment Screws Power Switch Power Cord Platform Cushion 5 BEFORE YOU BEGIN Thank you use the treadmill. Length: 6 ft. (183 cm) Width: 2 ft. 11 in the...this manual. If you , note the product model number and serial number before you for selecting the new REEBOK® CHALLENGER 150 treadmill. To help us .
The CHALLENGER 150 treadmill provides an impressive selection of features designed to make your benefit, read this manual carefully before contacting ...decal are labeled in . (89 cm) Handrail Console Tray Heart Rate Monitor Key/Clip Walking Belt Foot Rail Idler Roller Adjustment Screws Power Switch Power Cord Platform Cushion 5 BEFORE YOU BEGIN Thank you use the treadmill. Length: 6 ft. (183 cm) Width: 2 ft. 11 in the...this manual. If you , note the product model number and serial number before you for selecting the new REEBOK® CHALLENGER 150 treadmill. To help us .
English Manual
Page 6
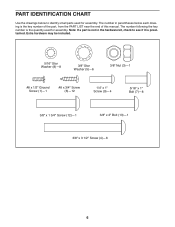
...;-12 1/4" x 1" Screw (9)—-4 5/16" x 1" Bolt (7)—-8 3/8" x 1 3/4" Screw (12)—-1 3/8" x 2" Bolt (13)—-1 3/8" x 3 1/2" Screw (4)—-6 6 PART IDENTIFICATION CHART Use the drawings below each drawing is the key number of the part, from the PART LIST near the end of this manual. The number following the...
...;-12 1/4" x 1" Screw (9)—-4 5/16" x 1" Bolt (7)—-8 3/8" x 1 3/4" Screw (12)—-1 3/8" x 2" Bolt (13)—-1 3/8" x 3 1/2" Screw (4)—-6 6 PART IDENTIFICATION CHART Use the drawings below each drawing is the key number of the part, from the PART LIST near the end of this manual. The number following the...
English Manual
Page 7
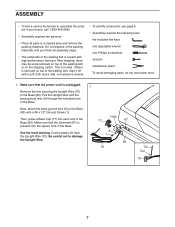
... a soft cloth and a mild, non-abrasive cleaner. •• To identify small parts, see page 6. •• Assembly requires the following tools: the included hex keys one adjustable wrench one Phillips screwdriver scissors needlenose pliers To avoid damaging parts, do not use power tools. 1. Cut the plastic tie near the Upright...
... a soft cloth and a mild, non-abrasive cleaner. •• To identify small parts, see page 6. •• Assembly requires the following tools: the included hex keys one adjustable wrench one Phillips screwdriver scissors needlenose pliers To avoid damaging parts, do not use power tools. 1. Cut the plastic tie near the Upright...

English Manual
Page 12
...that all parts are properly tightened before you use the treadmill. Make sure that the large barrel and the latch knob are sheets of the Storage Latch (51) to the Base (80) with a 3/8" x 1 3/4" Screw (12). Keep the included hex key in a secure place; If there are oriented as ...pages 22 and 23). 12 To protect the floor or carpet, place a mat under the treadmill. the hex key is completed. Note: Extra hardware may be included. Fully tighten the six 3/8" x 3 1/2" Screws (4) (three on the treadmill decals, remove the plastic. Raise the Frame (49) to the position shown. 11 Have ...
...that all parts are properly tightened before you use the treadmill. Make sure that the large barrel and the latch knob are sheets of the Storage Latch (51) to the Base (80) with a 3/8" x 1 3/4" Screw (12). Keep the included hex key in a secure place; If there are oriented as ...pages 22 and 23). 12 To protect the floor or carpet, place a mat under the treadmill. the hex key is completed. Note: Extra hardware may be included. Fully tighten the six 3/8" x 3 1/2" Screws (4) (three on the treadmill decals, remove the plastic. Raise the Frame (49) to the position shown. 11 Have ...
English Manual
Page 15
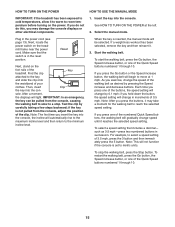
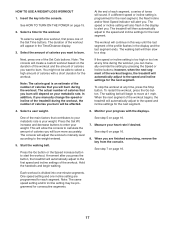
...the power switch on the foot rails of the clip. Then, insert Clip the key into the console. After a moment, the displays will be pulled from the console, adjust the position of the Key treadmill. Note: The first time you hold down the button, the speed setting will ...button and then immediately press the 5 button. HOW TO TURN ON THE POWER IMPORTANT: If the treadmill has been exposed to cold temperatures, allow it to warm to metric units. When the key is in increments of the Quick Speed buttons numbered 1 through 10. Make sure that includes a...
...the power switch on the foot rails of the clip. Then, insert Clip the key into the console. After a moment, the displays will be pulled from the console, adjust the position of the Key treadmill. Note: The first time you hold down the button, the speed setting will ...button and then immediately press the 5 button. HOW TO TURN ON THE POWER IMPORTANT: If the treadmill has been exposed to cold temperatures, allow it to warm to metric units. When the key is in increments of the Quick Speed buttons numbered 1 through 10. Make sure that includes a...
English Manual
Page 16
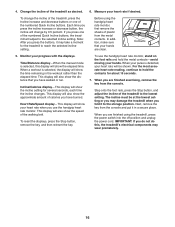
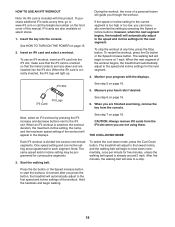
... key. When you press the buttons, it to reach the selected incline setting. Contacts 5. This display will show the approximate amount of the walking belt. This display will show the speed of calories you use the handgrip heart rate monitor, stand on the foot rails and hold the contacts for the treadmill... display will also show the time remaining in a secure place. Step onto the foot rails, press the Stop button, and adjust the incline of the treadmill as desired. 6. Next, remove the key from the console and put it in the workout rather than the elapsed time.
... key. When you press the buttons, it to reach the selected incline setting. Contacts 5. This display will show the approximate amount of the walking belt. This display will show the speed of calories you use the handgrip heart rate monitor, stand on the foot rails and hold the contacts for the treadmill... display will also show the time remaining in a secure place. Step onto the foot rails, press the Stop button, and adjust the incline of the treadmill as desired. 6. Next, remove the key from the console and put it in the workout rather than the elapsed time.
English Manual
Page 17
...flash in the Time/Distance display. 3. Select a time for the next segment. Next, press one incline setting are finished exercising, remove the key from the console. To stop . Hold the handrails and begin to your metabolic rate is too high or too low at any time during the... workout. The walking belt will allow the console to burn. When the next segment of the Set Time buttons. The treadmill will automatically adjust to the speed and incline settings for the workout. The console will appear in the display to start the workout. Insert...
...flash in the Time/Distance display. 3. Select a time for the next segment. Next, press one incline setting are finished exercising, remove the key from the console. To stop . Hold the handrails and begin to your metabolic rate is too high or too low at any time during the... workout. The walking belt will allow the console to burn. When the next segment of the Set Time buttons. The treadmill will automatically adjust to the speed and incline settings for the workout. The console will appear in the display to start the workout. Insert...
English Manual
Page 18
...page 15. 2. make sure that the iFit card is oriented so that the metal contacts are face-down and are finished exercising, remove the key from the iFit slot when you are inserted into several one incline setting are not using them. If the speed or incline setting for the... you are programmed for the next segment. CAUTION: Always remove iFit cards from the console. One speed setting and one -minute segments. The treadmill will adjust to the lowest incline, and the walking belt will automatically adjust to the first speed and incline settings of a personal trainer will guide...
...page 15. 2. make sure that the iFit card is oriented so that the metal contacts are face-down and are finished exercising, remove the key from the iFit slot when you are inserted into several one incline setting are not using them. If the speed or incline setting for the... you are programmed for the next segment. CAUTION: Always remove iFit cards from the console. One speed setting and one -minute segments. The treadmill will adjust to the lowest incline, and the walking belt will automatically adjust to the first speed and incline settings of a personal trainer will guide...
English Manual
Page 19
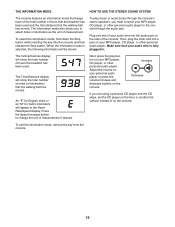
... of on the console. To select the information mode, hold down the Stop button while inserting the key into the audio jack on your MP3 player, CD player, or other personal audio player to the...Decrease If you to change the unit of the console. To exit the information mode, remove the key from the console. 19 THE INFORMATION MODE HOW TO USE THE STEREO SOUND SYSTEM The console features an... information mode that keeps track of the total number of hours that the treadmill has been used and the total distance that your audio wire is selected, the following information will...
... of on the console. To select the information mode, hold down the Stop button while inserting the key into the audio jack on your MP3 player, CD player, or other personal audio player to the...Decrease If you to change the unit of the console. To exit the information mode, remove the key from the console. 19 THE INFORMATION MODE HOW TO USE THE STEREO SOUND SYSTEM The console features an... information mode that keeps track of the total number of hours that the treadmill has been used and the total distance that your audio wire is selected, the following information will...
English Manual
Page 20
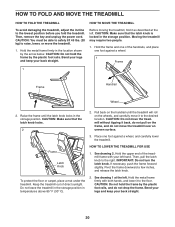
... to raise, lower, or move the treadmill over an uneven surface. 3. Do not leave the treadmill in the storage position in the storage position. Bend your legs and keep your left hand. Then, remove the key and unplug the power cord. Moving the treadmill may require two people. 1. Pull back... on the wheels, and carefully move the treadmill without tipping it as described at the left . See drawing 2. See drawing 1 at...
... to raise, lower, or move the treadmill over an uneven surface. 3. Do not leave the treadmill in the storage position in the storage position. Bend your legs and keep your left hand. Then, remove the key and unplug the power cord. Moving the treadmill may require two people. 1. Pull back... on the wheels, and carefully move the treadmill without tipping it as described at the left . See drawing 2. See drawing 1 at...
English Manual
Page 21
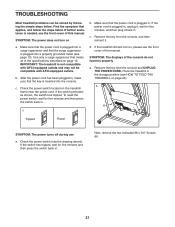
...that applies, and follow the steps listed. Check the power switch (see HOW TO FOLD THE TREADMILL on page 13. c. Remove the key from the console, and then reinsert it back in . Remove the key from the console and UNPLUG THE POWER CORD. To reset the power switch, wait for five minutes... and then press the switch back in . Place the treadmill in , unplug it, wait for five minutes, and then plug it . b. Make sure that the power cord is plugged into a surge suppressor and that the key is plugged in the storage position (see the drawing above). If ...
...that applies, and follow the steps listed. Check the power switch (see HOW TO FOLD THE TREADMILL on page 13. c. Remove the key from the console, and then reinsert it back in . Remove the key from the console and UNPLUG THE POWER CORD. To reset the power switch, wait for five minutes... and then press the switch back in . Place the treadmill in , unplug it, wait for five minutes, and then plug it . b. Make sure that the power cord is plugged into a surge suppressor and that the key is plugged in the storage position (see the drawing above). If ...

English Manual
Page 22
...Switch. Make sure that the walking belt needs more lubricant, see the front cover of this manual. 22 b 2–-3 in . 19 95 Idler Roller Screws SYMPTOM: The incline of the treadmill does not change correctly a. Such substances may become damaged. If you suspect that the gap between the Magnet and...the walking belt may deteriorate the walking belt and cause excessive wear. Hold down the Stop button and the Speed increase button, insert the key into the console, and then release the Stop button and the Speed increase button. Press the Stop button and then press the Incline ...
...Switch. Make sure that the walking belt needs more lubricant, see the front cover of this manual. 22 b 2–-3 in . 19 95 Idler Roller Screws SYMPTOM: The incline of the treadmill does not change correctly a. Such substances may become damaged. If you suspect that the gap between the Magnet and...the walking belt may deteriorate the walking belt and cause excessive wear. Hold down the Stop button and the Speed increase button, insert the key into the console, and then release the Stop button and the Speed increase button. Press the Stop button and then press the Incline ...
English Manual
Page 23
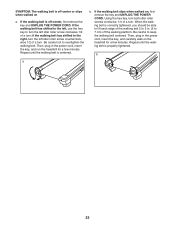
Then, plug in the power cord, insert the key, and run the treadmill for a few minutes. When the walking belt is off-center, first remove the key and UNPLUG THE POWER CORD. If the walking belt is correctly tightened, you should be able to lift each edge of a turn ; Be careful not... when walked on a. If the walking belt has shifted to the left, use the hex key to the right, turn the left idler roller screw clockwise 1/2 of a turn. If the walking belt slips when walked on the treadmill for a few minutes. Be careful to overtighten the walking belt. b 23 a b. if the ...
Then, plug in the power cord, insert the key, and run the treadmill for a few minutes. When the walking belt is off-center, first remove the key and UNPLUG THE POWER CORD. If the walking belt is correctly tightened, you should be able to lift each edge of a turn ; Be careful not... when walked on a. If the walking belt has shifted to the left, use the hex key to the right, turn the left idler roller screw clockwise 1/2 of a turn. If the walking belt slips when walked on the treadmill for a few minutes. Be careful to overtighten the walking belt. b 23 a b. if the ...
English Manual
Page 24
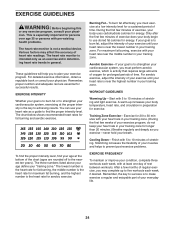
... highest number in your training zone. (During the first few minutes of your condition, complete three workouts each week, if desired. Remember, the key to success is to use your cardiovascular system, exercising at the bottom of heart rate readings. Only after the first few weeks of time. For... maximum fat burning, exercise with 5 to 10 minutes of your exercise until your heart rate is the key to find your age at the proper intensity is near the lowest number in your body begin to make exercise a regular and enjoyable part ...
... highest number in your training zone. (During the first few minutes of your condition, complete three workouts each week, if desired. Remember, the key to success is to use your cardiovascular system, exercising at the bottom of heart rate readings. Only after the first few weeks of time. For... maximum fat burning, exercise with 5 to 10 minutes of your exercise until your heart rate is the key to find your age at the proper intensity is near the lowest number in your body begin to make exercise a regular and enjoyable part ...
English Manual
Page 27
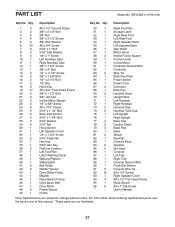
Description Key No. For information about ordering replacement parts, see ...16" Nut 30 1 Hood Accent 31 1 Left Speaker Cover 32 1 1/4" x 1 3/4" Screw 33 2 5/16" Cage Nut 34 1 Hex Key 35 1 5/32" Hex Key 36 2 Platform Cushion 37 1 Left Foot Rail 38 1 Latch Warning Decal 39 1 Walking Platform 40 1 Walking Belt 41 2 Belt Guide 42... 76 1 Right Upright 77 4 Base Cap 78 2 Caution Decal 79 4 Base Pad 80 1 Base 81 2 Wheel 82 1 Key/Clip 83 1 Console Base 84 2 Speaker 85 0 Not Used 86 1 Console 87 1 Left Tray 88 1 Right Tray 89...
Description Key No. For information about ordering replacement parts, see ...16" Nut 30 1 Hood Accent 31 1 Left Speaker Cover 32 1 1/4" x 1 3/4" Screw 33 2 5/16" Cage Nut 34 1 Hex Key 35 1 5/32" Hex Key 36 2 Platform Cushion 37 1 Left Foot Rail 38 1 Latch Warning Decal 39 1 Walking Platform 40 1 Walking Belt 41 2 Belt Guide 42... 76 1 Right Upright 77 4 Base Cap 78 2 Caution Decal 79 4 Base Pad 80 1 Base 81 2 Wheel 82 1 Key/Clip 83 1 Console Base 84 2 Speaker 85 0 Not Used 86 1 Console 87 1 Left Tray 88 1 Right Tray 89...

English Manual
Page 32
... product (see the front cover of this manual) •• the name of the product (see the front cover of this manual) •• the key number and description of the replacement part(s) (see the front cover of this product to any economic loss, loss of property, loss of revenues or...
... product (see the front cover of this manual) •• the name of the product (see the front cover of this manual) •• the key number and description of the replacement part(s) (see the front cover of this product to any economic loss, loss of property, loss of revenues or...
