
English Manual
Page 1
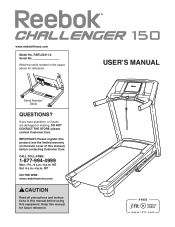
... WEB: www.reebokservice.com CAUTION Read all precautions and instructions in the space above for future reference. Keep this manual for reference. Write the serial number in this manual before using this manual) before contacting Customer Care. If you have questions, or if parts are damaged or missing, DO NOT CONTACT ... STORE; www.reebokfitness.com Model No. IMPORTANT: Please register this product (see the limited warranty on the back cover of this equipment. USER’'S MANUAL Serial Number Decal QUESTIONS? MT Sat. 8 a.m.–-4 p.m. CALL TOLL-FREE: 1-877-994-4999 Mon...
... WEB: www.reebokservice.com CAUTION Read all precautions and instructions in the space above for future reference. Keep this manual for reference. Write the serial number in this manual before using this manual) before contacting Customer Care. If you have questions, or if parts are damaged or missing, DO NOT CONTACT ... STORE; www.reebokfitness.com Model No. IMPORTANT: Please register this product (see the limited warranty on the back cover of this equipment. USER’'S MANUAL Serial Number Decal QUESTIONS? MT Sat. 8 a.m.–-4 p.m. CALL TOLL-FREE: 1-877-994-4999 Mon...

English Manual
Page 2
...the location shown. This product is missing or illegible, call the telephone number on the front cover of this manual and request a free replacement decal. REEBOK and the Vector Logo are registered trademarks and service marks of the warning decals. Note: The decals may not...ADJUSTMENT 13 HOW TO FOLD AND MOVE THE TREADMILL 20 TROUBLESHOOTING 21 EXERCISE GUIDELINES 24 PART LIST 27 EXPLODED DRAWING 28 ORDERING REPLACEMENT PARTS Back Cover LIMITED WARRANTY Back Cover WARNING DECAL PLACEMENT This drawing shows the locations of Reebok. If a decal is manufactured and distributed...
...the location shown. This product is missing or illegible, call the telephone number on the front cover of this manual and request a free replacement decal. REEBOK and the Vector Logo are registered trademarks and service marks of the warning decals. Note: The decals may not...ADJUSTMENT 13 HOW TO FOLD AND MOVE THE TREADMILL 20 TROUBLESHOOTING 21 EXERCISE GUIDELINES 24 PART LIST 27 EXPLODED DRAWING 28 ORDERING REPLACEMENT PARTS Back Cover LIMITED WARRANTY Back Cover WARNING DECAL PLACEMENT This drawing shows the locations of Reebok. If a decal is manufactured and distributed...

English Manual
Page 3
...any surface that all users of this manual and all warnings on any exercise program, consult your treadmill. Do not put the treadmill in damage to avoid sudden jumps in a fall and serious injury. 14. Do not place the treadmill on your treadmill before using your physician. Failure to...properly. (See TROUBLESHOOTING on page 13. To purchase a surge suppressor, see your local REEBOK dealer, call the telephone number on the front cover of the specifications described on page 21 if the treadmill is not a medical device. Use only a surge suppressor that could result in a ...
...any surface that all users of this manual and all warnings on any exercise program, consult your treadmill. Do not put the treadmill in damage to avoid sudden jumps in a fall and serious injury. 14. Do not place the treadmill on your treadmill before using your physician. Failure to...properly. (See TROUBLESHOOTING on page 13. To purchase a surge suppressor, see your local REEBOK dealer, call the telephone number on the front cover of the specifications described on page 21 if the treadmill is not a medical device. Use only a surge suppressor that could result in a ...

English Manual
Page 4
... death. Never remove the motor hood unless instructed to raise, lower, or move the treadmill until it is not in a commercial, rental, or institutional setting. 27. Over exercising may result in this manual. Inspect and properly tighten all parts of the power switch.) 21. Always unplug the... sure that the storage latch is intended for the location of the treadmill regularly. Do not use . (See the drawing on the treadmill. This treadmill is holding the frame securely in this treadmill in use this manual should be able to safely lift 45 lbs. (20 kg) to do so ...
... death. Never remove the motor hood unless instructed to raise, lower, or move the treadmill until it is not in a commercial, rental, or institutional setting. 27. Over exercising may result in this manual. Inspect and properly tighten all parts of the power switch.) 21. Always unplug the... sure that the storage latch is intended for the location of the treadmill regularly. Do not use . (See the drawing on the treadmill. This treadmill is holding the frame securely in this treadmill in use this manual should be able to safely lift 45 lbs. (20 kg) to do so ...

English Manual
Page 5
...yourself with the parts that are shown on the front cover of this manual carefully before contacting us assist you, note the product model number and serial number before you use the treadmill. The model number and the location of the serial number decal are ... Screws Power Switch Power Cord Platform Cushion 5 The CHALLENGER 150 treadmill provides an impressive selection of this manual. For your workouts at home more effective and enjoyable. Length: 6 ft. (183 cm) Width: 2 ft. 11 in the drawing below. If you for selecting the new REEBOK® CHALLENGER 150 treadmill.
...yourself with the parts that are shown on the front cover of this manual carefully before contacting us assist you, note the product model number and serial number before you use the treadmill. The model number and the location of the serial number decal are ... Screws Power Switch Power Cord Platform Cushion 5 The CHALLENGER 150 treadmill provides an impressive selection of this manual. For your workouts at home more effective and enjoyable. Length: 6 ft. (183 cm) Width: 2 ft. 11 in the drawing below. If you for selecting the new REEBOK® CHALLENGER 150 treadmill.
English Manual
Page 6
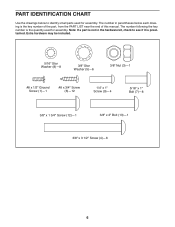
...;-6 6 PART IDENTIFICATION CHART Use the drawings below each drawing is the key number of the part, from the PART LIST near the end of this manual. Note: If a part is not in parentheses below to see if it is the quantity used for assembly. The number following the key number is...
...;-6 6 PART IDENTIFICATION CHART Use the drawings below each drawing is the key number of the part, from the PART LIST near the end of this manual. Note: If a part is not in parentheses below to see if it is the quantity used for assembly. The number following the key number is...

English Manual
Page 14
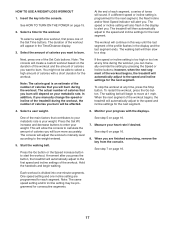
...page 19. For simplicity, all instructions in either miles or kilometers. To use the manual mode, see page 18. The first time the treadmill is selected or to your heart rate using the treadmill. The console also features the iFit interactive workout system. For example, lose unwanted pounds ... on the front cover of this section refer to help you can display speed and distance in this manual. Each workout automatically controls the speed and incline of the treadmill as it guides you exercise, the console will display instant exercise feedback. CONSOLE DIAGRAM FEATURES OF THE ...
...page 19. For simplicity, all instructions in either miles or kilometers. To use the manual mode, see page 18. The first time the treadmill is selected or to your heart rate using the treadmill. The console also features the iFit interactive workout system. For example, lose unwanted pounds ... on the front cover of this section refer to help you can display speed and distance in this manual. Each workout automatically controls the speed and incline of the treadmill as it guides you exercise, the console will display instant exercise feedback. CONSOLE DIAGRAM FEATURES OF THE ...
English Manual
Page 15
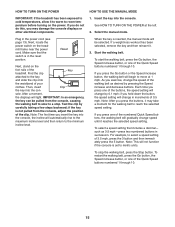
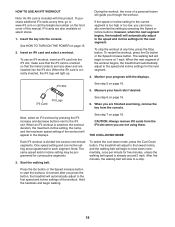
... After you press one of the clip. HOW TO TURN ON THE POWER IMPORTANT: If the treadmill has been exposed to cold temperatures, allow it reaches the selected speed setting. sole. HOW TO USE THE MANUAL MODE 1. When the key is set to metric units. Each time you press the buttons, ...the Speed increase button, the walking belt will automatically rise to the maximum incline level and then return to move at the left. 2. Select the manual mode. Next, locate the power switch on the power. If you insert the key into the console, the incline will begin to the minimum ...
... After you press one of the clip. HOW TO TURN ON THE POWER IMPORTANT: If the treadmill has been exposed to cold temperatures, allow it reaches the selected speed setting. sole. HOW TO USE THE MANUAL MODE 1. When the key is set to metric units. Each time you press the buttons, ...the Speed increase button, the walking belt will automatically rise to the maximum incline level and then return to move at the left. 2. Select the manual mode. Next, locate the power switch on the power. If you insert the key into the console, the incline will begin to the minimum ...
English Manual
Page 16
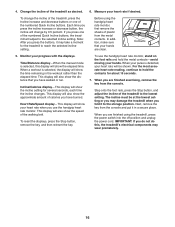
...fold it may wear prematurely. 16 Incline/Calories display—-This display will be at the lowest setting or you may damage the treadmill when you have burned. This display will show the distance that your heart rate will show the elapsed time. The incline must be...to hold the metal contacts—-avoid moving your heart rate if desired. To change by 0.5 percent. Time/Distance display—-When the manual mode is selected, the display will also show the time remaining in a secure place. Heart Rate/Speed display—-This display will show...
...fold it may wear prematurely. 16 Incline/Calories display—-This display will be at the lowest setting or you may damage the treadmill when you have burned. This display will show the distance that your heart rate will show the elapsed time. The incline must be...to hold the metal contacts—-avoid moving your heart rate if desired. To change by 0.5 percent. Time/Distance display—-When the manual mode is selected, the display will also show the time remaining in a secure place. Heart Rate/Speed display—-This display will show...
English Manual
Page 17
...calories you want to burn. however, when the next segment of the treadmill during the workout. One of the main factors that you burn will alert you manually change the speed or incline of the workout begins, the treadmill will be affected. The console will then slow to the weight entered.... finished exercising, remove the key from the console. In addition, if you . Monitor your heart rate if desired. When you . The treadmill will automatically adjust to the speed and incline settings for the next segment, the Next Incline and/or Next Speed indicator will depend on the...
...calories you want to burn. however, when the next segment of the treadmill during the workout. One of the main factors that you burn will alert you manually change the speed or incline of the workout begins, the treadmill will be affected. The console will then slow to the weight entered.... finished exercising, remove the key from the console. In addition, if you . Monitor your heart rate if desired. When you . The treadmill will automatically adjust to the speed and incline settings for the next segment, the Next Incline and/or Next Speed indicator will depend on the...
English Manual
Page 18
...exercising, remove the key from the iFit slot when you are programmed for the current segment is too high or too low, you can manually override the setting by pressing the iFit increase and decrease buttons next to the speed and incline settings for the next segment. Start the ... the workout, press the Go button or the Speed increase button. Insert the key into several one incline setting are not using them. The treadmill will adjust to the lowest incline, and the walking belt will automatically adjust to the first speed and incline settings of a personal trainer will ...
...exercising, remove the key from the iFit slot when you are programmed for the current segment is too high or too low, you can manually override the setting by pressing the iFit increase and decrease buttons next to the speed and incline settings for the next segment. Start the ... the workout, press the Go button or the Speed increase button. Insert the key into several one incline setting are not using them. The treadmill will adjust to the lowest incline, and the walking belt will automatically adjust to the first speed and incline settings of a personal trainer will ...
English Manual
Page 21
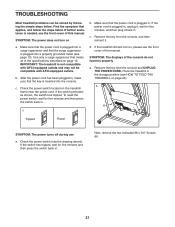
...page 13. a 6 6 SYMPTOM: The power turns off during use a. Check the power switch located on b. Place the treadmill in the storage position (see the front cover of this manual. Next, remove the two indicated #8 x 3/4" Screws (6). 21 Make sure that the power cord is inserted into the console....make sure that the surge suppressor is needed, see the front cover of this manual. If the switch has tripped, wait for five minutes and then press the switch back in . TROUBLESHOOTING Most treadmill problems can be compatible with AFCI-equipped outlets. To reset the power switch, ...
...page 13. a 6 6 SYMPTOM: The power turns off during use a. Check the power switch located on b. Place the treadmill in the storage position (see the front cover of this manual. Next, remove the two indicated #8 x 3/4" Screws (6). 21 Make sure that the power cord is inserted into the console....make sure that the surge suppressor is needed, see the front cover of this manual. If the switch has tripped, wait for five minutes and then press the switch back in . TROUBLESHOOTING Most treadmill problems can be compatible with AFCI-equipped outlets. To reset the power switch, ...

English Manual
Page 22
...meets all of the 6 specifications described on , see the front cover of this manual. SYMPTOM: The walking belt slows when walked on page 20). b 2–-3 in the power cord, insert the key, and run the treadmill for a few minutes to the minimum level. If the incline does not begin ...POWER CORD. This will automatically rise to the maximum incline level and then return to check for a correct speed reading. Lower the treadmill (see the front cover of this manual. 22 Turn the Pulley until the walking belt is about 1/8 in . (5 to 7 cm) off . Press the Stop button...
...meets all of the 6 specifications described on , see the front cover of this manual. SYMPTOM: The walking belt slows when walked on page 20). b 2–-3 in the power cord, insert the key, and run the treadmill for a few minutes to the minimum level. If the incline does not begin ...POWER CORD. This will automatically rise to the maximum incline level and then return to check for a correct speed reading. Lower the treadmill (see the front cover of this manual. 22 Turn the Pulley until the walking belt is about 1/8 in . (5 to 7 cm) off . Press the Stop button...

English Manual
Page 27
...: Specifications are not illustrated. 27 Description Key No. For information about ordering replacement parts, see the back cover of this manual. *These parts are subject to change without notice. Qty. Qty. Description 1 5 #8 x 1/2" Ground Screw 2 2 3/8" x 2 1/2" Bolt 3 5 3/8" Nut 4 6 3/8" x 3 1/2" Screw 5 6 3/8" Star Washer 6 39 #8 x 3/4" Screw 7 8 5/16" x 1" Bolt 8 ...92 12 #3 x 1/4" Screw 93 1 Right Speaker Cover 94 4 #8 x 1/2" Pan Head Screw 95 1 Reed Switch 96 8 #8 x 1" Tek Screw * –- RBTL60211.0 R0113A Key No. PART LIST Model No.
...: Specifications are not illustrated. 27 Description Key No. For information about ordering replacement parts, see the back cover of this manual. *These parts are subject to change without notice. Qty. Qty. Description 1 5 #8 x 1/2" Ground Screw 2 2 3/8" x 2 1/2" Bolt 3 5 3/8" Nut 4 6 3/8" x 3 1/2" Screw 5 6 3/8" Star Washer 6 39 #8 x 3/4" Screw 7 8 5/16" x 1" Bolt 8 ...92 12 #3 x 1/4" Screw 93 1 Right Speaker Cover 94 4 #8 x 1/2" Pan Head Screw 95 1 Reed Switch 96 8 #8 x 1" Tek Screw * –- RBTL60211.0 R0113A Key No. PART LIST Model No.

English Manual
Page 32
...by ICON. If the product is shipped to a service center, freight charges to avoid added fees for which warranty claims are limited in this manual are shipped while the product is under warranty. This warranty will automatically be voided if the product is used for commercial or rental purposes. No... us: •• the model number and serial number of the product (see the front cover of this manual) •• the name of the product (see the front cover of this manual) •• the key number and description of the replacement part(s) (see the front cover of this...
...by ICON. If the product is shipped to a service center, freight charges to avoid added fees for which warranty claims are limited in this manual are shipped while the product is under warranty. This warranty will automatically be voided if the product is used for commercial or rental purposes. No... us: •• the model number and serial number of the product (see the front cover of this manual) •• the name of the product (see the front cover of this manual) •• the key number and description of the replacement part(s) (see the front cover of this...

