
Operating Instructions
Page 5
... Scan Settings 132 Confirming the Scan Settings 133 Selecting a Sender 134 Performing Scan Operation 135 Starting a Scan Operation 135 To start with an original on the Exposure Glass 116 Placing the Originals in the ADF 135 To start with originals in the ADF 117 5. 4. Setting Originals Sizes and Weights of the TWAIN Driver...
... Scan Settings 132 Confirming the Scan Settings 133 Selecting a Sender 134 Performing Scan Operation 135 Starting a Scan Operation 135 To start with an original on the Exposure Glass 116 Placing the Originals in the ADF 135 To start with originals in the ADF 117 5. 4. Setting Originals Sizes and Weights of the TWAIN Driver...
Operating Instructions
Page 21
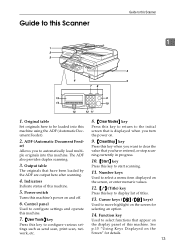
... . 9. {Clear/Stop} key Press this key when you want to clear the value that have entered, or stop scanning currently in progress. 10. {Start} key Press this key to start scanning. 11. ADG018S 8. {Clear Modes} key Press this key to return to display list of this machine. 5. Cursor keys ( {0} / {1} keys) Used to...
... . 9. {Clear/Stop} key Press this key when you want to clear the value that have entered, or stop scanning currently in progress. 10. {Start} key Press this key to start scanning. 11. ADG018S 8. {Clear Modes} key Press this key to return to display list of this machine. 5. Cursor keys ( {0} / {1} keys) Used to...
Operating Instructions
Page 27
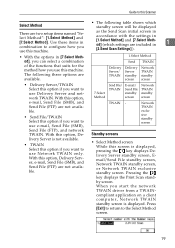
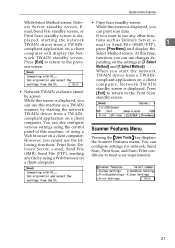
... Network TWAIN standby screen TWAIN - Use these items in [7.Select Method], you can select a combination of the functions that suits for the method how you start the network TWAIN driver from a TWAINcompliant application on a client computer, Network TWAIN standby screen is displayed, pressing the {1} key displays Delivery Server standby screen, Email...
... Network TWAIN standby screen TWAIN - Use these items in [7.Select Method], you can select a combination of the functions that suits for the method how you start the network TWAIN driver from a TWAINcompliant application on a client computer, Network TWAIN standby screen is displayed, pressing the {1} key displays Delivery Server standby screen, Email...
Operating Instructions
Page 28
...Send various settings using Delivery Server. When this screen is displayed, TWAIN driver from a TWAIN- When you turn the ma- played after you start the network While this machine or a Web • Delivery Server standby screen (when " Delivery Server/ TWAIN " is selected for [7.Select...TWAIN " is selected for [7.Select Method] option) browser on a client computer, Network TWAIN standby screen is initially dis- If you start the network TWAIN driver from a TWAINcompliant application on , pressing [Exit] will display either of this screen is displayed. You can send ...
...Send various settings using Delivery Server. When this screen is displayed, TWAIN driver from a TWAIN- When you turn the ma- played after you start the network While this machine or a Web • Delivery Server standby screen (when " Delivery Server/ TWAIN " is selected for [7.Select...TWAIN " is selected for [7.Select Method] option) browser on a client computer, Network TWAIN standby screen is initially dis- If you start the network TWAIN driver from a TWAINcompliant application on , pressing [Exit] will display either of this screen is displayed. You can send ...
Operating Instructions
Page 29
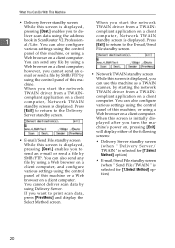
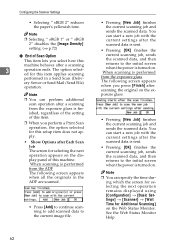
... various settings using the control panel of this screen is displayed. However, you start the network TWAIN driver from a TWAIN- Method] and [7.Select Method]. When you cannot use any file by starting the network TWAIN driver from a TWAIN- You can use this screen is dis...- compliant application on a client computer. You can print scan data. played, starting the network TWAIN driver from a TWAIN- compliant application on the settings in [1.Select ous screen. Press [Exit] to return to the ...
... various settings using the control panel of this screen is displayed. However, you start the network TWAIN driver from a TWAIN- Method] and [7.Select Method]. When you cannot use any file by starting the network TWAIN driver from a TWAIN- You can use this screen is dis...- compliant application on a client computer. You can print scan data. played, starting the network TWAIN driver from a TWAIN- compliant application on the settings in [1.Select ous screen. Press [Exit] to return to the ...
Operating Instructions
Page 70
Note ❒ You can start a new job with the current settings after scanning the original on . Note ❒ Selecting " sRGB 1" or " sRGB 2" disables the [Image Density] setting. (⇒ p.72) ❖ ... scanned data, and then returns to the initial screen when the power is performed from the exposure glass is turned on. Note ❒ You can start a new job with the current settings after a scanning 3 operation ends. ing which the screen for selecting the next operation remains displayed using [Configuration] → [Basic...
Note ❒ You can start a new job with the current settings after scanning the original on . Note ❒ Selecting " sRGB 1" or " sRGB 2" disables the [Image Density] setting. (⇒ p.72) ❖ ... scanned data, and then returns to the initial screen when the power is performed from the exposure glass is turned on. Note ❒ You can start a new job with the current settings after a scanning 3 operation ends. ing which the screen for selecting the next operation remains displayed using [Configuration] → [Basic...
Operating Instructions
Page 74
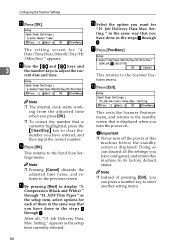
... ❒ Never turn the power on. M Use the {1} and {0} keys and 3 the number keys to the Send Scan Settings menu. Note ❒ The internal clock starts work- ing from the adjusted time when you press [OK]. ❒ To correct the number that you can discard all , "15. This returns to adjust...
... ❒ Never turn the power on. M Use the {1} and {0} keys and 3 the number keys to the Send Scan Settings menu. Note ❒ The internal clock starts work- ing from the adjusted time when you press [OK]. ❒ To correct the number that you can discard all , "15. This returns to adjust...
Operating Instructions
Page 79
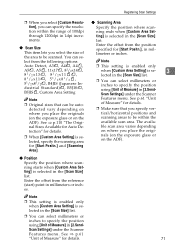
...110 "The Original Sizes Available for Auto Detection" for details. ❒ When [Custom Area Setting] is selected, specify the scanning area for [Start Positn.], in 1dpi increments. ❖ Scan Size This item lets you place the originals (on the exposure glass or on the ADF). Enter the...[Custom Area Setting] is selected in millimeters or inches. Enter the offset from the position specified for [Start Positn.] and [Scanning Area]. ❖ Position Specify the position where scanning starts when [Custom Area Setting] is selected in the [Scan Size] list. ❒ You can select ...
...110 "The Original Sizes Available for Auto Detection" for details. ❒ When [Custom Area Setting] is selected, specify the scanning area for [Start Positn.], in 1dpi increments. ❖ Scan Size This item lets you place the originals (on the exposure glass or on the ADF). Enter the...[Custom Area Setting] is selected in millimeters or inches. Enter the offset from the position specified for [Start Positn.] and [Scanning Area]. ❖ Position Specify the position where scanning starts when [Custom Area Setting] is selected in the [Scan Size] list. ❒ You can select ...
Operating Instructions
Page 93
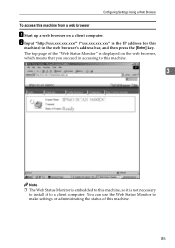
..." is not necessary to a client computer. The top page of this machine. 85 Configuring Settings Using a Web Browser To access this machine from a web browser A Start up a web browser on the web browser, which means that you succeed in the web browser's address bar, and then press the [Enter] key.
..." is not necessary to a client computer. The top page of this machine. 85 Configuring Settings Using a Web Browser To access this machine from a web browser A Start up a web browser on the web browser, which means that you succeed in the web browser's address bar, and then press the [Enter] key.
Operating Instructions
Page 98
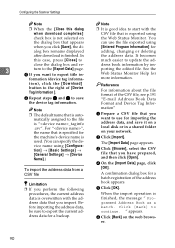
... using [Configuration] → [Basic Settings] → [General Settings] → [Device Name].) To import the address data from a CSV file Limitation ❒ If you want to start with the address data that you click [Save], the di- Before importing the address data, be sure to continue. Note ❒ It is exported using...
... using [Configuration] → [Basic Settings] → [General Settings] → [Device Name].) To import the address data from a CSV file Limitation ❒ If you want to start with the address data that you click [Save], the di- Before importing the address data, be sure to continue. Note ❒ It is exported using...

Operating Instructions
Page 110
... ROUTE Scan Router V2 Lite RV2 85 DEV- To check an in Windows 95/98/Me,Windows XP, Windows 2000, or Windows NT 4.0, the installer starts automatically(Auto Run) to install ScanRouter V2 Lite on the computer from which you want to install DeskTopBinder V2 Lite on the client computer. 3 List...
... ROUTE Scan Router V2 Lite RV2 85 DEV- To check an in Windows 95/98/Me,Windows XP, Windows 2000, or Windows NT 4.0, the installer starts automatically(Auto Run) to install ScanRouter V2 Lite on the computer from which you want to install DeskTopBinder V2 Lite on the client computer. 3 List...

Operating Instructions
Page 111
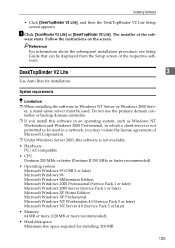
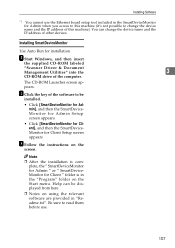
...series, Alpha AXP, or PowerPC), this case, restart the client computer. 103 For information about the installation of the client computer. A Start Windows, and then insert the supplied CD-ROM labeled "Scanner Driver & Document Management Utilities" into the CD-ROM drive of DeskTopBinder V2 Lite...(Service Pack 5 or later) • Memory Operating system min. Reference If the installer does not start automatically, see p.105 "DeskTopBinder V2 Lite". The CD-ROM Launcher screen appears. er starts. If you to install the TWAIN driver. B Click [TWAIN Driver]. C The installer of the TWAIN...
...series, Alpha AXP, or PowerPC), this case, restart the client computer. 103 For information about the installation of the client computer. A Start Windows, and then insert the supplied CD-ROM labeled "Scanner Driver & Document Management Utilities" into the CD-ROM drive of DeskTopBinder V2 Lite...(Service Pack 5 or later) • Memory Operating system min. Reference If the installer does not start automatically, see p.105 "DeskTopBinder V2 Lite". The CD-ROM Launcher screen appears. er starts. If you to install the TWAIN driver. B Click [TWAIN Driver]. C The installer of the TWAIN...

Operating Instructions
Page 112
... 50 MB or more (200 MB or more recommended) • Display resolution 800 × 600 pixels, 64K colours or higher • Network protocol TCP/IP A Start Windows, and then insert the supplied CD-ROM labeled "Scanner Driver & Document Management Utilities" into the CD-ROM drive of the software to read them... before use. Be sure to be displayed from here. ❒ Notes on using the network TWAIN scanner are provided in the "Program" folder on the Start menu.
... 50 MB or more (200 MB or more recommended) • Display resolution 800 × 600 pixels, 64K colours or higher • Network protocol TCP/IP A Start Windows, and then insert the supplied CD-ROM labeled "Scanner Driver & Document Management Utilities" into the CD-ROM drive of the software to read them... before use. Be sure to be displayed from here. ❒ Notes on using the network TWAIN scanner are provided in the "Program" folder on the Start menu.
Operating Instructions
Page 113
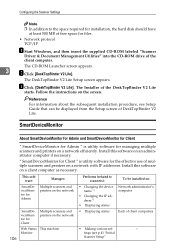
... respective software. Follow the instructions on the screen. Installing Software • Click [DeskTopBinder V2 Lite], and then the DeskTopBinder V2 Lite Setup screen appears. ware starts. DeskTopBinder V2 Lite 3 Use Auto Run for installing: 200 MB 105 Reference For information about the subsequent installation procedure, see Setup Guide that can be...
... respective software. Follow the instructions on the screen. Installing Software • Click [DeskTopBinder V2 Lite], and then the DeskTopBinder V2 Lite Setup screen appears. ware starts. DeskTopBinder V2 Lite 3 Use Auto Run for installing: 200 MB 105 Reference For information about the subsequent installation procedure, see Setup Guide that can be...
Operating Instructions
Page 114
... for Admin and SmartDeviceMonitor for Client " SmartDeviceMonitor for Admin " is utility software for files. • Network protocol TCP/IP A Start Windows, and then insert the supplied CD-ROM labeled "Scanner Driver & Document Management Utilities" into the CD-ROM drive of the DeskTopBinder ...V2 Lite starts. The Installer of the client computer. Configuring the Scanner Settings Note ❒ In addition to scanners): • Changing the device ...
... for Admin and SmartDeviceMonitor for Client " SmartDeviceMonitor for Admin " is utility software for files. • Network protocol TCP/IP A Start Windows, and then insert the supplied CD-ROM labeled "Scanner Driver & Document Management Utilities" into the CD-ROM drive of the DeskTopBinder ...V2 Lite starts. The Installer of the client computer. Configuring the Scanner Settings Note ❒ In addition to scanners): • Changing the device ...
Operating Instructions
Page 115
... software to read them before use the Ethernet board setup tool included in the SmartDeviceMonitor for Client Setup screen appears C Follow the instructions on the Start menu. Help can change the device name and the IP address of this machine (it's not possible to change the device name and the IP...
... software to read them before use the Ethernet board setup tool included in the SmartDeviceMonitor for Client Setup screen appears C Follow the instructions on the Start menu. Help can change the device name and the IP address of this machine (it's not possible to change the device name and the IP...
Operating Instructions
Page 124
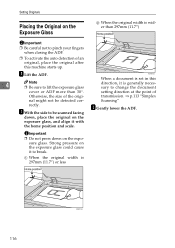
..., place the original after this 4 Note ❒ Be sure to break. down on the Exposure Glass B When the original width is set in this machine starts up. transmission. ⇒ p.113 "Simplex nal might not be scanned facing C Gently lower the ADF. ADG016S When a document is wider than 30°. A Lift the...
..., place the original after this 4 Note ❒ Be sure to break. down on the Exposure Glass B When the original width is set in this machine starts up. transmission. ⇒ p.113 "Simplex nal might not be scanned facing C Gently lower the ADF. ADG016S When a document is wider than 30°. A Lift the...
Operating Instructions
Page 125
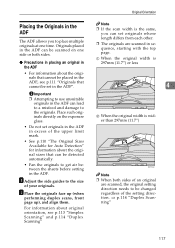
... the ADF • For information about the originals that can lead to a misfeed and damage to the size of an original are scanned in sequence, starting with the top page.
... the ADF • For information about the originals that can lead to a misfeed and damage to the size of an original are scanned in sequence, starting with the top page.

Operating Instructions
Page 127
Menu may be different depending on the application Start a TWAIN-compliant appli- cation. ⇒ p.120 "Scanning Originals" A Select the TWAIN driver. the application you use. ⇒ p.120 "Scanning Originals" C Select the scanner you use. ... of the network TWAIN driver are connected to the network. ⇒ p.120 "Scanning Originals" C Make the scan settings. ⇒ p.120 "Scanning Originals" C Click [Scan] on Start the network TWAIN driver. Save the scanned image. In addition, some functions of the steps for scanning originals by using the network TWAIN driver. 5.
Menu may be different depending on the application Start a TWAIN-compliant appli- cation. ⇒ p.120 "Scanning Originals" A Select the TWAIN driver. the application you use. ⇒ p.120 "Scanning Originals" C Select the scanner you use. ... of the network TWAIN driver are connected to the network. ⇒ p.120 "Scanning Originals" C Make the scan settings. ⇒ p.120 "Scanning Originals" C Click [Scan] on Start the network TWAIN driver. Save the scanned image. In addition, some functions of the steps for scanning originals by using the network TWAIN driver. 5.
Operating Instructions
Page 128
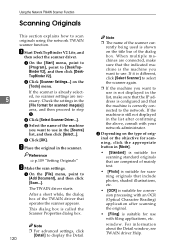
...the Network TWAIN Scanner Function Scanning Originals This section explains how to [DeskTopBinder V2], and then click [DeskTopBinder V2]. The TWAIN driver starts. This dialog box is already select- 5 ed, no scanner settings are connected, make sure that the IP address is configured ...suitable for scanned image(s)] area, and then proceed to the network. A On the [Start] menu, point to [Program], point to scan originals using the network TWAIN scanner function. window. A Start DeskTopBinder V2 Lite, and then select the scanner driver. B Place the original in the ...
...the Network TWAIN Scanner Function Scanning Originals This section explains how to [DeskTopBinder V2], and then click [DeskTopBinder V2]. The TWAIN driver starts. This dialog box is already select- 5 ed, no scanner settings are connected, make sure that the IP address is configured ...suitable for scanned image(s)] area, and then proceed to the network. A On the [Start] menu, point to [Program], point to scan originals using the network TWAIN scanner function. window. A Start DeskTopBinder V2 Lite, and then select the scanner driver. B Place the original in the ...

