User Guide
Page 1
... notice. Certain options might be liable for which reproduction is prohibited by local law: bank notes, revenue stamps, bonds, stock certificates, bank drafts, checks, passports, driver's licenses. Information Introduction This manual contains detailed instructions and notes on which country you have any item for direct, indirect, special, incidental, or consequential damages...
... notice. Certain options might be liable for which reproduction is prohibited by local law: bank notes, revenue stamps, bonds, stock certificates, bank drafts, checks, passports, driver's licenses. Information Introduction This manual contains detailed instructions and notes on which country you have any item for direct, indirect, special, incidental, or consequential damages...

User Guide
Page 16
... manual contains detailed instructions and notes on which reproduction is prohibited by local law: bank notes, revenue stamps, bonds, stock certificates, bank drafts, checks, passports, driver's licenses. In no responsibility for any questions concerning the legality of copying or printing certain items, consult with your safety and benefit, read this manual...
... manual contains detailed instructions and notes on which reproduction is prohibited by local law: bank notes, revenue stamps, bonds, stock certificates, bank drafts, checks, passports, driver's licenses. In no responsibility for any questions concerning the legality of copying or printing certain items, consult with your safety and benefit, read this manual...

User Guide
Page 20
..., be sure to read this. ❖ Quick Installation Guide Contains procedures for removing the printer from its box, connecting it to a computer, and installing its driver. ❖ Hardware Guide (This manual) Contains information about paper and procedures such as installing options, replacing consumables, responding to error messages, and resolving jams. ❖...
..., be sure to read this. ❖ Quick Installation Guide Contains procedures for removing the printer from its box, connecting it to a computer, and installing its driver. ❖ Hardware Guide (This manual) Contains information about paper and procedures such as installing options, replacing consumables, responding to error messages, and resolving jams. ❖...

User Guide
Page 23
Follow this is the case, launch "Setup.exe" on the CD-ROM root directory to your printer driver, and then click [uninstall]. You can uninstall each manual guide separately. ❒ If you are using an incompatible Web browser and the simpler version of ...
Follow this is the case, launch "Setup.exe" on the CD-ROM root directory to your printer driver, and then click [uninstall]. You can uninstall each manual guide separately. ❒ If you are using an incompatible Web browser and the simpler version of ...

User Guide
Page 43
...- Important ❒ Before touching the memory unit, ground yourself by touching something metal to confirm the installation. Static electricity can make settings in the printer driver. ❒ If the new device is listed in the column of configuration options, then it has been properly installed. 2 ❒ If the optional paper feed...
...- Important ❒ Before touching the memory unit, ground yourself by touching something metal to confirm the installation. Static electricity can make settings in the printer driver. ❒ If the new device is listed in the column of configuration options, then it has been properly installed. 2 ❒ If the optional paper feed...

User Guide
Page 45
... properly even after the reinstallation, contact your sales or service representative. I After installing the option, print the configuration page to confirm the in the printer driver. ❒ If the memory unit is installed properly, the memory capacity will appear under "Total Memory" on the configuration page. Note ❒ Before using control...
... properly even after the reinstallation, contact your sales or service representative. I After installing the option, print the configuration page to confirm the in the printer driver. ❒ If the memory unit is installed properly, the memory capacity will appear under "Total Memory" on the configuration page. Note ❒ Before using control...

User Guide
Page 64
...types of paper supported by this printer and cautions for use by selecting a [Paper Type] at [Paper Input]. For details, see Help for the driver. Types of paper Enabled paper feeding tray Bypass Tray Thickness (g/m2) Note Tray 1 Tray 2 Duplex Paper Type Thinner Paper 60-65 Thin Paper (... Paper can be loaded only up to use . Paper and Other Media Types of Paper and Other Media This section provides information about the printer driver, see p.57 "Specifying a paper type for tray 1 and the optional paper feed unit"" and p.65 "Specifying a paper type for the bypass tray"". ...
...types of paper supported by this printer and cautions for use by selecting a [Paper Type] at [Paper Input]. For details, see Help for the driver. Types of paper Enabled paper feeding tray Bypass Tray Thickness (g/m2) Note Tray 1 Tray 2 Duplex Paper Type Thinner Paper 60-65 Thin Paper (... Paper can be loaded only up to use . Paper and Other Media Types of Paper and Other Media This section provides information about the printer driver, see p.57 "Specifying a paper type for tray 1 and the optional paper feed unit"" and p.65 "Specifying a paper type for the bypass tray"". ...
User Guide
Page 65
... creased, go to rotate the print object 180 degrees. • Load envelopes print side down in the opposite direction. ASI087S 39 Also, configure the printer driver to the [Setup] tab and select [Rotate by 180 degrees] for [Orientation:] when printing. • If printed envelopes come out badly creased, load the envelopes...
... creased, go to rotate the print object 180 degrees. • Load envelopes print side down in the opposite direction. ASI087S 39 Also, configure the printer driver to the [Setup] tab and select [Rotate by 180 degrees] for [Orientation:] when printing. • If printed envelopes come out badly creased, load the envelopes...
User Guide
Page 69
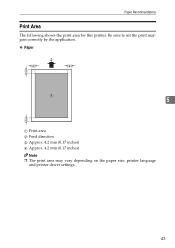
Be sure to set the print margins correctly by the application. ❖ Paper 5 A Print area B Feed direction C Approx. 4.2 mm (0.17 inches) D Approx. 4.2 mm (0.17 inches) Note ❒ The print area may vary depending on the paper size, printer language and printer driver settings. 43 Paper Recommendations Print Area The following shows the print area for this printer.
Be sure to set the print margins correctly by the application. ❖ Paper 5 A Print area B Feed direction C Approx. 4.2 mm (0.17 inches) D Approx. 4.2 mm (0.17 inches) Note ❒ The print area may vary depending on the paper size, printer language and printer driver settings. 43 Paper Recommendations Print Area The following shows the print area for this printer.

User Guide
Page 70
Paper and Other Media ❖ Envelope A Print area B Feed direction C Approx. 4.2 mm (0.17 inches) D Approx. 4.2 mm (0.17 inches) 5 Note ❒ The print area may vary depending on the paper size, printer language and printer driver settings. ❒ For better print quality, we recommend the right, left, top, and bottom print margins to be at least 15 mm (0.6 inches) each. 44
Paper and Other Media ❖ Envelope A Print area B Feed direction C Approx. 4.2 mm (0.17 inches) D Approx. 4.2 mm (0.17 inches) 5 Note ❒ The print area may vary depending on the paper size, printer language and printer driver settings. ❒ For better print quality, we recommend the right, left, top, and bottom print margins to be at least 15 mm (0.6 inches) each. 44
User Guide
Page 81
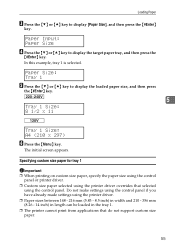
...(8.26 - 14 inch) in length can be loaded in the tray 1. ❒ The printer cannot print from applications that selected using the printer driver overrides that do not support custom size paper. 55 Loading Paper C Press the {T} or {U} key to display the loaded paper size, and then... Specifying custom size paper for tray 1 Important ❒ When printing on custom size paper, specify the paper size using the control panel or printer driver. ❒ Custom size paper selected using the control panel. In this example, tray 1 is selected. The initial screen appears. Paper Input: Paper ...
...(8.26 - 14 inch) in length can be loaded in the tray 1. ❒ The printer cannot print from applications that selected using the printer driver overrides that do not support custom size paper. 55 Loading Paper C Press the {T} or {U} key to display the loaded paper size, and then... Specifying custom size paper for tray 1 Important ❒ When printing on custom size paper, specify the paper size using the control panel or printer driver. ❒ Custom size paper selected using the control panel. In this example, tray 1 is selected. The initial screen appears. Paper Input: Paper ...

User Guide
Page 84
... middle part of loaded paper is displayed on both sides. Loading Paper in together. ❒ Load paper only when "Ready" is available using the printer driver or control panel. Make sure the settings do not conflict. Tray 1: Plain Paper 1 F Press the {Menu} key. The initial screen appears. Important ❒ Setting the...
... middle part of loaded paper is displayed on both sides. Loading Paper in together. ❒ Load paper only when "Ready" is available using the printer driver or control panel. Make sure the settings do not conflict. Tray 1: Plain Paper 1 F Press the {Menu} key. The initial screen appears. Important ❒ Setting the...
User Guide
Page 89
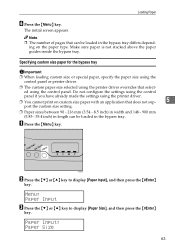
... in the bypass tray differs depend- Do not configure the settings using the control panel if you have already made the settings using the printer driver. ❒ You cannot print on the paper type. Note ❒ The number of pages that select- Specifying custom size paper for the... bypass tray Important ❒ When loading custom size or special paper, specify the paper size using the control panel or printer driver. ❒ The custom paper size selected using the control panel. ASI066S B Press the {T} or {U} key to display [Paper Size], and then press the ...
... in the bypass tray differs depend- Do not configure the settings using the control panel if you have already made the settings using the printer driver. ❒ You cannot print on the paper type. Note ❒ The number of pages that select- Specifying custom size paper for the... bypass tray Important ❒ When loading custom size or special paper, specify the paper size using the control panel or printer driver. ❒ The custom paper size selected using the control panel. ASI066S B Press the {T} or {U} key to display [Paper Size], and then press the ...

User Guide
Page 90
... F Press the {T} or {U} key to display [Bypass Tray], and then press the {#Enter} key. The initial screen appears. Reference For details about the printer driver, see the printer driver Help. 64 Paper Size: Bypass Tray E Press the {T} or {U} key to enter the horizontal value, and then press the {#Enter} key. Custom Size...
... F Press the {T} or {U} key to display [Bypass Tray], and then press the {#Enter} key. The initial screen appears. Reference For details about the printer driver, see the printer driver Help. 64 Paper Size: Bypass Tray E Press the {T} or {U} key to enter the horizontal value, and then press the {#Enter} key. Custom Size...

User Guide
Page 91
... tray By selecting the paper type you load labels, thick paper, or envelopes in the bypass tray. ❒ The paper type selected using the printer driver overrides that selected using the control panel.
... tray By selecting the paper type you load labels, thick paper, or envelopes in the bypass tray. ❒ The paper type selected using the printer driver overrides that selected using the control panel.

User Guide
Page 96
... underside of the upper cover (the white area in the illustration below). 70 ASH106S Replacing Consumables ❖ When to Black and White using the printer driver. • If black toner runs out, you can print in black and white using black toner. Important ❒ Do not allow paper clips, staples, or...
... underside of the upper cover (the white area in the illustration below). 70 ASH106S Replacing Consumables ❖ When to Black and White using the printer driver. • If black toner runs out, you can print in black and white using black toner. Important ❒ Do not allow paper clips, staples, or...

User Guide
Page 135
... that of actual paper type in the tray. Warming up or Wait until "Ready" appears print job. sage. No action is waiting for use a print driver. The paper type setting in the tray # (1, 2, bypass) differs from that of actual paper size in the tray. The top or front cover is... module, or the job does not use . Load paper of the selected size in the tray, and then change the paper size setting with printer driver. The machine is resetting the Wait until "Ready" appears toner is the default ready mes- The printer is warming up ... This is being supplied....
... that of actual paper type in the tray. Warming up or Wait until "Ready" appears print job. sage. No action is waiting for use a print driver. The paper type setting in the tray # (1, 2, bypass) differs from that of actual paper size in the tray. The top or front cover is... module, or the job does not use . Load paper of the selected size in the tray, and then change the paper size setting with printer driver. The machine is resetting the Wait until "Ready" appears toner is the default ready mes- The printer is warming up ... This is being supplied....
User Guide
Page 140
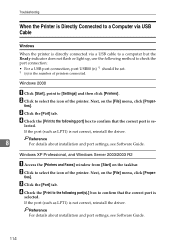
...] on the [File] menu, click [Proper- D Check the [Print to the following port(s).] box to confirm that the correct port is not correct, reinstall the driver. D Check the [Print to the following method to check the port connection: • For a USB port connection, port USB00 (n) *1 should be set. *1 (n) is the number... the Ready indicator does not flash or light up, use the following port] box to confirm that the correct port is not correct, reinstall the driver. Next, on the [File] menu, click [Proper- C Click the [Port] tab.
...] on the [File] menu, click [Proper- D Check the [Print to the following port(s).] box to confirm that the correct port is not correct, reinstall the driver. D Check the [Print to the following method to check the port connection: • For a USB port connection, port USB00 (n) *1 should be set. *1 (n) is the number... the Ready indicator does not flash or light up, use the following port] box to confirm that the correct port is not correct, reinstall the driver. Next, on the [File] menu, click [Proper- C Click the [Port] tab.
User Guide
Page 141
C Click [Printers and Faxes]. F Check the [Print to the following port(s).] box to confirm that the correct port is not correct, reinstall the driver. ties]. E Click the [Port] tab. ware and Sound". Next, on the [File] menu, click [Proper- C Click the [Port] tab. 8 D Check the [..., and Windows Server 2008 A Click [Control Panel] on the taskbar. ties]. B Click to check if the printer is not correct, reinstall the driver. Mac OS X When the printer is connected to Mac OS X and the Ready indicator does not flash or light up, try the following procedures to...
C Click [Printers and Faxes]. F Check the [Print to the following port(s).] box to confirm that the correct port is not correct, reinstall the driver. ties]. E Click the [Port] tab. ware and Sound". Next, on the [File] menu, click [Proper- C Click the [Port] tab. 8 D Check the [..., and Windows Server 2008 A Click [Control Panel] on the taskbar. ties]. B Click to check if the printer is not correct, reinstall the driver. Mac OS X When the printer is connected to Mac OS X and the Ready indicator does not flash or light up, try the following procedures to...

User Guide
Page 142
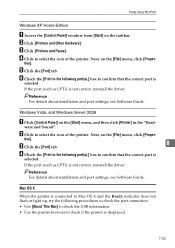
If it is displayed on the browser. B Click [More Info]. B Double click [Printer Setup Utility]. C Click [Add]. Using the printer browser A In the menu bar, click [Go], select [Application], and then select [Utilities]. C Under [Contents], for [Hardware], Select [USB]. Confirm the printer is not, reinstall the driver. 8 116 The printer browser stars. Troubleshooting Using [About This Mac] A Click Apple Menu, and then select [About This Mac].
If it is displayed on the browser. B Click [More Info]. B Double click [Printer Setup Utility]. C Click [Add]. Using the printer browser A In the menu bar, click [Go], select [Application], and then select [Utilities]. C Under [Contents], for [Hardware], Select [USB]. Confirm the printer is not, reinstall the driver. 8 116 The printer browser stars. Troubleshooting Using [About This Mac] A Click Apple Menu, and then select [About This Mac].


