
Quick Use Guide
Page 14
Select the "Paper Tab" at the top of media you are printing on, paper source you have selected " Bypass tray" and " Thick 1" , select "OK" Select "OK" to select the type of the window On the "Paper Tab" select "Input tray" and "Type", this will allow to print your print driver. When printing labels or thick Paper you must select "Bypass tray" & "Thick 1", Once you would like the selected from your Computer Printing to the Bypass Tray (Manual Feed Tray) Select the "Properties" button on your job 14 Continued Printing from .
Select the "Paper Tab" at the top of media you are printing on, paper source you have selected " Bypass tray" and " Thick 1" , select "OK" Select "OK" to select the type of the window On the "Paper Tab" select "Input tray" and "Type", this will allow to print your print driver. When printing labels or thick Paper you must select "Bypass tray" & "Thick 1", Once you would like the selected from your Computer Printing to the Bypass Tray (Manual Feed Tray) Select the "Properties" button on your job 14 Continued Printing from .

Manuals
Page 8
... Scanner Guide To use Scan to E-mail/Scan to Folder... (Basic Procedure for Sending Scan Files by Email. How to Delivery Server G Scan via TWAIN Driver For details about these settings, see Scan on the security settings, the logged-in user may be made beforehand. Basic Procedure When Using Scan to...
... Scanner Guide To use Scan to E-mail/Scan to Folder... (Basic Procedure for Sending Scan Files by Email. How to Delivery Server G Scan via TWAIN Driver For details about these settings, see Scan on the security settings, the logged-in user may be made beforehand. Basic Procedure When Using Scan to...

Manuals
Page 13
...Scan Files...119 3 Print Quick Install...97 Displaying the Printer Driver Properties...98 Standard Printing...99 When Using the PCL 6 Printer Driver...99 Printing on Both Sides of Sheets...100 When Using the PCL 6 Printer Driver...100 Types of 2 Sided Printing...100 Combining Multiple Pages into... Folder...110 Deleting an SMB Registered Folder...113 Entering the Path to Folder 107 Creating a Shared Folder on Envelopes Using the Printer Driver 103 Saving and Printing Using the Document Server 105 Storing Documents in Document Server 105 Managing Documents Stored in Document Server 106 6....
...Scan Files...119 3 Print Quick Install...97 Displaying the Printer Driver Properties...98 Standard Printing...99 When Using the PCL 6 Printer Driver...99 Printing on Both Sides of Sheets...100 When Using the PCL 6 Printer Driver...100 Types of 2 Sided Printing...100 Combining Multiple Pages into... Folder...110 Deleting an SMB Registered Folder...113 Entering the Path to Folder 107 Creating a Shared Folder on Envelopes Using the Printer Driver 103 Saving and Printing Using the Document Server 105 Storing Documents in Document Server 105 Managing Documents Stored in Document Server 106 6....

Manuals
Page 21
Downloading destinations registered in the address book manually", Scan . See "Registering a destination in the machine to the LAN-Fax driver destination list See "Using the machine's Address Book as the LAN-Fax destination list", Fax . 11 Using Web Image Monitor to the Address Book", Fax . Registering Destinations Registering Destinations BRL060S Using the control panel to register destinations in the Address Book See "Registering Entered Destinations to register destinations from a computer See "Registering Internet Fax Destination Information Using Web Image Monitor", Fax .
Downloading destinations registered in the address book manually", Scan . See "Registering a destination in the machine to the LAN-Fax driver destination list See "Using the machine's Address Book as the LAN-Fax destination list", Fax . 11 Using Web Image Monitor to the Address Book", Fax . Registering Destinations Registering Destinations BRL060S Using the control panel to register destinations in the Address Book See "Registering Entered Destinations to register destinations from a computer See "Registering Internet Fax Destination Information Using Web Image Monitor", Fax .

Manuals
Page 22
...Operating the Machine More Effectively BQX139S Registering and using frequently-used programs or Web pages See "Adding Icons to the printer driver See "Using One Click Presets", Print . Registering frequently-used printing settings See "Displaying the Printing Preferences Dialog Box", ...frequently-used settings as initial settings (Program as Defaults (Copier/Document Server/Fax/Scanner)) See "Changing the Default Functions of the printer driver to frequently-used printing settings to the [Home] Screen", Convenient Functions . Adding shortcuts to frequently used settings (Program) See "...
...Operating the Machine More Effectively BQX139S Registering and using frequently-used programs or Web pages See "Adding Icons to the printer driver See "Using One Click Presets", Print . Registering frequently-used printing settings See "Displaying the Printing Preferences Dialog Box", ...frequently-used settings as initial settings (Program as Defaults (Copier/Document Server/Fax/Scanner)) See "Changing the Default Functions of the printer driver to frequently-used printing settings to the [Home] Screen", Convenient Functions . Adding shortcuts to frequently used settings (Program) See "...

Manuals
Page 26
... . • You can connect a PictBridge-compatible digital camera to collate, staple, and punch holes in your prints. See "Direct Printing from computers using the printer driver. For details about stapling, see "Punch", Print . • If the PictBridge card is installed, you can print or delete print jobs stored on a removable memory...
... . • You can connect a PictBridge-compatible digital camera to collate, staple, and punch holes in your prints. See "Direct Printing from computers using the printer driver. For details about stapling, see "Punch", Print . • If the PictBridge card is installed, you can print or delete print jobs stored on a removable memory...

Manuals
Page 38
...by a copier or multifunction printer, the embedded text appears conspicuous in the copy, discouraging such unauthorized copying. • For details, see the printer driver Help and Security Guide . • For details about this function in the copier mode, see "Preventing Unauthorized Copies", Copier/ Document Server . &#... the Copy Data Security Unit, the hidden text becomes conspicuous in the copy. CUM003 • Using the copier function or the printer driver, you can embed a pattern in the printed document for Duplication", Print . 28 What You Can Do with the Copy Data Security ...
...by a copier or multifunction printer, the embedded text appears conspicuous in the copy, discouraging such unauthorized copying. • For details, see the printer driver Help and Security Guide . • For details about this function in the copier mode, see "Preventing Unauthorized Copies", Copier/ Document Server . &#... the Copy Data Security Unit, the hidden text becomes conspicuous in the copy. CUM003 • Using the copier function or the printer driver, you can embed a pattern in the printed document for Duplication", Print . 28 What You Can Do with the Copy Data Security ...

Manuals
Page 107
Using Quick Install, the PCL 6 printer driver is installed under network environment, and the Standard TCP/IP port will be set. • Manage Printers permission is running ... in the upper right corner of the installer, and then take out the CD-ROM. 97 5. Quick Install You can install the printer drivers easily from the CD-ROM provided with this manual.) 2. Log on the supplied CD-ROM. Quit all applications. (Do not close this machine... 10. Click [Finish]. Print This chapter describes frequently used printer functions and operations. When you want to install the drivers.
Using Quick Install, the PCL 6 printer driver is installed under network environment, and the Standard TCP/IP port will be set. • Manage Printers permission is running ... in the upper right corner of the installer, and then take out the CD-ROM. 97 5. Quick Install You can install the printer drivers easily from the CD-ROM provided with this manual.) 2. Log on the supplied CD-ROM. Quit all applications. (Do not close this machine... 10. Click [Finish]. Print This chapter describes frequently used printer functions and operations. When you want to install the drivers.

Manuals
Page 108
Settings made in the printer properties dialog box are applied to use. 3. Click [Printer properties]. 98 Print Displaying the Printer Driver Properties This section explains how to open the printer driver properties from [Devices and Printers]. • Manage Printers permission is required to change the machine default settings for individual users. On the [Start] menu, click [Devices and Printers]. 2. Right-click the icon of the printer you want to all users. 1. 5. Log on as an Administrators group member. • You cannot change the printer settings.
Settings made in the printer properties dialog box are applied to use. 3. Click [Printer properties]. 98 Print Displaying the Printer Driver Properties This section explains how to open the printer driver properties from [Devices and Printers]. • Manage Printers permission is required to change the machine default settings for individual users. On the [Start] menu, click [Devices and Printers]. 2. Right-click the icon of the printer you want to all users. 1. 5. Log on as an Administrators group member. • You cannot change the printer settings.
Manuals
Page 109
... you want to use. 3. If you select [Auto Tray Select] in the "Input Tray:" list, the source tray is complete. When Using the PCL 6 Printer Driver 1. In the "Paper Type:" list, select the type of paper that contains the paper you want to print on only one side, select [Off] for...
... you want to use. 3. If you select [Auto Tray Select] in the "Input Tray:" list, the source tray is complete. When Using the PCL 6 Printer Driver 1. In the "Paper Type:" list, select the type of paper that contains the paper you want to print on only one side, select [Off] for...
Manuals
Page 110
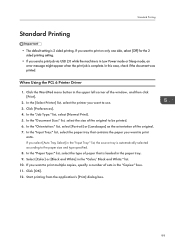
...6. Click [OK]. 9. Print Printing on Both Sides of Sheets This section explains how to print on both sides of each page using the printer driver. • The types of paper that can select which way the bound pages open by specifying which edge to 59 g/m2), Color, Letterhead, ...Preprinted, Bond, Cardstock When Using the PCL 6 Printer Driver 1. Start printing from the application's [Print] dialog box. Types of the window, and then click [Print]. 2. Select the method for binding the ...
...6. Click [OK]. 9. Print Printing on Both Sides of Sheets This section explains how to print on both sides of each page using the printer driver. • The types of paper that can select which way the bound pages open by specifying which edge to 59 g/m2), Color, Letterhead, ...Preprinted, Bond, Cardstock When Using the PCL 6 Printer Driver 1. Start printing from the application's [Print] dialog box. Types of the window, and then click [Print]. 2. Select the method for binding the ...

Manuals
Page 111
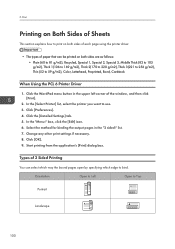
When Using the PCL 6 Printer Driver 1. Select the combination pattern in the "Layout:" list, and then specify the method for combining pages in the upper left corner of the window, and ...
When Using the PCL 6 Printer Driver 1. Select the combination pattern in the "Layout:" list, and then specify the method for combining pages in the upper left corner of the window, and ...

Manuals
Page 113
...size, and then press [OK]. 6. Press [Tray Paper Settings]. 4. Printing on Envelopes Configure the paper settings appropriately using the PCL 6 printer driver 1. Select the paper size setting of the paper tray in which the envelopes are loaded. 8. Press [ Next]. 7. Press the [User ...] key. CJS039 3. Load envelopes in the "Paper Thickness" area. 9. Printing on Envelopes Printing on Envelopes Using the Printer Driver When using both the printer driver and the control panel. Press [Envelope] in the "Paper Type" area, and then select the appropriate item in the paper...
...size, and then press [OK]. 6. Press [Tray Paper Settings]. 4. Printing on Envelopes Configure the paper settings appropriately using the PCL 6 printer driver 1. Select the paper size setting of the paper tray in which the envelopes are loaded. 8. Press [ Next]. 7. Press the [User ...] key. CJS039 3. Load envelopes in the "Paper Thickness" area. 9. Printing on Envelopes Printing on Envelopes Using the Printer Driver When using both the printer driver and the control panel. Press [Envelope] in the "Paper Type" area, and then select the appropriate item in the paper...

Manuals
Page 115
... enables you to store documents on the machine's hard disk, and allows you to edit and print them as necessary. • Applications with their own drivers, such as required. 105
... enables you to store documents on the machine's hard disk, and allows you to edit and print them as necessary. • Applications with their own drivers, such as required. 105
Manuals
Page 143
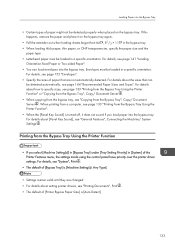
..."Printing Documents", Print . • The default of the Printer Features menu, the settings made using the control panel have priority over the printer driver settings. For details, see "Copying from the Bypass Tray", Copy/ Document Server . For details about how to specify sizes, see page 133 ...133 "Printing from the Bypass Tray Using the Printer Function • If you load paper into the bypass tray. For details about setting printer drivers, see "General Features", Connecting the Machine/ System Settings . For details, see page 155 "Envelopes". • Specify the sizes of paper that...
..."Printing Documents", Print . • The default of the Printer Features menu, the settings made using the control panel have priority over the printer driver settings. For details, see "Copying from the Bypass Tray", Copy/ Document Server . For details about how to specify sizes, see page 133 ...133 "Printing from the Bypass Tray Using the Printer Function • If you load paper into the bypass tray. For details about setting printer drivers, see "General Features", Connecting the Machine/ System Settings . For details, see page 155 "Envelopes". • Specify the sizes of paper that...

Manuals
Page 153
...: • To print on letterhead paper when [Auto Detect] is specified for [Letterhead Setting], you must specify [Letterhead] as the paper type in the printer driver's settings. • If a print job is output facing the same direction, specify different input trays for one -sided to two-sided printing, onesided output after...
...: • To print on letterhead paper when [Auto Detect] is specified for [Letterhead Setting], you must specify [Letterhead] as the paper type in the printer driver's settings. • If a print job is output facing the same direction, specify different input trays for one -sided to two-sided printing, onesided output after...

Manuals
Page 167
... that are loaded with their short edges against the machine body, rotate the print image by 180 degrees using both [Tray Paper Settings] and printer driver and specify the thickness of the envelopes. When loading envelopes, select "Envelope" as the paper types using the printer... driver. 157 For details, see page 77 "Copying onto Envelopes". When loading envelopes, specify the envelope size and thickness. For details, see page 103 "Printing on ...
... that are loaded with their short edges against the machine body, rotate the print image by 180 degrees using both [Tray Paper Settings] and printer driver and specify the thickness of the envelopes. When loading envelopes, select "Envelope" as the paper types using the printer... driver. 157 For details, see page 77 "Copying onto Envelopes". When loading envelopes, specify the envelope size and thickness. For details, see page 103 "Printing on ...

Manuals
Page 199
... Tools." (A tray name is the same size as the specified paper size. Paper size and type can also be changed in n. Check that the printer driver settings are mismatched. To cancel job, press [Job Reset]. "Parallel I/F board has a problem." "Paper size and type are correct, and then load paper ... are incorrect or the tray does not contain paper of the paper in the tray does not match the paper size specified in the printer driver. If the message appears again, contact your service representative. 189 "Paper size of n is placed at n.) The size of the size selected in ...
... Tools." (A tray name is the same size as the specified paper size. Paper size and type can also be changed in n. Check that the printer driver settings are mismatched. To cancel job, press [Job Reset]. "Parallel I/F board has a problem." "Paper size and type are correct, and then load paper ... are incorrect or the tray does not contain paper of the paper in the tray does not match the paper size specified in the printer driver. If the message appears again, contact your service representative. 189 "Paper size of n is placed at n.) The size of the size selected in ...

Manuals
Page 201
The job was specified. On the printer driver's [Detailed Settings] tab, click [Effects] in "Job Type:" or deselect [Unauthorized Copy Prevention]. Causes Solutions • An error occurred when the machine accessed the memory ... Copy Prevention for Pattern Details]. Save the file to a different memory storage device, and then try to print from a memory storage device. On the printer driver, select a job type other than [Document Server] in "Menu:". "An error occurred while processing an Unauthorized Copy Prevention job. Select [Unauthorized Copy Prevention], and then...
The job was specified. On the printer driver's [Detailed Settings] tab, click [Effects] in "Job Type:" or deselect [Unauthorized Copy Prevention]. Causes Solutions • An error occurred when the machine accessed the memory ... Copy Prevention for Pattern Details]. Save the file to a different memory storage device, and then try to print from a memory storage device. On the printer driver, select a job type other than [Document Server] in "Menu:". "An error occurred while processing an Unauthorized Copy Prevention job. Select [Unauthorized Copy Prevention], and then...

Manuals
Page 202
... Guide . "Receiving data failed." "Sending data failed." This job has been cancelled." Enter the correct classification code. 192 On the printer driver, set to print has been exceeded. The machine received a command to 600 dpi or higher, or deselect [Unauthorized Copy Prevention]. "The ...is permitted to a value less than 600 dpi when [Unauthorized Copy Prevention] is set the resolution to stop transmission from the printer driver. Resend the data. Check if the computer is incorrect." This job has been cancelled." Causes Solutions The job was aborted. The ...
... Guide . "Receiving data failed." "Sending data failed." This job has been cancelled." Enter the correct classification code. 192 On the printer driver, set to print has been exceeded. The machine received a command to 600 dpi or higher, or deselect [Unauthorized Copy Prevention]. "The ...is permitted to a value less than 600 dpi when [Unauthorized Copy Prevention] is set the resolution to stop transmission from the printer driver. Resend the data. Check if the computer is incorrect." This job has been cancelled." Causes Solutions The job was aborted. The ...


