

Users Manual
Page 3
...63 Controlling this Device with Web Browser 63 Connecting to the device 63 Log in 64 System Status 65 General Setup 66 Projector Control 67 Network Setup 70 Alert Setup 71 Crestron 73 Crestron Tools 74 Crestron Info 74 Contacting the IT administrator of ...Crestron..75 Reset to Default 75 Reboot System 76 Control the Projector via the Projector Management Utility 77 Installing Projector Management Utility..78 Control the projector with the projector Management Utility 81 Troubleshooting 83 Appendices 87 List of Compatible Signals 87 Configurations ...
...63 Controlling this Device with Web Browser 63 Connecting to the device 63 Log in 64 System Status 65 General Setup 66 Projector Control 67 Network Setup 70 Alert Setup 71 Crestron 73 Crestron Tools 74 Crestron Info 74 Contacting the IT administrator of ...Crestron..75 Reset to Default 75 Reboot System 76 Control the Projector via the Projector Management Utility 77 Installing Projector Management Utility..78 Control the projector with the projector Management Utility 81 Troubleshooting 83 Appendices 87 List of Compatible Signals 87 Configurations ...
Users Manual
Page 6
..., never touch the unit, cables and/or peripherals. Do not disassemble or modify the machine. e) For users, do not install the projector by overheated internal components. Never operate this manual. After turning off its power immediately. Never push objects of the machine's internal components require...of any covers or screws that is installed in this unit on the product. Contact your service representative and report the problem. Installing the Projector on a Wall or Ceiling: a) Do not attempt to clean or replace parts for a machine that is incorrectly installed on a wall...
..., never touch the unit, cables and/or peripherals. Do not disassemble or modify the machine. e) For users, do not install the projector by overheated internal components. Never operate this manual. After turning off its power immediately. Never push objects of the machine's internal components require...of any covers or screws that is installed in this unit on the product. Contact your service representative and report the problem. Installing the Projector on a Wall or Ceiling: a) Do not attempt to clean or replace parts for a machine that is incorrectly installed on a wall...
Users Manual
Page 7
... or tilted surface. Doing so could result in damage to support the full weight of the projector and brackets. Do not place the machine in a location where direct sunlight or heat generation ... accident. Doing so may cause the machine to hot air coming from humidity and dust. The projector must be installed in malfunction, burns, or fire. Doing so could result in injury.... or hand near the exhaust vents. The heat may cause fire due to support the projector. WXL5670/ WUL5670 Series weights less than 11.4kg. - Do not place the machine or use the ...
... or tilted surface. Doing so could result in damage to support the full weight of the projector and brackets. Do not place the machine in a location where direct sunlight or heat generation ... accident. Doing so may cause the machine to hot air coming from humidity and dust. The projector must be installed in malfunction, burns, or fire. Doing so could result in injury.... or hand near the exhaust vents. The heat may cause fire due to support the projector. WXL5670/ WUL5670 Series weights less than 11.4kg. - Do not place the machine or use the ...

Users Manual
Page 9
...of glass since they may result in any way. (If the cabinet should break, please handle with care to verify that are covered by RICOH. Do not use attachments not recommended by the operating instructions. Do not place the product in a box or in fire, electric ...anything in a risk of the lens may overheat, which could cause hazards or damage to rain or water. Avoid any of the lens while the projector is not damaged under the machine. Usage Notice ■ Caution■ Caution■ Caution- ■ Caution■ Caution■ Caution■ Caution...
...of glass since they may result in any way. (If the cabinet should break, please handle with care to verify that are covered by RICOH. Do not use attachments not recommended by the operating instructions. Do not place the product in a box or in fire, electric ...anything in a risk of the lens may overheat, which could cause hazards or damage to rain or water. Avoid any of the lens while the projector is not damaged under the machine. Usage Notice ■ Caution■ Caution■ Caution- ■ Caution■ Caution■ Caution■ Caution...

Users Manual
Page 10
...hot and deform, deteriorate or cause a burn or fire. The bright light may make the lens hot and cause a product failure. This projector has built-in an environment with children. Do not stare into the lens or vent when the product is on . Do not block the projection...Possibly hazardous optical radiation emitted from the wall or the floor. Use of controls or adjustments or performance of the projectors are obstructed, the temperature inside the projector will rise and this product. If you do so, the part that intake and exhaust vents of procedures other than 30...
...hot and deform, deteriorate or cause a burn or fire. The bright light may make the lens hot and cause a product failure. This projector has built-in an environment with children. Do not stare into the lens or vent when the product is on . Do not block the projection...Possibly hazardous optical radiation emitted from the wall or the floor. Use of controls or adjustments or performance of the projectors are obstructed, the temperature inside the projector will rise and this product. If you do so, the part that intake and exhaust vents of procedures other than 30...
Users Manual
Page 11
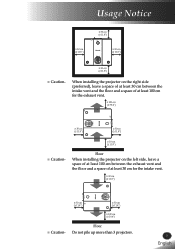
Floor When installing the projector on the right side (preferred), leave a space of at least 30 cm between the exhaust vent and the floor and...; 11.8") ≥ 30 cm (≥ 11.8") ≥ 30 cm (≥ 11.8") ≥ 30 cm (≥ 11.8") ■ Caution- When installing the projector on the left side, leave a space of at least 100 cm between the intake vent and the floor and a space of at least 100...cm (≥ 11.8") ≥ 30 cm (≥ 11.8") ≥ 100 cm (≥ 39.4") ■ Caution- Floor Do not pile up more than 3 projectors. 9 English English
Floor When installing the projector on the right side (preferred), leave a space of at least 30 cm between the exhaust vent and the floor and...; 11.8") ≥ 30 cm (≥ 11.8") ≥ 30 cm (≥ 11.8") ≥ 30 cm (≥ 11.8") ■ Caution- When installing the projector on the left side, leave a space of at least 100 cm between the intake vent and the floor and a space of at least 100...cm (≥ 11.8") ≥ 30 cm (≥ 11.8") ≥ 100 cm (≥ 39.4") ■ Caution- Floor Do not pile up more than 3 projectors. 9 English English
Users Manual
Page 13
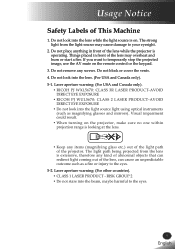
...AV mute on . If you want to the eyes. 5-2. Laser aperture warning: (For USA and Canada only). • RICOH PJ WXL5670: CLASS 3R LASER PRODUCT-AVOID DIRECT EYE EXPOSURE • RICOH PJ WUL5670: CLASS 2 LASER PRODUCT-AVOID DIRECT EYE EXPOSURE • Do not look into the beam, maybe harmful to your ... or cover the vents. 4. Laser aperture warning: (For other countries). • CLASS 1 LASER PRODUCT - Usage Notice Safety Labels of the projector. Do not place anything in front of the lens, can redirect light coming out of the lens may cause damage to the eyes. 11 English...
...AV mute on . If you want to the eyes. 5-2. Laser aperture warning: (For USA and Canada only). • RICOH PJ WXL5670: CLASS 3R LASER PRODUCT-AVOID DIRECT EYE EXPOSURE • RICOH PJ WUL5670: CLASS 2 LASER PRODUCT-AVOID DIRECT EYE EXPOSURE • Do not look into the beam, maybe harmful to your ... or cover the vents. 4. Laser aperture warning: (For other countries). • CLASS 1 LASER PRODUCT - Usage Notice Safety Labels of the projector. Do not place anything in front of the lens, can redirect light coming out of the lens may cause damage to the eyes. 11 English...
Users Manual
Page 15
... operation. Usage Notice Regulation & Safety Notices This appendix lists the general notices of America FCC notice MODEL NAME: RICOH PJ WXL5670/ WUL5670 TRADE NAME: PROJECTOR MODEL NAME: RICOH PJ WXL5670/ WUL5670 Tested To Comply With FCC Standards FOR HOME OR OFFICE USE This device complies with the instructions, may ...device generates, uses and can radiate radio frequency energy and, if not installed and used in the United States of your Projector. Operation is no guarantee that may not cause harmful interference and 2. Notice: Users in accordance with Part 15 of the following two ...
... operation. Usage Notice Regulation & Safety Notices This appendix lists the general notices of America FCC notice MODEL NAME: RICOH PJ WXL5670/ WUL5670 TRADE NAME: PROJECTOR MODEL NAME: RICOH PJ WXL5670/ WUL5670 Tested To Comply With FCC Standards FOR HOME OR OFFICE USE This device complies with the instructions, may ...device generates, uses and can radiate radio frequency energy and, if not installed and used in the United States of your Projector. Operation is no guarantee that may not cause harmful interference and 2. Notice: Users in accordance with Part 15 of the following two ...

Users Manual
Page 16
Wash hands after handling. 14 English Usage Notice RESPONSIBLE PARTY: Ricoh USA Inc. 5 Dedrick Place, West Caldwell, NJ 07006 Phone: 973-882-2000 Notice: Shielded cables All connections to other reproductive harm. dtsc.ca.gov/hazardouswaste/... cause cancer, and birth defects or other computing devices must be made using shielded cables to Users in the State of California to operate this projector.
Wash hands after handling. 14 English Usage Notice RESPONSIBLE PARTY: Ricoh USA Inc. 5 Dedrick Place, West Caldwell, NJ 07006 Phone: 973-882-2000 Notice: Shielded cables All connections to other reproductive harm. dtsc.ca.gov/hazardouswaste/... cause cancer, and birth defects or other computing devices must be made using shielded cables to Users in the State of California to operate this projector.

Users Manual
Page 20
...images for commercial purposes or public viewing Note to Users Viewing 3D Images Pay attention to the following points when viewing images using the projector, be careful not to infringe the copyright of images or movies using a function that the light in a room where on LED lighting...seizures, consult a doctor before viewing 3D images. 18 English Usage Notice Other Information Copyrights to Images When projecting images using 3D glasses with projector: • How 3D images are viewed may feel sick while viewing 3D images, stop viewing them. The following are examples that may ...
...images for commercial purposes or public viewing Note to Users Viewing 3D Images Pay attention to the following points when viewing images using the projector, be careful not to infringe the copyright of images or movies using a function that the light in a room where on LED lighting...seizures, consult a doctor before viewing 3D images. 18 English Usage Notice Other Information Copyrights to Images When projecting images using 3D glasses with projector: • How 3D images are viewed may feel sick while viewing 3D images, stop viewing them. The following are examples that may ...
Users Manual
Page 21
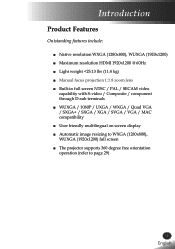
Introduction Product Features Outstanding features include: ■ Native resolution WXGA (1280x800), WUXGA (1920x1200) ■ Maximum resolution HDMI 1920x1200 @ 60Hz ■ Light weight
Introduction Product Features Outstanding features include: ■ Native resolution WXGA (1280x800), WUXGA (1920x1200) ■ Maximum resolution HDMI 1920x1200 @ 60Hz ■ Light weight
Users Manual
Page 22
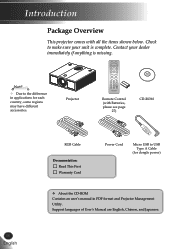
... Cable Documentation: Read This First Warranty Card Power Cord Micro USB to the difference in PDF format and Projector Management Utility. Support languages of User's Manual are English, Chinese, and Japanese. Note Due to USB Type A...(for dongle power) About the CD-ROM Contains an user's manual in applications for each country, some regions may have different accessories. Projector AV Mute Auto Input Enter Menu ECO Keystone Volume Computer Video 1 2 Digital A Digital B 4 5 Aspect Freeze 7 8 Status Picture 0 HDMI ...
... Cable Documentation: Read This First Warranty Card Power Cord Micro USB to the difference in PDF format and Projector Management Utility. Support languages of User's Manual are English, Chinese, and Japanese. Note Due to USB Type A...(for dongle power) About the CD-ROM Contains an user's manual in applications for each country, some regions may have different accessories. Projector AV Mute Auto Input Enter Menu ECO Keystone Volume Computer Video 1 2 Digital A Digital B 4 5 Aspect Freeze 7 8 Status Picture 0 HDMI ...

Users Manual
Page 25
... IR remote. Introduction Control Panel 1 23 4 6 5 7 8 10 9 11 1 Power indicator Indicate the projector's power status. 2 Lamp indicator Indicate the projector's lamp status. 3 Temp indicator Indicate the inside of the projector's temperature status. 4 Power Refer to the "Power On/Off the Projector" section. (pages 32~33) 5 Menu Press "Menu" to launch the on screen display...
... IR remote. Introduction Control Panel 1 23 4 6 5 7 8 10 9 11 1 Power indicator Indicate the projector's power status. 2 Lamp indicator Indicate the projector's lamp status. 3 Temp indicator Indicate the inside of the projector's temperature status. 4 Power Refer to the "Power On/Off the Projector" section. (pages 32~33) 5 Menu Press "Menu" to launch the on screen display...

Users Manual
Page 26
Receives signals from the IR remote. Introduction 10 Auto Set 11 IR Receiver Automatically optimize image. Keep the signal path to the sensor unobstructed for uninterrupted communication with the projector. 24 English
Receives signals from the IR remote. Introduction 10 Auto Set 11 IR Receiver Automatically optimize image. Keep the signal path to the sensor unobstructed for uninterrupted communication with the projector. 24 English

Users Manual
Page 27
... 4 5 +6 Aspect Freeze 9 15 7 8 -9 Status Picture 10 14 0 MHL 11 13 12 1 Power 2 Input 3 Enter 4 Four Directional Select Keys Refer to the "Power On/Off the Projector" section. (See pages 32~33) Press "Input" to your selection. 25 English English Use , , , or to select items or make adjustments to choose your section...
... 4 5 +6 Aspect Freeze 9 15 7 8 -9 Status Picture 10 14 0 MHL 11 13 12 1 Power 2 Input 3 Enter 4 Four Directional Select Keys Refer to the "Power On/Off the Projector" section. (See pages 32~33) Press "Input" to your selection. 25 English English Use , , , or to select items or make adjustments to choose your section...

Users Manual
Page 28
... 13 Picture 14 Status 15 Aspect 16 Digital A 17 Digital B 18 Computer 19 Keystone +/- 20 Menu 21 Auto 22 AV Mute Dim the projector lamp which will lower power consumption and extend the lamp life. This function is not supported. Input numbers. Press again to the input source. ... the image to choose signal from HDBaseT In terminal. Press "HDMI" to compensate for the OSD main menu operation. (See page 40) Automatically synchronize the projector to resume the screen image. Use this function to choose a signal from HDMI 1, HDMI 2, or HDMI 3 In terminal. Press "Digital A" to choose ...
... 13 Picture 14 Status 15 Aspect 16 Digital A 17 Digital B 18 Computer 19 Keystone +/- 20 Menu 21 Auto 22 AV Mute Dim the projector lamp which will lower power consumption and extend the lamp life. This function is not supported. Input numbers. Press again to the input source. ... the image to choose signal from HDBaseT In terminal. Press "HDMI" to compensate for the OSD main menu operation. (See page 40) Automatically synchronize the projector to resume the screen image. Use this function to choose a signal from HDMI 1, HDMI 2, or HDMI 3 In terminal. Press "Digital A" to choose ...

Users Manual
Page 30
Maximum operating range for the remote control is about 23.0' (7m) and ±30° (horizontally), ±20° (vertically) in front of the projector. 23.0' (7m) ±30° (horizontally) ±20° (vertically) 0 Status Picture 7 8 Aspect Freeze HDMI 3 Magnify +6 -9 MHL 4 5 Digital A Digital B 1 2 Computer Video ... ECO Status7Aspec4tDigitaFlCrA1eoemzep5Duitgeirtal 0Picture8 -9 Video 2 B +6Magnif3y HDMI Volume MHL 28 English Introduction Remote Control Operating Range Point the remote control toward the projector (Remote Receiver) when pressing any button.
Maximum operating range for the remote control is about 23.0' (7m) and ±30° (horizontally), ±20° (vertically) in front of the projector. 23.0' (7m) ±30° (horizontally) ±20° (vertically) 0 Status Picture 7 8 Aspect Freeze HDMI 3 Magnify +6 -9 MHL 4 5 Digital A Digital B 1 2 Computer Video ... ECO Status7Aspec4tDigitaFlCrA1eoemzep5Duitgeirtal 0Picture8 -9 Video 2 B +6Magnif3y HDMI Volume MHL 28 English Introduction Remote Control Operating Range Point the remote control toward the projector (Remote Receiver) when pressing any button.

Users Manual
Page 31
... your equipment. The distance from the lens of the projector to the desired distance from the screen. Follow these general guidelines: Position the projector on a flat surface at a right angle to the screen. Position the projector to the screen, the zoom setting, and the video... format determine the size of your power outlets, and the distance between the projector and the rest of the projected image. 360 degree free orientation ...
... your equipment. The distance from the lens of the projector to the desired distance from the screen. Follow these general guidelines: Position the projector on a flat surface at a right angle to the screen. Position the projector to the screen, the zoom setting, and the video... format determine the size of your power outlets, and the distance between the projector and the rest of the projected image. 360 degree free orientation ...

Users Manual
Page 32
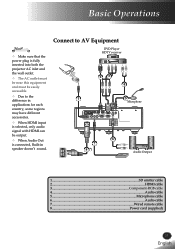
... to Computer/Notebook Note PC Make sure that the power plug is fully inserted into both the projector AC inlet and the wall outlet. The AC outlet must be near this equipment and must be easily accessible. Due to ... 14 RS-232 cable 15 12V DC jack 16 Wired Remote Control cable 17 Power cord (supplied) 30 English To ensure the projector works well with your computer, please make sure the timing of the display mode is compatible with your...
... to Computer/Notebook Note PC Make sure that the power plug is fully inserted into both the projector AC inlet and the wall outlet. The AC outlet must be near this equipment and must be easily accessible. Due to ... 14 RS-232 cable 15 12V DC jack 16 Wired Remote Control cable 17 Power cord (supplied) 30 English To ensure the projector works well with your computer, please make sure the timing of the display mode is compatible with your...
Users Manual
Page 33
... Out is connected, Built-in speaker doesn't sound. Basic Operations Note Make sure that the power plug is fully inserted into both the projector AC inlet and the wall outlet. The AC outlet must be near this equipment and must be easily accessible. Due to...
... Out is connected, Built-in speaker doesn't sound. Basic Operations Note Make sure that the power plug is fully inserted into both the projector AC inlet and the wall outlet. The AC outlet must be near this equipment and must be easily accessible. Due to...