Printer Reference
Page 2
Copying or printing the following items is meant as above. With this manual. If you use genuine master and ink from the supplier with your office products. In no responsibility for its completeness or accuracy. We assume no event will the company be ...
Copying or printing the following items is meant as above. With this manual. If you use genuine master and ink from the supplier with your office products. In no responsibility for its completeness or accuracy. We assume no event will the company be ...

Printer Reference
Page 4
If it topples over, an injury might move or come down to cut yourself on clothes are engineered to remove misfed sheets of paper or masters. • If ink comes into contact with ink, wash the affected area thoroughly with your clothes when replacing an ink container. For other small metallic ...
If it topples over, an injury might move or come down to cut yourself on clothes are engineered to remove misfed sheets of paper or masters. • If ink comes into contact with ink, wash the affected area thoroughly with your clothes when replacing an ink container. For other small metallic ...

Printer Reference
Page 10
... on Thick or Thin Paper". ❖ Selecting the Type of Original See p.40 "Type of Original". ❖ Saving Ink See p.42 "Economy Mode". ❖ Making Masters and Prints at One Go See p.43 "Auto Cycle". ❖ Memory/Class Modes See p.44 "Memory/Class". ❖ Combining Two Originals onto One Print See...
... on Thick or Thin Paper". ❖ Selecting the Type of Original See p.40 "Type of Original". ❖ Saving Ink See p.42 "Economy Mode". ❖ Making Masters and Prints at One Go See p.43 "Auto Cycle". ❖ Memory/Class Modes See p.44 "Memory/Class". ❖ Combining Two Originals onto One Print See...

Printer Reference
Page 12
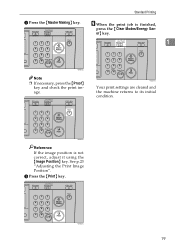
F Press the {Master Making} key. AQN025S Your print settings are cleared and the machine returns to disable Auto Cycle mode. See p.18 "When Auto Cycle mode is finished, press the {Clear Modes/Energy Saver} key. G When the print job is off". x Note ❒ If you wish to check the image before printing, press the {Auto Cycle} key before pressing the {Master Making} key, in order to its initial condition. AQN024S Printing starts automatically after the trial print.
F Press the {Master Making} key. AQN025S Your print settings are cleared and the machine returns to disable Auto Cycle mode. See p.18 "When Auto Cycle mode is finished, press the {Clear Modes/Energy Saver} key. G When the print job is off". x Note ❒ If you wish to check the image before printing, press the {Auto Cycle} key before pressing the {Master Making} key, in order to its initial condition. AQN024S Printing starts automatically after the trial print.
Printer Reference
Page 15
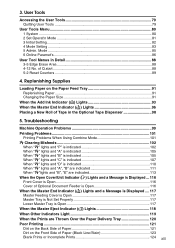
...116 Cover of Optional Document Feeder is Open 116 When the Master End Indicator (C) Lights and a Message is Displayed .... 117 Master Feeding Cover is Open 117 Master Tray is Not Set Properly 117 Lower Master Tray is Open 117 When the Master Eject Indicator (k) Lights 118 When Other Indicators Light 119 ...Dirt on the Paper Feed Tray 91 Replenishing Paper 91 Changing the Paper Size 91 When the Add Ink Indicator (j) Lights 93 When the Master End Indicator (C) Lights 96 Placing a New Roll of Paper (Black Line/Stain 123 Blank Prints or Incomplete Prints 124 xiii Replenishing Supplies ...
...116 Cover of Optional Document Feeder is Open 116 When the Master End Indicator (C) Lights and a Message is Displayed .... 117 Master Feeding Cover is Open 117 Master Tray is Not Set Properly 117 Lower Master Tray is Open 117 When the Master Eject Indicator (k) Lights 118 When Other Indicators Light 119 ...Dirt on the Paper Feed Tray 91 Replenishing Paper 91 Changing the Paper Size 91 When the Add Ink Indicator (j) Lights 93 When the Master End Indicator (C) Lights 96 Placing a New Roll of Paper (Black Line/Stain 123 Blank Prints or Incomplete Prints 124 xiii Replenishing Supplies ...

Printer Reference
Page 17
...pressure of the machine. 2. Paper feed side plates Use to paper thickness. 7. Paper feed tray Set paper on this tray to clear a master misfeed. 5. Side tray fine adjusting dial Use to the inside of the paper feed roller according to prevent paper skew. 8. Front cover ...tray sideways. 11. See p.4 "Control Panel". 3. Machine Exterior AQN002S 1. Master tray Open to replace the master roll or to clear a master misfeed. 6. When using the exposure glass, lower its cover over an original before master making. Paper feed side plate lock lever Use to lower the paper feed ...
...pressure of the machine. 2. Paper feed side plates Use to paper thickness. 7. Paper feed tray Set paper on this tray to clear a master misfeed. 5. Side tray fine adjusting dial Use to the inside of the paper feed roller according to prevent paper skew. 8. Front cover ...tray sideways. 11. See p.4 "Control Panel". 3. Machine Exterior AQN002S 1. Master tray Open to replace the master roll or to clear a master misfeed. 6. When using the exposure glass, lower its cover over an original before master making. Paper feed side plate lock lever Use to lower the paper feed ...

Printer Reference
Page 18
... the buffer fins. 8. Exposure glass Position originals face down on . 4. Chocks Use to turn the power on the paper delivery tray. 12. Drum unit The master is on the exposure glass. 5. Drum position indicator It is shown that the drum is in this unit. 2 Paper delivery end plate Use to unlock... are stored here. 10. Machine Interior AQN020S 1. Ink holder Set the ink cartridge in the standard position when a upper lamp is wrapped around this holder. 3. Master eject box Used masters are delivered here. 7.
... the buffer fins. 8. Exposure glass Position originals face down on . 4. Chocks Use to turn the power on the paper delivery tray. 12. Drum unit The master is on the exposure glass. 5. Drum position indicator It is shown that the drum is in this unit. 2 Paper delivery end plate Use to unlock... are stored here. 10. Machine Interior AQN020S 1. Ink holder Set the ink cartridge in the standard position when a upper lamp is wrapped around this holder. 3. Master eject box Used masters are delivered here. 7.

Printer Reference
Page 21
... Modes Press to clear previously entered print settings. • Energy Saver Press to switch to make masters and prints in a single operation. See p.43 "Auto Cycle". 30. {Proof} key Press to make a proof print. 31. {Master Making} key Press to make prints darker or lighter. See p.79 "User Tools". 21. {Image Density...} key Press to make a master. 32. {Print} key Press to suit your requirements. See p.20 "Saving Energy". 29. {Auto Cycle} key Press to and from Energy Saver mode. See p.25 "...
... Modes Press to clear previously entered print settings. • Energy Saver Press to switch to make masters and prints in a single operation. See p.43 "Auto Cycle". 30. {Proof} key Press to make a proof print. 31. {Master Making} key Press to make prints darker or lighter. See p.79 "User Tools". 21. {Image Density...} key Press to make a master. 32. {Print} key Press to suit your requirements. See p.20 "Saving Energy". 29. {Auto Cycle} key Press to and from Energy Saver mode. See p.25 "...

Printer Reference
Page 22
...you know the status of the keys under the behind cover has been selected. x: Misfeed indicator See p.102 "x Clearing Misfeeds". played". 6 C: Master End indicator See p.116 "When the Open Cover/Unit Indicator (M) Lights and a Message is to be printed. 6. Counter Shows the number of... prints entered. M: Open Cover/Unit indicator 2. Indicators AQN027S 1. See p.118 "When the Master Eject Indicator (k) Lights". j: Add Ink indicator See p.93 "When the Add Ink Indicator (j) Lights". While printing, it shows the remainder that ...
...you know the status of the keys under the behind cover has been selected. x: Misfeed indicator See p.102 "x Clearing Misfeeds". played". 6 C: Master End indicator See p.116 "When the Open Cover/Unit Indicator (M) Lights and a Message is to be printed. 6. Counter Shows the number of... prints entered. M: Open Cover/Unit indicator 2. Indicators AQN027S 1. See p.118 "When the Master Eject Indicator (k) Lights". j: Add Ink indicator See p.93 "When the Add Ink Indicator (j) Lights". While printing, it shows the remainder that ...

Printer Reference
Page 33
cess masters and make prints in the Document Feeder". To do so, see p.70 "Placing Originals in a sin- C Make sure that the machine is ready ZFRH060E for ...
cess masters and make prints in the Document Feeder". To do so, see p.70 "Placing Originals in a sin- C Make sure that the machine is ready ZFRH060E for ...

Printer Reference
Page 34
AQN030S B Press the {Master Making} key. try, press the {Clear/Stop} key and then enter the number again. When Auto Cycle mode is on A Check that Auto Cycle mode is off A Check that Auto Cycle mode has been disabled. 18 AQN030S AQN024S Printing starts automatically after the trial print. H Enter the number of prints with the number keys. Operation F Lower the exposure glass cover. 1 When Auto Cycle mode is on . AQN023S Note ❒ If you have made a wrong en- ZFRH061E G Specify the print settings.
AQN030S B Press the {Master Making} key. try, press the {Clear/Stop} key and then enter the number again. When Auto Cycle mode is on A Check that Auto Cycle mode is off A Check that Auto Cycle mode has been disabled. 18 AQN030S AQN024S Printing starts automatically after the trial print. H Enter the number of prints with the number keys. Operation F Lower the exposure glass cover. 1 When Auto Cycle mode is on . AQN023S Note ❒ If you have made a wrong en- ZFRH061E G Specify the print settings.
Printer Reference
Page 35
AQN025S Your print settings are cleared and the machine returns to its initial condition. er} key. 1 AQN024S Note ❒ If necessary, press the {Proof} key and check the print image. See p.23 "Adjusting the Print Image Position". I When the print job is not correct, adjust it using the {Image Position} key. AQN032S 19 C Press the {Print} key. Standard Printing B Press the {Master Making} key. AQN031S Reference If the image position is finished, press the {Clear Modes/Energy Sav-
AQN025S Your print settings are cleared and the machine returns to its initial condition. er} key. 1 AQN024S Note ❒ If necessary, press the {Proof} key and check the print image. See p.23 "Adjusting the Print Image Position". I When the print job is not correct, adjust it using the {Image Position} key. AQN032S 19 C Press the {Print} key. Standard Printing B Press the {Master Making} key. AQN031S Reference If the image position is finished, press the {Clear Modes/Energy Sav-

Printer Reference
Page 36
To operate the machine, press the Operation switch, or place originals on . • a warning message appears • there is no master • originals are left in the ADF • a cover is open Note ❒ You can change the time the machine waits before Energy Saver or ... mode The display goes off automatically. Operation Saving Energy If not used for a certain period of a combine repeat. • there is no paper • the master eject box is full • there is no ink • originals or paper are jammed • it , turn the main switch on the exposure glass...
To operate the machine, press the Operation switch, or place originals on . • a warning message appears • there is no master • originals are left in the ADF • a cover is open Note ❒ You can change the time the machine waits before Energy Saver or ... mode The display goes off automatically. Operation Saving Energy If not used for a certain period of a combine repeat. • there is no paper • the master eject box is full • there is no ink • originals or paper are jammed • it , turn the main switch on the exposure glass...

Printer Reference
Page 38
... been operated for Auto Reset is Off. ❒ In the following cases, Auto Reset will not take place. • If there is no master • If the master eject box is full • If there is an original in the process of time. This is lit • If you have set ". set...; If the machine has not finished making changes to "Off". See "1 Auto Reset" on p.80 "1 System". ❒ The default for a certain pe- riod of making masters or prints • If the machine is printing the second page of a Combine print • If there is no paper • If there is no...
... been operated for Auto Reset is Off. ❒ In the following cases, Auto Reset will not take place. • If there is no master • If the master eject box is full • If there is an original in the process of time. This is lit • If you have set ". set...; If the machine has not finished making changes to "Off". See "1 Auto Reset" on p.80 "1 System". ❒ The default for a certain pe- riod of making masters or prints • If the machine is printing the second page of a Combine print • If there is no paper • If there is no...
Printer Reference
Page 41
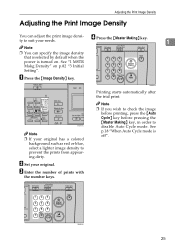
...original has a colored background such as red or blue, select a lighter image density to prevent the prints from appearing dirty. AQN023S 25 Press the {Master Making} key. 1 Note ❒ You can adjust the print image densi- Note ❒ If you wish to check the image before printing, press the ...{Auto Cycle} key before pressing the {Master Making} key, in order to suit your needs. C Enter the number of prints with the number keys. ty to disable Auto Cycle mode. A ...
...original has a colored background such as red or blue, select a lighter image density to prevent the prints from appearing dirty. AQN023S 25 Press the {Master Making} key. 1 Note ❒ You can adjust the print image densi- Note ❒ If you wish to check the image before printing, press the ...{Auto Cycle} key before pressing the {Master Making} key, in order to suit your needs. C Enter the number of prints with the number keys. ty to disable Auto Cycle mode. A ...

Printer Reference
Page 42
AQN024S Printing starts automatically after the trial print. Note ❒ If you wish to check the image before printing, press the {Auto Cycle} key before pressing the {Master Making} key, in order to make halftone prints. A Press the {Tint} key. See p.18 "When Auto Cycle mode is off". 26 AQN023S Operation Tint Mode 1 Use this function to disable Auto Cycle mode. D Press the {Master Making} key. C Enter the number of prints with the number keys. GRTINT0E BQZ022S B Set your original.
AQN024S Printing starts automatically after the trial print. Note ❒ If you wish to check the image before printing, press the {Auto Cycle} key before pressing the {Master Making} key, in order to make halftone prints. A Press the {Tint} key. See p.18 "When Auto Cycle mode is off". 26 AQN023S Operation Tint Mode 1 Use this function to disable Auto Cycle mode. D Press the {Master Making} key. C Enter the number of prints with the number keys. GRTINT0E BQZ022S B Set your original.

Printer Reference
Page 43
... the number of prints with the number keys. If you wish to check the image 1 before printing, press the {Auto Cycle} key before pressing the {Master Making} key, in order to make clear prints. AQN024S Printing starts automatically after the trial print. 27 See p.18 "When Auto Cycle mode is off... be used together. Fine Mode Use the {Fine} key to disable Auto Cycle mode. A Press the {Fine} key. BQZ024S B Set your original. AQN023S D Press the {Master Making} key.
... the number of prints with the number keys. If you wish to check the image 1 before printing, press the {Auto Cycle} key before pressing the {Master Making} key, in order to make clear prints. AQN024S Printing starts automatically after the trial print. 27 See p.18 "When Auto Cycle mode is off... be used together. Fine Mode Use the {Fine} key to disable Auto Cycle mode. A Press the {Fine} key. BQZ024S B Set your original. AQN023S D Press the {Master Making} key.

Printer Reference
Page 45
AQN035S B Change the number of prints and press the {Master Making} key. C Enter the number of prints or check the completed prints. Prints A Press the {Clear/Stop} key. Note ❒ To change the number of ...
AQN035S B Change the number of prints and press the {Master Making} key. C Enter the number of prints or check the completed prints. Prints A Press the {Clear/Stop} key. Note ❒ To change the number of ...

Printer Reference
Page 46
...; 81/2" × 11"K ★ ★ ★ -- ★ -- 51/2" × 81/2"L -- -- -- ★ -- ★ ★: The machine automatically rotates the original image by 90° to make masters in Image Rotation mode. ❒ You can cancel Image Rotation mode with User Tools. A4K B5 B5 A5L✩ A5K✩ JISL JISK -- ★ -- ★...
...; 81/2" × 11"K ★ ★ ★ -- ★ -- 51/2" × 81/2"L -- -- -- ★ -- ★ ★: The machine automatically rotates the original image by 90° to make masters in Image Rotation mode. ❒ You can cancel Image Rotation mode with User Tools. A4K B5 B5 A5L✩ A5K✩ JISL JISK -- ★ -- ★...

Printer Reference
Page 48
... ratio, and press the {OK} key. Note ❒ If you wish to check the image before printing, press the {Auto Cycle} key before pressing the {Master Making} key, in order to select your original. See p.18 "When Auto Cycle mode is off". E Enter the number of the correct size. Operation A Press...
... ratio, and press the {OK} key. Note ❒ If you wish to check the image before printing, press the {Auto Cycle} key before pressing the {Master Making} key, in order to select your original. See p.18 "When Auto Cycle mode is off". E Enter the number of the correct size. Operation A Press...


