Operating Instructions
Page 6
Maintaining the Machine Replacing the Print Cartridge...129 Replacing the Waste Toner Bottle...134 Replacing a Component...140 Replacing the Intermediate Transfer Unit 140 Replacing the Fusing Unit and Transfer Roller 140 Cautions When Cleaning...141 Cleaning the Toner Density Sensor...142 Cleaning the Friction Pad and Paper Feed Roller 144 Cleaning the Registration Roller and...
Maintaining the Machine Replacing the Print Cartridge...129 Replacing the Waste Toner Bottle...134 Replacing a Component...140 Replacing the Intermediate Transfer Unit 140 Replacing the Fusing Unit and Transfer Roller 140 Cautions When Cleaning...141 Cleaning the Toner Density Sensor...142 Cleaning the Friction Pad and Paper Feed Roller 144 Cleaning the Registration Roller and...
Operating Instructions
Page 7
... on the Computer 181 Enabling and Disabling IPsec Using the Control Panel 183 Notes About the Toner...184 Moving and Transporting the Machine...185 Disposal...185 Where to Inquire...186 Consumables...187 Print Cartridge...187 Waste Toner Bottle...189 Specifications of the Machine...190 General Function Specifications...190 Printer Function Specifications...192 Specifications of...
... on the Computer 181 Enabling and Disabling IPsec Using the Control Panel 183 Notes About the Toner...184 Moving and Transporting the Machine...185 Disposal...185 Where to Inquire...186 Consumables...187 Print Cartridge...187 Waste Toner Bottle...189 Specifications of the Machine...190 General Function Specifications...190 Printer Function Specifications...192 Specifications of...
Operating Instructions
Page 20
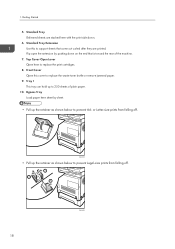
... retainer as shown below to 250 sheets of the machine. 7. 1. Standard Tray Delivered sheets are printed. Top Cover Open Lever Open here to replace the waste toner bottle or remove jammed paper. 9. Tray 1 This tray can hold up the retainer as shown below to support sheets that is toward the rear of plain...
... retainer as shown below to 250 sheets of the machine. 7. 1. Standard Tray Delivered sheets are printed. Top Cover Open Lever Open here to replace the waste toner bottle or remove jammed paper. 9. Tray 1 This tray can hold up the retainer as shown below to support sheets that is toward the rear of plain...
Operating Instructions
Page 22
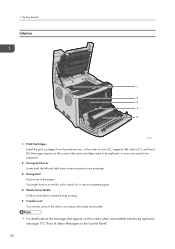
... you print on an envelope. 3. Fusing Unit Lever Lower both the left and right levers when you replace the waste toner bottle. • For details about the messages that is wasted during printing. 5. Waste Toner Bottle Collects toner that appear on the Control Panel". 20 Print Cartridges Install the print cartridges from the machine rear, in the order...
... you print on an envelope. 3. Fusing Unit Lever Lower both the left and right levers when you replace the waste toner bottle. • For details about the messages that is wasted during printing. 5. Waste Toner Bottle Collects toner that appear on the Control Panel". 20 Print Cartridges Install the print cartridges from the machine rear, in the order...
Operating Instructions
Page 106
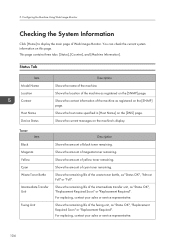
...toner remaining. Toner Item Black Magenta Yellow Cyan Waste Toner Bottle Intermediate Transfer Unit Fusing Unit Description Shows the amount of yellow toner remaining. For replacing, contact your sales or service representative. 104 5. Status Tab Item Model Name Location Contact Host Name Device Status Description Shows the name of magenta toner... the System Information Click [Home] to display the main page of cyan toner remaining. Shows the amount of Web Image Monitor. Shows the remaining life of the waste toner bottle, as registered on the machine's display.
...toner remaining. Toner Item Black Magenta Yellow Cyan Waste Toner Bottle Intermediate Transfer Unit Fusing Unit Description Shows the amount of yellow toner remaining. For replacing, contact your sales or service representative. 104 5. Status Tab Item Model Name Location Contact Host Name Device Status Description Shows the name of magenta toner... the System Information Click [Home] to display the main page of cyan toner remaining. Shows the amount of Web Image Monitor. Shows the remaining life of the waste toner bottle, as registered on the machine's display.
Operating Instructions
Page 136
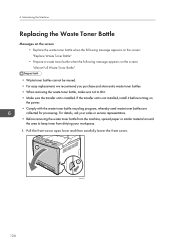
... extra waste toner bottles. • When removing the waste toner bottle, make sure not to keep toner from dirtying your workspace. 1. Maintaining the Machine Replacing the Waste Toner Bottle Messages on the screen • Replace the waste toner bottle when the following message appears on the screen: "Replace Waste Toner Bottle" • Prepare a waste toner bottle when the following message appears on the power. • Comply with the waste toner bottle recycling...
... extra waste toner bottles. • When removing the waste toner bottle, make sure not to keep toner from dirtying your workspace. 1. Maintaining the Machine Replacing the Waste Toner Bottle Messages on the screen • Replace the waste toner bottle when the following message appears on the screen: "Replace Waste Toner Bottle" • Prepare a waste toner bottle when the following message appears on the power. • Comply with the waste toner bottle recycling...

Operating Instructions
Page 137
2. DAC076 135 Replacing the Waste Toner Bottle DAC089 3. Holding the tabs on both levers on the front cover forward. Holding the handle at the center of the transfer unit, tilt it backwards and lift it . Slide both ends of the waste toner bottle, carefully pull it partially out without tilting it up. 2 1 DAC088 4.
2. DAC076 135 Replacing the Waste Toner Bottle DAC089 3. Holding the tabs on both levers on the front cover forward. Holding the handle at the center of the transfer unit, tilt it backwards and lift it . Slide both ends of the waste toner bottle, carefully pull it partially out without tilting it up. 2 1 DAC088 4.
Operating Instructions
Page 138
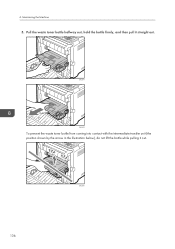
Pull the waste toner bottle halfway out, hold the bottle firmly, and then pull it out. 6. Maintaining the Machine 5. DAC077 DAC078 To prevent the waste toner bottle from coming into contact with the intermediate transfer unit (the position shown by the arrow in the illustration below), do not lift the bottle while pulling it straight out. DAC081 136
Pull the waste toner bottle halfway out, hold the bottle firmly, and then pull it out. 6. Maintaining the Machine 5. DAC077 DAC078 To prevent the waste toner bottle from coming into contact with the intermediate transfer unit (the position shown by the arrow in the illustration below), do not lift the bottle while pulling it straight out. DAC081 136

Operating Instructions
Page 139
DAC079 To prevent the waste toner bottle from coming into contact with the intermediate transfer unit (the position shown by the arrow in the illustration below), do not lift the bottle while inserting it halfway into the machine body. 6. Leave the bottle cap open. Close the bottle cap. Holding the center of the new waste toner bottle, carefully insert it . 137 Replacing the Waste Toner Bottle DAC083 DAC082 7.
DAC079 To prevent the waste toner bottle from coming into contact with the intermediate transfer unit (the position shown by the arrow in the illustration below), do not lift the bottle while inserting it halfway into the machine body. 6. Leave the bottle cap open. Close the bottle cap. Holding the center of the new waste toner bottle, carefully insert it . 137 Replacing the Waste Toner Bottle DAC083 DAC082 7.
Operating Instructions
Page 140
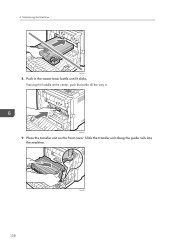
Slide the transfer unit along the guide rails into the machine. 138 DAC086 Pressing the handle at the center, push the bottle all the way in the waste toner bottle until it clicks. Push in . DAC075 9. 6. Place the transfer unit on the front cover. Maintaining the Machine DAC080 8.
Slide the transfer unit along the guide rails into the machine. 138 DAC086 Pressing the handle at the center, push the bottle all the way in the waste toner bottle until it clicks. Push in . DAC075 9. 6. Place the transfer unit on the front cover. Maintaining the Machine DAC080 8.
Operating Instructions
Page 141
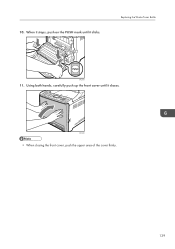
Replacing the Waste Toner Bottle DAC087 11. DAC062 • When closing the front cover, push the upper area of the cover firmly. 139 Using both hands, carefully push up the front cover until it closes. When it stops, push on the PUSH mark until it clicks. 10.
Replacing the Waste Toner Bottle DAC087 11. DAC062 • When closing the front cover, push the upper area of the cover firmly. 139 Using both hands, carefully push up the front cover until it closes. When it stops, push on the PUSH mark until it clicks. 10.
Operating Instructions
Page 176
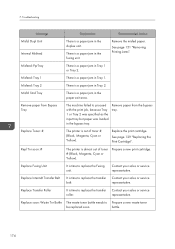
... It is time to replace the transfer Contact your sales or service belt. Replace soon: Waste Tnr Bottle The waste toner bottle needs to replace the transfer Contact your sales or service representative. bottle. 174 See page 151 "Removing Printing Jams". Misfd: Stnd Tray There is a paper ...Tray 1 or Tray 2. Troubleshooting Message Explanation Recommended Action Misfd: Dupl Unit Internal Misfeed There is time to Prepare a new waste toner be replaced soon. Repl Tnr soon: # The printer is a paper jam in the duplex unit. representative. Misfeed: PprTray There is ...
... It is time to replace the transfer Contact your sales or service belt. Replace soon: Waste Tnr Bottle The waste toner bottle needs to replace the transfer Contact your sales or service representative. bottle. 174 See page 151 "Removing Printing Jams". Misfd: Stnd Tray There is a paper ...Tray 1 or Tray 2. Troubleshooting Message Explanation Recommended Action Misfd: Dupl Unit Internal Misfeed There is time to Prepare a new waste toner be replaced soon. Repl Tnr soon: # The printer is a paper jam in the duplex unit. representative. Misfeed: PprTray There is ...
Operating Instructions
Page 177
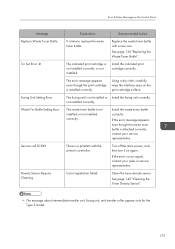
...the interface area on again. If the error message appears even though the waste toner bottle is attached correctly, contact your sales or service representative. Color registration failed. Replace the waste toner bottle with the printer's controller. There is not installed or Install the fusing ...unit correctly. Error & Status Messages on the Control Panel Message Replace Waste Toner Bottle Tnr Set Error: # Fusing Unit Setting Error Waste Tnr Bottle Setting Error Service call SCXXX Density Sensor Require Cleaning Explanation Recommended Action It is not installed...
...the interface area on again. If the error message appears even though the waste toner bottle is attached correctly, contact your sales or service representative. Color registration failed. Replace the waste toner bottle with the printer's controller. There is not installed or Install the fusing ...unit correctly. Error & Status Messages on the Control Panel Message Replace Waste Toner Bottle Tnr Set Error: # Fusing Unit Setting Error Waste Tnr Bottle Setting Error Service call SCXXX Density Sensor Require Cleaning Explanation Recommended Action It is not installed...
Operating Instructions
Page 191
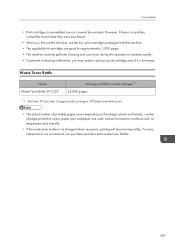
For easy replacement, we recommend you purchase and store extra waste toner bottles. 189 Waste Toner Bottle Name Waste Toner Bottle SP C220 Average printable number of pages*1 25,000 pages *1 A4/Letter 5% test chart, 3 pages per job, printing in 50% black and white/color. &#...density, number of pages printed at a time, paper type and paper size used, and environmental conditions such as temperature and humidity. • If the waste toner bottle is not empty. However, if there is a problem, contact the store where they were purchased. • When you first use this machine, use the...
For easy replacement, we recommend you purchase and store extra waste toner bottles. 189 Waste Toner Bottle Name Waste Toner Bottle SP C220 Average printable number of pages*1 25,000 pages *1 A4/Letter 5% test chart, 3 pages per job, printing in 50% black and white/color. &#...density, number of pages printed at a time, paper type and paper size used, and environmental conditions such as temperature and humidity. • If the waste toner bottle is not empty. However, if there is a problem, contact the store where they were purchased. • When you first use this machine, use the...
Operating Instructions
Page 203
U User code 40 User restriction 8 W Waste toner bottle 134 Web Image Monitor 101 Where to put the machine 22 Wireless LAN settings 119 Wireless LAN setup 34 Wireless settings 119 WPA Supplicant 195 201
U User code 40 User restriction 8 W Waste toner bottle 134 Web Image Monitor 101 Where to put the machine 22 Wireless LAN settings 119 Wireless LAN setup 34 Wireless settings 119 WPA Supplicant 195 201


