

Owners Manual
Page 1
... of injury, the user must read and understand the operator's manual before using this product. Thank you years of rugged, trouble-free performance. OPERATOR'S MANUAL OSCILLATING EDGE BELT/ SPINDLE SANDER EB44241 REMOVE Shown with Spindle Sander attached. REMOVE Shown with Edge Belt Sander attached. aaaa Your Oscillating Edge Belt/Spindle Sander has been engineered and manufactured to RIDGID's high standard for buying...
... of injury, the user must read and understand the operator's manual before using this product. Thank you years of rugged, trouble-free performance. OPERATOR'S MANUAL OSCILLATING EDGE BELT/ SPINDLE SANDER EB44241 REMOVE Shown with Spindle Sander attached. REMOVE Shown with Edge Belt Sander attached. aaaa Your Oscillating Edge Belt/Spindle Sander has been engineered and manufactured to RIDGID's high standard for buying...
Owners Manual
Page 10
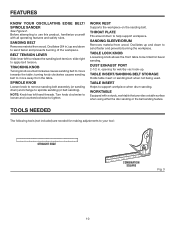
.... 3 10 TOOLS NEEDED The following tools (not included) are needed for wet/dry vac hook-up and down to release the sanding belt tension; Oscillates (3/4 in . Sanding Sleeve/Drum Removes material from wood. FEATURES KNOW YOUR OSCILLATING EDGE BELT/ SPINDLE SANDER See Figure 2. Throat plate Fits around drum to sand faster and prevents burning the workpiece.
.... 3 10 TOOLS NEEDED The following tools (not included) are needed for wet/dry vac hook-up and down to release the sanding belt tension; Oscillates (3/4 in . Sanding Sleeve/Drum Removes material from wood. FEATURES KNOW YOUR OSCILLATING EDGE BELT/ SPINDLE SANDER See Figure 2. Throat plate Fits around drum to sand faster and prevents burning the workpiece.

Owners Manual
Page 11
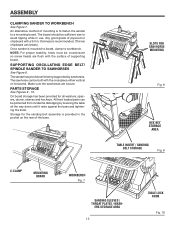
....D. WARNING: Do not attempt to do not operate this tool. ASSEMBLY UNPACKING This product requires assembly. Carefully lift sander from the carton by the base, and place it on a level work surface. n Do not discard the packing material ... when needed. O.D., 5/8 in . O.D. 7/8 in possible serious personal injury. To avoid back injury, lift with your legs, not your tool: Oscillating Edge Belt/Spindle Sander (1) Throat Plates (4) Switch Key Hex Keys (2) Knob Rubber Feet (4) Throat plates SWITCH KEY ...
....D. WARNING: Do not attempt to do not operate this tool. ASSEMBLY UNPACKING This product requires assembly. Carefully lift sander from the carton by the base, and place it on a level work surface. n Do not discard the packing material ... when needed. O.D., 5/8 in . O.D. 7/8 in possible serious personal injury. To avoid back injury, lift with your legs, not your tool: Oscillating Edge Belt/Spindle Sander (1) Throat Plates (4) Switch Key Hex Keys (2) Knob Rubber Feet (4) Throat plates SWITCH KEY ...
Owners Manual
Page 13
... with a 3/4 in. Supporting Oscillating Edge Belt/ Spindle Sander to workbench. The sawhorse can be protected from incidental dislodging by sawhorses. Make sure the sawhorses are flush with the crosspiece either vertical or horizontal. thickness is to fasten the sander to avoid tipping while in the... 10 Storage for being supported by lowering the table all washers, spacers, drums, sleeves and hex keys. The sander has provisions for the sanding belt assembly is mounted to board, clamp to Sawhorses See Figure 8. On board storage has been provided for saw horse...
... with a 3/4 in. Supporting Oscillating Edge Belt/ Spindle Sander to workbench. The sawhorse can be protected from incidental dislodging by sawhorses. Make sure the sawhorses are flush with the crosspiece either vertical or horizontal. thickness is to fasten the sander to avoid tipping while in the... 10 Storage for being supported by lowering the table all washers, spacers, drums, sleeves and hex keys. The sander has provisions for the sanding belt assembly is mounted to board, clamp to Sawhorses See Figure 8. On board storage has been provided for saw horse...

Owners Manual
Page 17
...button to begin sanding without bogging down or binding spindle. n To lock switch in OFF ( O ) position, hold switch in use and keep it away from children and others . Press workpiece against the sanding sleeve or belt hard enough to turn oFF rEMOVE switch key WARNING... power failure, turn on , make sure the sanding belt turns clockwise, when viewed from accidentally starting your work, watch the sander while it makes an unfamiliar noise or vibrates excessively, stop . for the purposes listed below: Oscillating and Rotary Motion - BEFORE FREEING ANY JAMMED MATERIAL: ...
...button to begin sanding without bogging down or binding spindle. n To lock switch in OFF ( O ) position, hold switch in use and keep it away from children and others . Press workpiece against the sanding sleeve or belt hard enough to turn oFF rEMOVE switch key WARNING... power failure, turn on , make sure the sanding belt turns clockwise, when viewed from accidentally starting your work, watch the sander while it makes an unfamiliar noise or vibrates excessively, stop . for the purposes listed below: Oscillating and Rotary Motion - BEFORE FREEING ANY JAMMED MATERIAL: ...

Owners Manual
Page 22
...dust. It is extremely important to periodically clean sanding dust from making a complete oscillation, which may be damaged by the carry handles. GENERAL MAINTENANCE Avoid using this tool...Collection Capability See Figure 27. Sawdust buildup in the table recess may prevent the belt or spindle from the recess in serious personal injury. However, if you do work on ...sander by the worktable or by their respective storage areas. Be careful when transporting to make dustless sanding possible. If operation is acceptable to damage from their use only identical RIDGID...
...dust. It is extremely important to periodically clean sanding dust from making a complete oscillation, which may be damaged by the carry handles. GENERAL MAINTENANCE Avoid using this tool...Collection Capability See Figure 27. Sawdust buildup in the table recess may prevent the belt or spindle from the recess in serious personal injury. However, if you do work on ...sander by the worktable or by their respective storage areas. Be careful when transporting to make dustless sanding possible. If operation is acceptable to damage from their use only identical RIDGID...

Owners Manual
Page 26
... number of the authorized service center nearest you call 1-866-539-1710 or visit us online at www.ridgid.com. OPERATOR'S MANUAL OSCILLATING EDGE BELT/ SPINDLE SANDER EB44241 Customer Service Information: For parts or service, contact your nearest RIDGID authorized service center. For the location of this tool is found on a plate attached to provide all...
... number of the authorized service center nearest you call 1-866-539-1710 or visit us online at www.ridgid.com. OPERATOR'S MANUAL OSCILLATING EDGE BELT/ SPINDLE SANDER EB44241 Customer Service Information: For parts or service, contact your nearest RIDGID authorized service center. For the location of this tool is found on a plate attached to provide all...


