

Owners Manual
Page 1
..., and operator safety. aaaa Your Oscillating Edge Belt/Spindle Sander has been engineered and manufactured to RIDGID's high standard for dependability, ease of injury, the user must read and understand the operator's manual before using this product. OPERATOR'S MANUAL OSCILLATING EDGE BELT/ SPINDLE SANDER EB44241 REMOVE Shown with Spindle Sander attached. REMOVE Shown with Edge Belt Sander attached. SAVE THIS MANUAL FOR FUTURE...
..., and operator safety. aaaa Your Oscillating Edge Belt/Spindle Sander has been engineered and manufactured to RIDGID's high standard for dependability, ease of injury, the user must read and understand the operator's manual before using this product. OPERATOR'S MANUAL OSCILLATING EDGE BELT/ SPINDLE SANDER EB44241 REMOVE Shown with Spindle Sander attached. REMOVE Shown with Edge Belt Sander attached. SAVE THIS MANUAL FOR FUTURE...
Owners Manual
Page 10
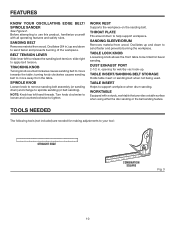
.... NOTE: Knob has left to sand faster and prevents burning of the workpiece. Belt Tension Lever Slide lever left hand threads. Table Lock Knob Loosening knob allows the front table to support workpiece when drum sanding. Oscillates up . FEATURES KNOW YOUR OSCILLATING EDGE BELT/ SPINDLE SANDER See Figure 2. Work rest Supports the workpiece on the sanding...
.... NOTE: Knob has left to sand faster and prevents burning of the workpiece. Belt Tension Lever Slide lever left hand threads. Table Lock Knob Loosening knob allows the front table to support workpiece when drum sanding. Oscillates up . FEATURES KNOW YOUR OSCILLATING EDGE BELT/ SPINDLE SANDER See Figure 2. Work rest Supports the workpiece on the sanding...

Owners Manual
Page 11
... tool carefully to do not operate this tool. O.D. 1/2 in . ASSEMBLY UNPACKING This product requires assembly. Carefully lift sander from the carton by the base, and place it on a level work surface. WARNING: Do not attempt to possible serious personal...possible serious personal injury. n Do not discard the packing material until the missing parts are included with your legs, not your tool: Oscillating Edge Belt/Spindle Sander (1) Throat Plates (4) Switch Key Hex Keys (2) Knob Rubber Feet (4) Throat plates SWITCH...
... tool carefully to do not operate this tool. O.D. 1/2 in . ASSEMBLY UNPACKING This product requires assembly. Carefully lift sander from the carton by the base, and place it on a level work surface. WARNING: Do not attempt to possible serious personal...possible serious personal injury. n Do not discard the packing material until the missing parts are included with your legs, not your tool: Oscillating Edge Belt/Spindle Sander (1) Throat Plates (4) Switch Key Hex Keys (2) Knob Rubber Feet (4) Throat plates SWITCH...
Owners Manual
Page 13
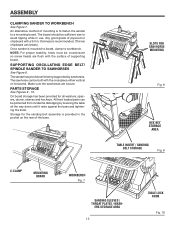
... for all the way down until it rests against the base and tightening the knob. Supporting Oscillating Edge Belt/ Spindle Sander to workbench. The sander has provisions for saw horse mounting Fig. 8 hex key storage area REMOVE table insert / sanding belt storage Fig. 9 C-CLAMP MOUNTING BOARD WORKBENCH aaaa Fig. 7 sanding sleeves / Throat plates / wash- PARTS STORAGE...
... for all the way down until it rests against the base and tightening the knob. Supporting Oscillating Edge Belt/ Spindle Sander to workbench. The sander has provisions for saw horse mounting Fig. 8 hex key storage area REMOVE table insert / sanding belt storage Fig. 9 C-CLAMP MOUNTING BOARD WORKBENCH aaaa Fig. 7 sanding sleeves / Throat plates / wash- PARTS STORAGE...

Owners Manual
Page 17
...children and others . CAUTION: Before turning switch on edges, faces, contours, inside and outside curves. Unplug the sander. Do not restart until the unit comes to turn... glasses with one hand. Press workpiece against the sanding sleeve or belt hard enough to stop. BEFORE LEAVING THE SANDER n Turn switch off . Don't leave tool until identifying and ...lever in Fig. 17 WHEN SANDER IS RUNNING Before starting when power returns. OPERATION WARNING: Do not allow familiarity with other hand. n Wait for the purposes listed below: Oscillating and Rotary Motion - Disconnect...
...children and others . CAUTION: Before turning switch on edges, faces, contours, inside and outside curves. Unplug the sander. Do not restart until the unit comes to turn... glasses with one hand. Press workpiece against the sanding sleeve or belt hard enough to stop. BEFORE LEAVING THE SANDER n Turn switch off . Don't leave tool until identifying and ...lever in Fig. 17 WHEN SANDER IS RUNNING Before starting when power returns. OPERATION WARNING: Do not allow familiarity with other hand. n Wait for the purposes listed below: Oscillating and Rotary Motion - Disconnect...

Owners Manual
Page 26
The model number of the authorized service center nearest you call 1-866-539-1710 or visit us online at www.ridgid.com. Be sure to the motor housing. When ordering repair parts, always give the following information: Model No. Please record the serial number in the ... on a plate attached to provide all relevant information when you , please call or visit. EB44241 Serial No. 983000-482 1-30-08 (REV: 01) OPERATOR'S MANUAL OSCILLATING EDGE BELT/ SPINDLE SANDER EB44241 Customer Service Information: For parts or service, contact your nearest RIDGID authorized service center.
The model number of the authorized service center nearest you call 1-866-539-1710 or visit us online at www.ridgid.com. Be sure to the motor housing. When ordering repair parts, always give the following information: Model No. Please record the serial number in the ... on a plate attached to provide all relevant information when you , please call or visit. EB44241 Serial No. 983000-482 1-30-08 (REV: 01) OPERATOR'S MANUAL OSCILLATING EDGE BELT/ SPINDLE SANDER EB44241 Customer Service Information: For parts or service, contact your nearest RIDGID authorized service center.


