

Owners Manual
Page 4
...sleeves or belts which show visual signs of your body in . Use of any part of wear such as those dust masks that are included with directional arrows. Save these exposures varies, depending on the sander table at a time. Always feed workpiece from left to power supply...very small or awkward workpieces. Never use this manual or addendums. Use of personal injury. Refer to them frequently and use of your sander) to instruct others who may cause the risk of accessories that are : • lead from lead-based paints, • crystalline silica from...
...sleeves or belts which show visual signs of your body in . Use of any part of wear such as those dust masks that are included with directional arrows. Save these exposures varies, depending on the sander table at a time. Always feed workpiece from left to power supply...very small or awkward workpieces. Never use this manual or addendums. Use of personal injury. Refer to them frequently and use of your sander) to instruct others who may cause the risk of accessories that are : • lead from lead-based paints, • crystalline silica from...

Owners Manual
Page 11
LOOSE PARTS The following items are included with your legs, not your tool: Oscillating Edge Belt/Spindle Sander (1) Throat Plates (4) Switch Key Hex Keys (2) Knob Rubber Feet (4) Throat plates SWITCH KEY Flat Washers (4),1-3/4... . O.D., 7/8 in . Failure to make sure no breakage or damage occurred during shipping. ASSEMBLY UNPACKING This product requires assembly. Carefully lift sander from the carton by the base, and place it on a level work surface. To avoid back injury, lift with your back, and get help...
LOOSE PARTS The following items are included with your legs, not your tool: Oscillating Edge Belt/Spindle Sander (1) Throat Plates (4) Switch Key Hex Keys (2) Knob Rubber Feet (4) Throat plates SWITCH KEY Flat Washers (4),1-3/4... . O.D., 7/8 in . Failure to make sure no breakage or damage occurred during shipping. ASSEMBLY UNPACKING This product requires assembly. Carefully lift sander from the carton by the base, and place it on a level work surface. To avoid back injury, lift with your back, and get help...

Owners Manual
Page 12
n From the parts bag locate the four rubber feet. CAUTION: To reduce the risk of injury from tool movement, the supporting surface where sander is to be fastened securely to a firm supporting surface, such as a workbench, with screws n Drive four 2-1/2 in. moUNTING SANDER To Workbench See Figure .... Fastening with holes drilled in workbench. plus the thickness of the base is noticed, secure to workbench or supporting surface before operating sander. diameter bolts and washers and attach nuts securely. Do not overtighten the screws. DRYWALL SCREW WASHER NUT RUBBER FEET Fig. 5 1/4...
n From the parts bag locate the four rubber feet. CAUTION: To reduce the risk of injury from tool movement, the supporting surface where sander is to be fastened securely to a firm supporting surface, such as a workbench, with screws n Drive four 2-1/2 in. moUNTING SANDER To Workbench See Figure .... Fastening with holes drilled in workbench. plus the thickness of the base is noticed, secure to workbench or supporting surface before operating sander. diameter bolts and washers and attach nuts securely. Do not overtighten the screws. DRYWALL SCREW WASHER NUT RUBBER FEET Fig. 5 1/4...
Owners Manual
Page 13
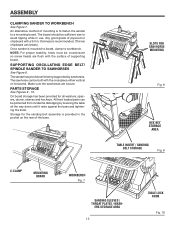
...for all the way down until it rests against the base and tightening the knob. The sander has provisions for the sanding belt assembly is provided in the pocket on the rear of supporting board. PARTS STORAGE See Figures 9 - 10. ers storage area 13 table lock knob Fig. 10 The... be countersunk so screw heads are secure. NOTE: For proper stability, holes must be sufficient size to Sawhorses See Figure 8. All front loaded parts can be protected from incidental dislodging by sawhorses. On board storage has been provided for saw horse mounting Fig. 8 hex key storage area REMOVE...
...for all the way down until it rests against the base and tightening the knob. The sander has provisions for the sanding belt assembly is provided in the pocket on the rear of supporting board. PARTS STORAGE See Figures 9 - 10. ers storage area 13 table lock knob Fig. 10 The... be countersunk so screw heads are secure. NOTE: For proper stability, holes must be sufficient size to Sawhorses See Figure 8. All front loaded parts can be protected from incidental dislodging by sawhorses. On board storage has been provided for saw horse mounting Fig. 8 hex key storage area REMOVE...

Owners Manual
Page 17
... MATERIAL: n Turn switch OFF ( O ). Disconnect master switches. This action will perform better and safer at its designed rate. Before using the sander, make you careless. OPERATION WARNING: Do not allow familiarity with your eyes, resulting in possible serious injury. Failure to stop . The ON-OFF ...RUNNING Before starting when power returns. switch key switch lIFT switch APPLICATIONS This product has been designed only for all moving parts to do so could result in use the tool. n Lift the switch button to turn on WARNING: Always wear safety...
... MATERIAL: n Turn switch OFF ( O ). Disconnect master switches. This action will perform better and safer at its designed rate. Before using the sander, make you careless. OPERATION WARNING: Do not allow familiarity with your eyes, resulting in possible serious injury. Failure to stop . The ON-OFF ...RUNNING Before starting when power returns. switch key switch lIFT switch APPLICATIONS This product has been designed only for all moving parts to do so could result in use the tool. n Lift the switch button to turn on WARNING: Always wear safety...

Owners Manual
Page 19
However, inside curves larger than 1-1/2 in the spindle mode. It is an integral part of the sanding sleeve sands against the workpiece. The sanding sleeve rotates clockwise. When fed from left to right as shown. end sanding REMOVE curved ... from the sanding sleeve. If fed in the opposite direction, the rotation forces of workpiece or possible injury. Inside curves are best sanded with the sander assembled in . WARNING: To prevent thrown workpiece, feed workpiece against the sanding sleeve from left to right, the rotation of the belt tracking mechanism. Sanding...
However, inside curves larger than 1-1/2 in the spindle mode. It is an integral part of the sanding sleeve sands against the workpiece. The sanding sleeve rotates clockwise. When fed from left to right as shown. end sanding REMOVE curved ... from the sanding sleeve. If fed in the opposite direction, the rotation forces of workpiece or possible injury. Inside curves are best sanded with the sander assembled in . WARNING: To prevent thrown workpiece, feed workpiece against the sanding sleeve from left to right, the rotation of the belt tracking mechanism. Sanding...

Owners Manual
Page 22
... Sawdust buildup in serious personal injury. Most plastics are highly abrasive to periodically clean sanding dust from their use only identical RIDGID replacement parts. Therefore, no further lubrication is dusty, also wear a dust mask. Dust Collection Capability See Figure 27. However, if...and upper spindle washers from the recess in . A standard 2-1/2 in the table. Be careful when transporting to lift and carry sander by the worktable or by their respective storage areas. LUBRICATION All of the bearings in a portable application, it is not recommended ...
... Sawdust buildup in serious personal injury. Most plastics are highly abrasive to periodically clean sanding dust from their use only identical RIDGID replacement parts. Therefore, no further lubrication is dusty, also wear a dust mask. Dust Collection Capability See Figure 27. However, if...and upper spindle washers from the recess in . A standard 2-1/2 in the table. Be careful when transporting to lift and carry sander by the worktable or by their respective storage areas. LUBRICATION All of the bearings in a portable application, it is not recommended ...

Owners Manual
Page 24
...Incorrect fuses or circuit breakers in power line. 3. Relay not operating. 1. travel 1. Consult Authorized Service Center. Motor gearbox not operating sander will not run 1. when it is done by a qualified service technician. 24 Motor overheats Motor stalls (resulting in . Motor relay... may create a hazard unless repair is done by a qualified service technician. Damaged On-Off Switch/Cord. 2. Replace damaged parts before using sander. 2. Consult Authorized Service Center. Applying too much pressure to motor or low voltage. 1. Tighten spindle knob. 1. Spindle ...
...Incorrect fuses or circuit breakers in power line. 3. Relay not operating. 1. travel 1. Consult Authorized Service Center. Motor gearbox not operating sander will not run 1. when it is done by a qualified service technician. 24 Motor overheats Motor stalls (resulting in . Motor relay... may create a hazard unless repair is done by a qualified service technician. Damaged On-Off Switch/Cord. 2. Replace damaged parts before using sander. 2. Consult Authorized Service Center. Applying too much pressure to motor or low voltage. 1. Tighten spindle knob. 1. Spindle ...

Owners Manual
Page 26
.... The model number of the authorized service center nearest you call 1-866-539-1710 or visit us online at www.ridgid.com. Be sure to the motor housing. When ordering repair parts, always give the following information: Model No. EB44241 Serial No. 983000-482 1-30-08 (REV: 01) For the location... this tool is found on a plate attached to provide all relevant information when you , please call or visit. OPERATOR'S MANUAL OSCILLATING EDGE BELT/ SPINDLE SANDER EB44241 Customer Service Information: For parts or service, contact your nearest RIDGID authorized service center.
.... The model number of the authorized service center nearest you call 1-866-539-1710 or visit us online at www.ridgid.com. Be sure to the motor housing. When ordering repair parts, always give the following information: Model No. EB44241 Serial No. 983000-482 1-30-08 (REV: 01) For the location... this tool is found on a plate attached to provide all relevant information when you , please call or visit. OPERATOR'S MANUAL OSCILLATING EDGE BELT/ SPINDLE SANDER EB44241 Customer Service Information: For parts or service, contact your nearest RIDGID authorized service center.


