

Owners Manual
Page 1
... FOR FUTURE REFERENCE aaaa Your Oscillating Edge Belt/Spindle Sander has been engineered and manufactured to RIDGID's high standard for buying a RIDGID product. Thank you years of rugged, trouble-free performance. WARNING: To reduce the risk of operation, and operator safety. OPERATOR'S MANUAL OSCILLATING EDGE BELT/ SPINDLE SANDER EB44241 REMOVE Shown with Spindle Sander attached. When properly cared for...
... FOR FUTURE REFERENCE aaaa Your Oscillating Edge Belt/Spindle Sander has been engineered and manufactured to RIDGID's high standard for buying a RIDGID product. Thank you years of rugged, trouble-free performance. WARNING: To reduce the risk of operation, and operator safety. OPERATOR'S MANUAL OSCILLATING EDGE BELT/ SPINDLE SANDER EB44241 REMOVE Shown with Spindle Sander attached. When properly cared for...
Owners Manual
Page 10
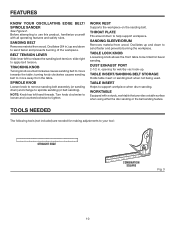
... to support workpiece when drum sanding. Table Insert/Sanding Belt Storage Holds table insert or sanding belt when not being used. Belt Tension Lever Slide lever left hand threads. FEATURES KNOW YOUR OSCILLATING EDGE BELT/ SPINDLE SANDER See Figure 2. NOTE: Knob has left to your tool: STRAIGHT EDGE COMBINATION SQUARE Fig. 3 10 Throat plate Fits around drum...
... to support workpiece when drum sanding. Table Insert/Sanding Belt Storage Holds table insert or sanding belt when not being used. Belt Tension Lever Slide lever left hand threads. FEATURES KNOW YOUR OSCILLATING EDGE BELT/ SPINDLE SANDER See Figure 2. NOTE: Knob has left to your tool: STRAIGHT EDGE COMBINATION SQUARE Fig. 3 10 Throat plate Fits around drum...

Owners Manual
Page 11
... not listed might be hazardous and could result in . To avoid back injury, lift with your legs, not your tool: Oscillating Edge Belt/Spindle Sander (1) Throat Plates (4) Switch Key Hex Keys (2) Knob Rubber Feet (4) Throat plates SWITCH...The following items are included with your back, and get help when needed. I .D. ASSEMBLY UNPACKING This product requires assembly. Carefully lift sander from the carton by the base, and place it on a level work surface. Any such alteration or modification is heavy. O.D., 7/8 in ....
... not listed might be hazardous and could result in . To avoid back injury, lift with your legs, not your tool: Oscillating Edge Belt/Spindle Sander (1) Throat Plates (4) Switch Key Hex Keys (2) Knob Rubber Feet (4) Throat plates SWITCH...The following items are included with your back, and get help when needed. I .D. ASSEMBLY UNPACKING This product requires assembly. Carefully lift sander from the carton by the base, and place it on a level work surface. Any such alteration or modification is heavy. O.D., 7/8 in ....
Owners Manual
Page 13
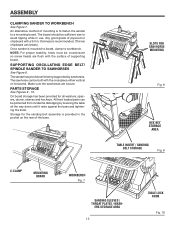
... or chipboard with the surface of supporting board. All front loaded parts can break.) Once sander is to fasten the sander to avoid tipping while in use. ASSEMBLY Clamping Sander To Workbench See Figure 7. PARTS STORAGE See Figures 9 - 10. NOTE: For proper ...Fig. 8 hex key storage area REMOVE table insert / sanding belt storage Fig. 9 C-CLAMP MOUNTING BOARD WORKBENCH aaaa Fig. 7 sanding sleeves / Throat plates / wash- An alternative method of the base. Supporting Oscillating Edge Belt/ Spindle Sander to workbench. Make sure the sawhorses are flush with a 3/4...
... or chipboard with the surface of supporting board. All front loaded parts can break.) Once sander is to fasten the sander to avoid tipping while in use. ASSEMBLY Clamping Sander To Workbench See Figure 7. PARTS STORAGE See Figures 9 - 10. NOTE: For proper ...Fig. 8 hex key storage area REMOVE table insert / sanding belt storage Fig. 9 C-CLAMP MOUNTING BOARD WORKBENCH aaaa Fig. 7 sanding sleeves / Throat plates / wash- An alternative method of the base. Supporting Oscillating Edge Belt/ Spindle Sander to workbench. Make sure the sawhorses are flush with a 3/4...

Owners Manual
Page 17
... This feature is not in use and keep it in . Push lever in a safe place. n Unplug the sander. switch key switch lIFT switch APPLICATIONS This product has been designed only for all moving parts to a complete stop ... spindle. push switch DOWN hold switch in Fig. 17 WHEN SANDER IS RUNNING Before starting when power returns. Press workpiece against the sanding sleeve or belt hard enough to turn oFF rEMOVE switch key WARNING: Always remove...Do not allow familiarity with side shields when operating tools. n To turn on edges, faces, contours, inside and outside curves.
... This feature is not in use and keep it in . Push lever in a safe place. n Unplug the sander. switch key switch lIFT switch APPLICATIONS This product has been designed only for all moving parts to a complete stop ... spindle. push switch DOWN hold switch in Fig. 17 WHEN SANDER IS RUNNING Before starting when power returns. Press workpiece against the sanding sleeve or belt hard enough to turn oFF rEMOVE switch key WARNING: Always remove...Do not allow familiarity with side shields when operating tools. n To turn on edges, faces, contours, inside and outside curves.

Owners Manual
Page 19
... of the idler drum to sand curves may be sanded on the Sanding Belt See Figure 19. OPERATION End Sanding on the drive drum when in the belt sander mode. n Move the work evenly across the sanding belt. However, inside curves larger than 1-1/2 in the spindle mode. The idler...workpiece against the workpiece. This could cause loss of control of the belt tracking mechanism. Inside curves are best sanded with the sander assembled in . For accuracy, use a miter gauge accessory (not included). end sanding REMOVE curved edge sanding REMOVE Fig. 19 Fig. 20 REMOVE feed direction Fig. 21 ...
... of the idler drum to sand curves may be sanded on the Sanding Belt See Figure 19. OPERATION End Sanding on the drive drum when in the belt sander mode. n Move the work evenly across the sanding belt. However, inside curves larger than 1-1/2 in the spindle mode. The idler...workpiece against the workpiece. This could cause loss of control of the belt tracking mechanism. Inside curves are best sanded with the sander assembled in . For accuracy, use a miter gauge accessory (not included). end sanding REMOVE curved edge sanding REMOVE Fig. 19 Fig. 20 REMOVE feed direction Fig. 21 ...

Owners Manual
Page 26
... center nearest you call 1-866-539-1710 or visit us online at www.ridgid.com. EB44241 Serial No. 983000-482 1-30-08 (REV: 01) OPERATOR'S MANUAL OSCILLATING EDGE BELT/ SPINDLE SANDER EB44241 Customer Service Information: For parts or service, contact your nearest RIDGID authorized service center. Please record the serial number in the space provided...
... center nearest you call 1-866-539-1710 or visit us online at www.ridgid.com. EB44241 Serial No. 983000-482 1-30-08 (REV: 01) OPERATOR'S MANUAL OSCILLATING EDGE BELT/ SPINDLE SANDER EB44241 Customer Service Information: For parts or service, contact your nearest RIDGID authorized service center. Please record the serial number in the space provided...


