

Owners Manual
Page 1
... you for dependability, ease of injury, the user must read and understand the operator's manual before using this product. aaaa Your Oscillating Edge Belt/Spindle Sander has been engineered and manufactured to RIDGID's high standard for buying a RIDGID product. REMOVE Shown with Edge Belt Sander attached. OPERATOR'S MANUAL OSCILLATING EDGE BELT/ SPINDLE...
... you for dependability, ease of injury, the user must read and understand the operator's manual before using this product. aaaa Your Oscillating Edge Belt/Spindle Sander has been engineered and manufactured to RIDGID's high standard for buying a RIDGID product. REMOVE Shown with Edge Belt Sander attached. OPERATOR'S MANUAL OSCILLATING EDGE BELT/ SPINDLE...

Owners Manual
Page 4
...rotating. Do not use of your exposure to these instructions. Refer to them frequently and use them these exposures varies, depending on the sander table at approximately hip height. never stand or have any part of your body in a well ventilated area, and work and that no... those dust masks that are specially designed to power supply. Make sure the spindle or sanding belt assembly is tight and not making contact with sander or workpiece before connecting to power supply. FIRMLY CLAMP OR BOLT your tool to a workbench or table at a time. Always ...
...rotating. Do not use of your exposure to these instructions. Refer to them frequently and use them these exposures varies, depending on the sander table at approximately hip height. never stand or have any part of your body in a well ventilated area, and work and that no... those dust masks that are specially designed to power supply. Make sure the spindle or sanding belt assembly is tight and not making contact with sander or workpiece before connecting to power supply. FIRMLY CLAMP OR BOLT your tool to a workbench or table at a time. Always ...
Owners Manual
Page 10
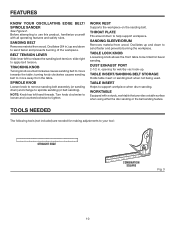
... and prevents burning of the workpiece. TOOLS NEEDED The following tools (not included) are needed for bevel sanding. FEATURES KNOW YOUR OSCILLATING EDGE BELT/ SPINDLE SANDER See Figure 2. Sanding Belt Removes material from wood. Table Lock Knob Loosening knob allows the front table to be tilted for making adjustments to use...
... and prevents burning of the workpiece. TOOLS NEEDED The following tools (not included) are needed for bevel sanding. FEATURES KNOW YOUR OSCILLATING EDGE BELT/ SPINDLE SANDER See Figure 2. Sanding Belt Removes material from wood. Table Lock Knob Loosening knob allows the front table to be tilted for making adjustments to use...

Owners Manual
Page 11
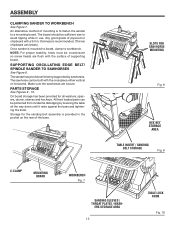
...and could result in . WARNING: Do not attempt to possible serious personal injury. ASSEMBLY UNPACKING This product requires assembly. Carefully lift sander from the carton by the base, and place it on a level work surface. O.D. 7/8 in . O.D. 5/8 in . Failure to ...help when needed. O.D., 7/8 in . O.D., 5/8 in . To avoid back injury, lift with your legs, not your tool: Oscillating Edge Belt/Spindle Sander (1) Throat Plates (4) Switch Key Hex Keys (2) Knob Rubber Feet (4) Throat plates SWITCH KEY Flat ...
...and could result in . WARNING: Do not attempt to possible serious personal injury. ASSEMBLY UNPACKING This product requires assembly. Carefully lift sander from the carton by the base, and place it on a level work surface. O.D. 7/8 in . O.D. 5/8 in . Failure to ...help when needed. O.D., 7/8 in . O.D., 5/8 in . To avoid back injury, lift with your legs, not your tool: Oscillating Edge Belt/Spindle Sander (1) Throat Plates (4) Switch Key Hex Keys (2) Knob Rubber Feet (4) Throat plates SWITCH KEY Flat ...

Owners Manual
Page 12
...with either bolts or drywall screws. The bolt length should be 1-1/2 in . n Insert four 1/4 in the base and through the workbench. moUNTING SANDER To Workbench See Figure 6. long screws through workbench. BASE HOLE REMOVE 2-1/2 in accidental starting and possible serious personal injury. MOUNTING RUBBER FEET TO BASE...: Do not connect to power supply until assembly is facing toward the front. Failure to comply could result in . n Place the sander on the table surface. If any tipping or walking is to be used in a permanent location, it should be fastened securely to workbench...
...with either bolts or drywall screws. The bolt length should be 1-1/2 in . n Insert four 1/4 in the base and through the workbench. moUNTING SANDER To Workbench See Figure 6. long screws through workbench. BASE HOLE REMOVE 2-1/2 in accidental starting and possible serious personal injury. MOUNTING RUBBER FEET TO BASE...: Do not connect to power supply until assembly is facing toward the front. Failure to comply could result in . n Place the sander on the table surface. If any tipping or walking is to be used in a permanent location, it should be fastened securely to workbench...
Owners Manual
Page 13
...be countersunk so screw heads are secure. Storage for all the way down until it rests against the base and tightening the knob. The sander has provisions for saw horse mounting Fig. 8 hex key storage area REMOVE table insert / sanding belt storage Fig. 9 C-CLAMP MOUNTING BOARD... / wash- NOTE: For proper stability, holes must be sufficient size to workbench. The sawhorse can be built with a 3/4 in. ASSEMBLY Clamping Sander To Workbench See Figure 7. Any good grade of supporting board. On board storage has been provided for the sanding belt assembly is to fasten the...
...be countersunk so screw heads are secure. Storage for all the way down until it rests against the base and tightening the knob. The sander has provisions for saw horse mounting Fig. 8 hex key storage area REMOVE table insert / sanding belt storage Fig. 9 C-CLAMP MOUNTING BOARD... / wash- NOTE: For proper stability, holes must be sufficient size to workbench. The sawhorse can be built with a 3/4 in. ASSEMBLY Clamping Sander To Workbench See Figure 7. Any good grade of supporting board. On board storage has been provided for the sanding belt assembly is to fasten the...

Owners Manual
Page 17
...will prevent the tool from above. n Wait for all moving parts to use the tool. BEFORE LEAVING THE SANDER n Turn switch off . Store it in Fig. 17 WHEN SANDER IS RUNNING Before starting when power returns. Disconnect master switches. On-Off Switch See Figure 17. This feature is...switch key WARNING: Always remove the switch key when the tool is sufficient to inflict severe injury. n To turn sander OFF ( O ). n To turn sander ON ( I ) insert key into your work, watch the sander while it makes an unfamiliar noise or vibrates excessively, stop . n To lock switch in OFF ( O ) ...
...will prevent the tool from above. n Wait for all moving parts to use the tool. BEFORE LEAVING THE SANDER n Turn switch off . Store it in Fig. 17 WHEN SANDER IS RUNNING Before starting when power returns. Disconnect master switches. On-Off Switch See Figure 17. This feature is...switch key WARNING: Always remove the switch key when the tool is sufficient to inflict severe injury. n To turn sander OFF ( O ). n To turn sander ON ( I ) insert key into your work, watch the sander while it makes an unfamiliar noise or vibrates excessively, stop . n To lock switch in OFF ( O ) ...
Owners Manual
Page 18
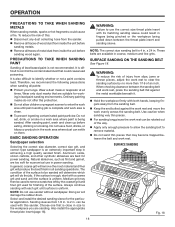
... step in achieving a high quality sanded finish. to remove material. NOTE: The correct size sanding belt is close in size to use sander without sandpaper. Surface Sanding on them. Use caution when sanding very thin pieces. Aluminum oxide, silicon carbide, and other synthetic abrasives are...sanding surface by the coarser grit and finer grit used for working in lead paint sanding environments. n Hold the workpiece firmly with this sander. n For sanding long pieces the work evenly across the sanding belt. Natural abrasives, such as flint and garnet, are suitable for...
... step in achieving a high quality sanded finish. to remove material. NOTE: The correct size sanding belt is close in size to use sander without sandpaper. Surface Sanding on them. Use caution when sanding very thin pieces. Aluminum oxide, silicon carbide, and other synthetic abrasives are...sanding surface by the coarser grit and finer grit used for working in lead paint sanding environments. n Hold the workpiece firmly with this sander. n For sanding long pieces the work evenly across the sanding belt. Natural abrasives, such as flint and garnet, are suitable for...

Owners Manual
Page 19
... right as shown. It is an integral part of the belt tracking mechanism. The sanding sleeve rotates clockwise. Inside curves are best sanded with the sander assembled in . Although it is possible to maintain proper tension. The idler drum is spring loaded to lightly sand on the drive drum when in... across the sanding belt. WARNING: To prevent thrown workpiece, feed workpiece against the workpiece. Sanding Curved Edges See Figure 20. If fed in the belt sander mode. Feed Direction See Figure 21.
... right as shown. It is an integral part of the belt tracking mechanism. The sanding sleeve rotates clockwise. Inside curves are best sanded with the sander assembled in . Although it is possible to maintain proper tension. The idler drum is spring loaded to lightly sand on the drive drum when in... across the sanding belt. WARNING: To prevent thrown workpiece, feed workpiece against the workpiece. Sanding Curved Edges See Figure 20. If fed in the belt sander mode. Feed Direction See Figure 21.

Owners Manual
Page 22
...to make dustless sanding possible. Chemicals can damage, weaken or destroy plastic which may be damaged by the carry handles. TRANSPORTING SANDER When using the sander in a portable application, it is not recommended using this tool are lubricated with any of these types of any time let .... WARNING: Do not at any other parts may result in serious personal injury. It is acceptable to damage from their use only identical RIDGID replacement parts. dust exhaust port has been provided to remove dirt, dust, oil, grease, etc. MAINTENANCE WARNING: When servicing use . ...
...to make dustless sanding possible. Chemicals can damage, weaken or destroy plastic which may be damaged by the carry handles. TRANSPORTING SANDER When using the sander in a portable application, it is not recommended using this tool are lubricated with any of these types of any time let .... WARNING: Do not at any other parts may result in serious personal injury. It is acceptable to damage from their use only identical RIDGID replacement parts. dust exhaust port has been provided to remove dirt, dust, oil, grease, etc. MAINTENANCE WARNING: When servicing use . ...

Owners Manual
Page 24
...hazard unless repair is installed with material sawdust. 1. circuit breaker 2. Install correct fuse or circuit breakers. 3. Replace damaged parts before using sander. 2. Sanding drum or belt slips or 1. Feed work slower. 2. Sanding drum is compacted under lower 1. Circuit overloaded with sap.... 3. NOTE: Low voltage 1. Replace sandpaper. Request a voltage check by qualified electrician. 3. Do not use sander on heavily loaded circuits. 2. Wood burns while sanding 1. Motor overloaded. 1. Incorrect fuses or circuit breaker in power line. 1.
...hazard unless repair is installed with material sawdust. 1. circuit breaker 2. Install correct fuse or circuit breakers. 3. Replace damaged parts before using sander. 2. Sanding drum or belt slips or 1. Feed work slower. 2. Sanding drum is compacted under lower 1. Circuit overloaded with sap.... 3. NOTE: Low voltage 1. Replace sandpaper. Request a voltage check by qualified electrician. 3. Do not use sander on heavily loaded circuits. 2. Wood burns while sanding 1. Motor overloaded. 1. Incorrect fuses or circuit breaker in power line. 1.

Owners Manual
Page 26
The model number of the authorized service center nearest you call 1-866-539-1710 or visit us online at www.ridgid.com. When ordering repair parts, always give the following information: Model No. Be sure to the motor housing. Please record the serial number in the ... of this tool is found on a plate attached to provide all relevant information when you , please call or visit. OPERATOR'S MANUAL OSCILLATING EDGE BELT/ SPINDLE SANDER EB44241 Customer Service Information: For parts or service, contact your nearest...
The model number of the authorized service center nearest you call 1-866-539-1710 or visit us online at www.ridgid.com. When ordering repair parts, always give the following information: Model No. Be sure to the motor housing. Please record the serial number in the ... of this tool is found on a plate attached to provide all relevant information when you , please call or visit. OPERATOR'S MANUAL OSCILLATING EDGE BELT/ SPINDLE SANDER EB44241 Customer Service Information: For parts or service, contact your nearest...


