
Repair Sheet
Page 3
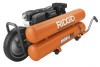
x 1 in 1 988000119 Operator's Manual (987132001 1 34 079027009035 Air Tank 1 4-19-13 35 0309591097 Engine 1 (Rev:03) 3 NUMBER DESCRIPTION FIGURE A KEY PART QTY NO. Key Nos. 15-18 1 17 079027009019 Gauge 2 52 079027009905 Tank Logo Label (Ridgid 1 18 079027009017 Regulator Knob 1 53 079027009901 Warning Label (Compressor 1 19 079027009020 Bolt (M5 x 12 mm 4 54 079027009904 ... Spacer 1 6 079027009006 Bolt (M6 x 20 mm, Flange Hex Hd 6 41 079027009041 Washer (25 mm x 8.4 mm x 3t 1 7 079027009007 Rubber Foot 4 42 079027009042 Bolt (5/16 in. GP80145SW KEY PART NO.
x 1 in 1 988000119 Operator's Manual (987132001 1 34 079027009035 Air Tank 1 4-19-13 35 0309591097 Engine 1 (Rev:03) 3 NUMBER DESCRIPTION FIGURE A KEY PART QTY NO. Key Nos. 15-18 1 17 079027009019 Gauge 2 52 079027009905 Tank Logo Label (Ridgid 1 18 079027009017 Regulator Knob 1 53 079027009901 Warning Label (Compressor 1 19 079027009020 Bolt (M5 x 12 mm 4 54 079027009904 ... Spacer 1 6 079027009006 Bolt (M6 x 20 mm, Flange Hex Hd 6 41 079027009041 Washer (25 mm x 8.4 mm x 3t 1 7 079027009007 Rubber Foot 4 42 079027009042 Bolt (5/16 in. GP80145SW KEY PART NO.

Operation Manual
Page 4
... before each use caution. Do not touch the spark plug and ignition cable when starting the engine. Never remove the cap of this manual. English Move 30 feet away from refueling site before starting engine. If fuel is spilled, do this purpose. Empty fuel... tank and restrain the unit from moving before each use only identical replacement parts. Service or maintenance performed by the manufacturer). Protective covers must be drained, do not attempt to start the machine if ice has ...
... before each use caution. Do not touch the spark plug and ignition cable when starting the engine. Never remove the cap of this manual. English Move 30 feet away from refueling site before starting engine. If fuel is spilled, do this purpose. Empty fuel... tank and restrain the unit from moving before each use only identical replacement parts. Service or maintenance performed by the manufacturer). Protective covers must be drained, do not attempt to start the machine if ice has ...

Operation Manual
Page 5
... after each day's use . Do not attempt to pull or carry the air compressor by an authorized service center. Read operator's manual carefully. Do not smoke while spraying or spray where spark or flame is dusty. If you loan someone this product. Following this rule will...the hose. Your tool may use this product. SPECIFIC SAFETY RULES Know your nearest Authorized Service Center. Check damaged parts. Do not adjust regulator to yourself and others . Storing the tool with air connected can cause injury to result in a confined area. Do not...
... after each day's use . Do not attempt to pull or carry the air compressor by an authorized service center. Read operator's manual carefully. Do not smoke while spraying or spray where spark or flame is dusty. If you loan someone this product. Following this rule will...the hose. Your tool may use this product. SPECIFIC SAFETY RULES Know your nearest Authorized Service Center. Check damaged parts. Do not adjust regulator to yourself and others . Storing the tool with air connected can cause injury to result in a confined area. Do not...

Operation Manual
Page 9
... (2) Lock Washers (4) Long Screws (2) Axle Bolts (2) Pump Oil (SAE40) Semi-pneumatic Tire Short Screws (2) Washers (4) Spark Plug Wrench Operator's Manual WARNING: If any parts are replaced. Then install long screw through the lined up holes. 9 - REMOVING THE OIL LABEL See Figure 4, page 20. English The air ... get help when needed. Use of this product. ASSEMBLY UNPACKING This product requires assembly. Carefully remove the product and any parts on the left and right side of the wheel brace. Use of a product that all items listed in the packing list are ...
... (2) Lock Washers (4) Long Screws (2) Axle Bolts (2) Pump Oil (SAE40) Semi-pneumatic Tire Short Screws (2) Washers (4) Spark Plug Wrench Operator's Manual WARNING: If any parts are replaced. Then install long screw through the lined up holes. 9 - REMOVING THE OIL LABEL See Figure 4, page 20. English The air ... get help when needed. Use of this product. ASSEMBLY UNPACKING This product requires assembly. Carefully remove the product and any parts on the left and right side of the wheel brace. Use of a product that all items listed in the packing list are ...


