

Operation Manual
Page 11
... make sure your workpiece is not in serious personal injury. WARNING: ALWAYS make sure the switch is not in use by an insert called the throat plate. FEATURES OPERATING COMPONENTS The upper portion of this warning may cause the workpiece to turn OFF ( O ). Detailed instructions are provided in the Operation section of...
... make sure your workpiece is not in serious personal injury. WARNING: ALWAYS make sure the switch is not in use by an insert called the throat plate. FEATURES OPERATING COMPONENTS The upper portion of this warning may cause the workpiece to turn OFF ( O ). Detailed instructions are provided in the Operation section of...

Operation Manual
Page 20
...knife that may require adjustment is above the saw table. To place in the "down" position for all non-through cutting: Remove the throat plate. Raise the saw blade by turning the height adjusting knob clockwise. Unlock the release lever by : 1)Unlocking the blade height ... IN DOWN POSITION FOR NON-THROUGH CUTTING Fig. 21 Push the riving knife down position for non-through cutting: Remove the throat plate. Raise the saw blade by turning the height adjusting knob clockwise. Unlock the release lever by pulling it up. ...
...knife that may require adjustment is above the saw table. To place in the "down" position for all non-through cutting: Remove the throat plate. Raise the saw blade by turning the height adjusting knob clockwise. Unlock the release lever by : 1)Unlocking the blade height ... IN DOWN POSITION FOR NON-THROUGH CUTTING Fig. 21 Push the riving knife down position for non-through cutting: Remove the throat plate. Raise the saw blade by turning the height adjusting knob clockwise. Unlock the release lever by pulling it up. ...
Operation Manual
Page 21
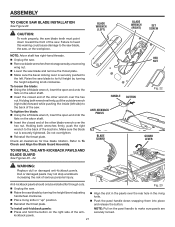
...may not stop a kickback increasing the risk of the machine. Fig. 23 Raise the saw . Do not overtighten. Reinstall the throat plate. BLADE WRENCH (LEFT) HANDLE ANTI-KICKBACK PAWLS BLADE GUARD BLADE WRENCH (RIGHT) SET SCREW HEX NUT BUTTON Fig. 22 GUARD LEVER WARNING: Replace dull... of the saw blade by turning the height/bevel adjusting handwheel clockwise. Place riving knife in "up" position. Reinstall the throat plate. Align the slot in the pawls over the hex nut. To install anti-kickback pawls: Press and hold the button on...
...may not stop a kickback increasing the risk of the machine. Fig. 23 Raise the saw . Do not overtighten. Reinstall the throat plate. BLADE WRENCH (LEFT) HANDLE ANTI-KICKBACK PAWLS BLADE GUARD BLADE WRENCH (RIGHT) SET SCREW HEX NUT BUTTON Fig. 22 GUARD LEVER WARNING: Replace dull... of the saw blade by turning the height/bevel adjusting handwheel clockwise. Place riving knife in "up" position. Reinstall the throat plate. Align the slot in the pawls over the hex nut. To install anti-kickback pawls: Press and hold the button on...
Operation Manual
Page 23
... accessories Cabinet making a cut being thrown into your hands are unsure about proper grounding. Knock out any areas where saw , blade guard, under the throat plate, and any loose knots with side shields marked to all local codes and ordinances. APPLICATIONS You may gather. Use the right type of kickback...
... accessories Cabinet making a cut being thrown into your hands are unsure about proper grounding. Knock out any areas where saw , blade guard, under the throat plate, and any loose knots with side shields marked to all local codes and ordinances. APPLICATIONS You may gather. Use the right type of kickback...

Operation Manual
Page 37
...completed: Unplug your hand, always use an adjustable dado on the shape and size of 3/4 in locked position. Install the dado throat plate and rotate the blade by hand to the tool. WARNING: Do not use blades rated less than the speed of this saw . Reinstall the... the cut . Unplug your saw. Remove the blade guard, anti-kickback pawls, and throat plate. Next, remove the blade nut, blade washer, and saw blade. An optional dado throat plate is required for the desired width of this manual and check with the edge flush against the rip...
...completed: Unplug your hand, always use an adjustable dado on the shape and size of 3/4 in locked position. Install the dado throat plate and rotate the blade by hand to the tool. WARNING: Do not use blades rated less than the speed of this saw . Reinstall the... the cut . Unplug your saw. Remove the blade guard, anti-kickback pawls, and throat plate. Next, remove the blade nut, blade washer, and saw blade. An optional dado throat plate is required for the desired width of this manual and check with the edge flush against the rip...

Operation Manual
Page 38
..., the scale will be within the limits stamped on the riving knife. Unplug the saw. Lower the saw blade and remove the throat plate. Raise the saw to the back of the other wrench over the arbor shaft. To replace the blade with an accessory blade, follow the... To install a standard blade: Place the new blade on the arbor shaft. Insert the closed end of the saw blade and reinstall the throat plate. 38 BLADE WRENCH (LEFT) ARBOR SHAFT BLADE WRENCH (RIGHT) Fig. 55 BLADE BLADE WASHER HEX NUT RELEASE LEVER Fig. 56 Raise the saw blade to...
..., the scale will be within the limits stamped on the riving knife. Unplug the saw. Lower the saw blade and remove the throat plate. Raise the saw to the back of the other wrench over the arbor shaft. To replace the blade with an accessory blade, follow the... To install a standard blade: Place the new blade on the arbor shaft. Insert the closed end of the saw blade and reinstall the throat plate. 38 BLADE WRENCH (LEFT) ARBOR SHAFT BLADE WRENCH (RIGHT) Fig. 55 BLADE BLADE WASHER HEX NUT RELEASE LEVER Fig. 56 Raise the saw blade to...

Operation Manual
Page 43
... and rails, periodically apply paste wax to them and buff to damage from underneath the saw table and in the blade teeth. Make sure the throat plate is dusty, also wear a dust mask. If operation is in good condition and in serious personal injury. Periodically check all clamps, nuts, bolts, and...
... and rails, periodically apply paste wax to them and buff to damage from underneath the saw table and in the blade teeth. Make sure the throat plate is dusty, also wear a dust mask. If operation is in good condition and in serious personal injury. Periodically check all clamps, nuts, bolts, and...

Operation Manual
Page 44
... result in serious personal injury. 44 BRUSH CAP BRUSH ASSEMBLY Fig. 70 ACCESSORIES Look for these accessories where you purchased this product: AC31DP1 AC9933 Dado Throat Plate Flip Top Portable Work Support WARNING: Current attachments and accessories available for wear. Replace both brushes when either has less than 1/4 in brush tube...
... result in serious personal injury. 44 BRUSH CAP BRUSH ASSEMBLY Fig. 70 ACCESSORIES Look for these accessories where you purchased this product: AC31DP1 AC9933 Dado Throat Plate Flip Top Portable Work Support WARNING: Current attachments and accessories available for wear. Replace both brushes when either has less than 1/4 in brush tube...
Repair Sheet
Page 3
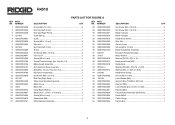
...8 827645 End Cap (Left Front 1 9 089037004009 Screw 4 10 089037004046 Set Screw (M8 x 18 mm 2 11 089037004047 Ind-I-Cut 1 12 089037004209 Screw (M5 x 8 mm 4 13 089037004703 Throat Plate Assembly (Inc. Key No. 12 1 14 089037004706 Blade Guard Assembly 1 15 089037004707 Anti-Kickback Pawl Assembly 1 16 089037004052 Bolt (M6 x 16 mm, Hex Soc. Hd... Board Assembly (Soft Start 1 52 089037004025 Strain Relief 2 53 089037004036 Cable Clamp 1 54 089037004023 Switch Box 1 3 NUMBER DESCRIPTION QTY. KEY PART NO. x 5/8 in . R4510 PARTS LIST FOR FIGURE A KEY PART NO.
...8 827645 End Cap (Left Front 1 9 089037004009 Screw 4 10 089037004046 Set Screw (M8 x 18 mm 2 11 089037004047 Ind-I-Cut 1 12 089037004209 Screw (M5 x 8 mm 4 13 089037004703 Throat Plate Assembly (Inc. Key No. 12 1 14 089037004706 Blade Guard Assembly 1 15 089037004707 Anti-Kickback Pawl Assembly 1 16 089037004052 Bolt (M6 x 16 mm, Hex Soc. Hd... Board Assembly (Soft Start 1 52 089037004025 Strain Relief 2 53 089037004036 Cable Clamp 1 54 089037004023 Switch Box 1 3 NUMBER DESCRIPTION QTY. KEY PART NO. x 5/8 in . R4510 PARTS LIST FOR FIGURE A KEY PART NO.

Repair Sheet
Page 25
... 2 26 089037004242 Retaining Ring 1 27 089037004025 Strain Relief 1 NOT SHOWN 089037004275 Hex Key (M5 1 089037004276 Hex Key (M4 1 089037004277 Hex Key (M2.5 1 987000342 Operator's Manual (R4510 1 AC31DP1 Dado Throat Plate 1 987000743 Operator's Manual (Dado Throat Plate 1 8-2-10 (REV:08) 25 R4510 PARTS LIST FOR FIGURE I KEY PART NO. KEY PART NO. NUMBER DESCRIPTION QTY.
... 2 26 089037004242 Retaining Ring 1 27 089037004025 Strain Relief 1 NOT SHOWN 089037004275 Hex Key (M5 1 089037004276 Hex Key (M4 1 089037004277 Hex Key (M2.5 1 987000342 Operator's Manual (R4510 1 AC31DP1 Dado Throat Plate 1 987000743 Operator's Manual (Dado Throat Plate 1 8-2-10 (REV:08) 25 R4510 PARTS LIST FOR FIGURE I KEY PART NO. KEY PART NO. NUMBER DESCRIPTION QTY.

