

Operation Manual
Page 4
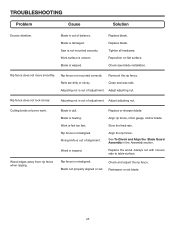
... cloth when cleaning. Always use common sense. Keep the blade guard down, the anti-kickback pawls down, and the riving knife in an accident causing possible serious personal injury. ALWAYS USE BLADE GUARD, RIVING KNIFE, AND ANTI-KICKBACK PAWLS on all nails from the rotating blade. INSPECT EXTENSION CORDS PERIODICALLY and replace...
... cloth when cleaning. Always use common sense. Keep the blade guard down, the anti-kickback pawls down, and the riving knife in an accident causing possible serious personal injury. ALWAYS USE BLADE GUARD, RIVING KNIFE, AND ANTI-KICKBACK PAWLS on all nails from the rotating blade. INSPECT EXTENSION CORDS PERIODICALLY and replace...
Operation Manual
Page 5
...turning the saw OFF and disconnecting the saw blade. h) Never operate saw blade guard and riving knife for every operation for wide or long workpieces. AVOID KICKBACKS (work . c) Keeping riving knife, anti-kickback pawls, and blade guard in this type of work thrown back toward you do... designed to filter out microscopic particles. 5 b) Use saw on reducing risk of kickback. Refer to them these chemicals varies, depending on the riving knife. THIS TOOL should have a straight edge to guide along the fence. IF THE POWER SUPPLY CORD IS DAMAGED, it ...
...turning the saw OFF and disconnecting the saw blade. h) Never operate saw blade guard and riving knife for every operation for wide or long workpieces. AVOID KICKBACKS (work . c) Keeping riving knife, anti-kickback pawls, and blade guard in this type of work thrown back toward you do... designed to filter out microscopic particles. 5 b) Use saw on reducing risk of kickback. Refer to them these chemicals varies, depending on the riving knife. THIS TOOL should have a straight edge to guide along the fence. IF THE POWER SUPPLY CORD IS DAMAGED, it ...

Operation Manual
Page 8
... Blocks (for jointer planers) Device used to hold the workpiece during cutting operations. This aid helps keep the operator's hands well away from being done. Riving Knife (table saws) A metal piece, slightly thinner than 90° to the table surface. Workpiece or Material The item on which helps keep the operator's hands...
... Blocks (for jointer planers) Device used to hold the workpiece during cutting operations. This aid helps keep the operator's hands well away from being done. Riving Knife (table saws) A metal piece, slightly thinner than 90° to the table surface. Workpiece or Material The item on which helps keep the operator's hands...

Operation Manual
Page 9
Cutting Depth at 45 2-1/2 in . Blade Arbor 5/8 in . Cutting Depth at 90 3-1/2 in . Rating 120 V~, 15 Amps, 60 Hz No Load Speed 4,400 r/min. (RPM) RIVING KNIFE ANTI-KICKBACK PAWLS BLADE GUARD ASSEMBLY SAW BLADE MITER GAUGE RIP FENCE MICRO-ADJUST WHEEL LOCKING LEVER FRONT RAIL BLADE WRENCHES BEVEL SCALE GRIPS BLADE AND BLADE WRENCH STORAGE LEG STAND BEVEL LOCKING LEVER SWITCH ASSEMBLY BEVEL ADJUSTING HANDWHEEL BEVEL INDICATOR HEIGHT ADJUSTING KNOB BLADE HEIGHT LOCK KNOB Fig. 3 9 FEATURES PRODUCT SPECIFICATIONS Blade Diameter 10 in .
Cutting Depth at 45 2-1/2 in . Blade Arbor 5/8 in . Cutting Depth at 90 3-1/2 in . Rating 120 V~, 15 Amps, 60 Hz No Load Speed 4,400 r/min. (RPM) RIVING KNIFE ANTI-KICKBACK PAWLS BLADE GUARD ASSEMBLY SAW BLADE MITER GAUGE RIP FENCE MICRO-ADJUST WHEEL LOCKING LEVER FRONT RAIL BLADE WRENCHES BEVEL SCALE GRIPS BLADE AND BLADE WRENCH STORAGE LEG STAND BEVEL LOCKING LEVER SWITCH ASSEMBLY BEVEL ADJUSTING HANDWHEEL BEVEL INDICATOR HEIGHT ADJUSTING KNOB BLADE HEIGHT LOCK KNOB Fig. 3 9 FEATURES PRODUCT SPECIFICATIONS Blade Diameter 10 in .

Operation Manual
Page 10
... dealer can provide you are attempting. BLADE GUARD - A plastic insert on which marks may be pulled back toward the operator. LOCKING LEVER - MITER GAUGE GROOVES - RIVING KNIFE - When in which helps keep the guard down " position, it is recommended that is used to -read scale provides precise measurements for bevel angles. This...
... dealer can provide you are attempting. BLADE GUARD - A plastic insert on which marks may be pulled back toward the operator. LOCKING LEVER - MITER GAUGE GROOVES - RIVING KNIFE - When in which helps keep the guard down " position, it is recommended that is used to -read scale provides precise measurements for bevel angles. This...

Operation Manual
Page 11
... that has a built-in serious personal injury. Detailed instructions are provided in use by an insert called the throat plate. The blade guard assembly includes: riving knife, anti-kickback pawls, and blade guard. TO TURN YOUR SAW OFF: Press the switch down . Remove the switch key from accidentally starting , always...
... that has a built-in serious personal injury. Detailed instructions are provided in use by an insert called the throat plate. The blade guard assembly includes: riving knife, anti-kickback pawls, and blade guard. TO TURN YOUR SAW OFF: Press the switch down . Remove the switch key from accidentally starting , always...

Operation Manual
Page 20
... end pulling the throat plate out toward the front of the saw. Adjust the set screws until the internal pins are engaged and the riving knife is below the saw to lower the blade. Using a hex key, adjust the four set screw at the back of the throat plate ... too low, the workpiece can catch on the tool housing. To remove the throat plate: place your index finger in place. To place in riving knife down position for non-through cutting: Remove the throat plate. Raise the saw blade by turning the height adjusting knob clockwise. Unlock...
... end pulling the throat plate out toward the front of the saw. Adjust the set screws until the internal pins are engaged and the riving knife is below the saw to lower the blade. Using a hex key, adjust the four set screw at the back of the throat plate ... too low, the workpiece can catch on the tool housing. To remove the throat plate: place your index finger in place. To place in riving knife down position for non-through cutting: Remove the throat plate. Raise the saw blade by turning the height adjusting knob clockwise. Unlock...
Operation Manual
Page 21
... open end onto the flats on the arbor shaft. Insert the closed end of the other blade wrench over the rear hole in the riving knife. Push the pawl handle down toward the front of the other wrench over the hex nut. Do not overtighten. Reinstall the ... sure the blade nut is securely pushed to the left side) to its full height by turning the height/bevel adjusting handwheel clockwise. Place riving knife in "up" position. Reinstall the throat plate. Align the slot in the pawls over the hex nut. ASSEMBLY TO CHECK SAW BLADE...
... open end onto the flats on the arbor shaft. Insert the closed end of the other blade wrench over the rear hole in the riving knife. Push the pawl handle down toward the front of the other wrench over the hex nut. Do not overtighten. Reinstall the ... sure the blade nut is securely pushed to the left side) to its full height by turning the height/bevel adjusting handwheel clockwise. Place riving knife in "up" position. Reinstall the throat plate. Align the slot in the pawls over the hex nut. ASSEMBLY TO CHECK SAW BLADE...

Operation Manual
Page 22
...securely retighten the screws. Check again for clearances and free movement. If the blade guard is not parallel to the table, the riving knife is not in place by turning the height adjusting knob clockwise. Remove the anti-kickback pawls and blade guard assembly. To check ...): Remove the anti-kickback pawls and blade guard assembly. Loosen the screws holding the mounting bracket. Reposition the riving knife left or right as needed . Push the front of alignment with the saw blade by pushing the guard lever down until it is square against...
...securely retighten the screws. Check again for clearances and free movement. If the blade guard is not parallel to the table, the riving knife is not in place by turning the height adjusting knob clockwise. Remove the anti-kickback pawls and blade guard assembly. To check ...): Remove the anti-kickback pawls and blade guard assembly. Loosen the screws holding the mounting bracket. Reposition the riving knife left or right as needed . Push the front of alignment with the saw blade by pushing the guard lever down until it is square against...
Operation Manual
Page 23
... can cause serious injury, and it occur. The use of blade for the cut wood and wood composition products only. APPLICATIONS You may use the riving knife for clarity, do not operate the saw dust or scrap workpieces may not always be effective. Always guide your body in serious personal injury...
... can cause serious injury, and it occur. The use of blade for the cut wood and wood composition products only. APPLICATIONS You may use the riving knife for clarity, do not operate the saw dust or scrap workpieces may not always be effective. Always guide your body in serious personal injury...
Operation Manual
Page 36
... the bevel angle to 0°. Turn the bevel adjusting handwheel until the bevel indica- For example, if your saw. Reinstall the riving knife in addition to avoid the risk of cut ). BLADE GUARD REMOVED NON-THROUGH CUT PUSH STICK WARNING: Never feed wood with the grain (ripping) or...the desired angle. Wait for the workpiece. Plug the saw . Remove the blade guard and anti-kickback pawls. Place riving knife in . boards when making a non-through cuts to the correct depth for the blade to come to lock the angle. The use push blocks, ...
... the bevel angle to 0°. Turn the bevel adjusting handwheel until the bevel indica- For example, if your saw. Reinstall the riving knife in addition to avoid the risk of cut ). BLADE GUARD REMOVED NON-THROUGH CUT PUSH STICK WARNING: Never feed wood with the grain (ripping) or...the desired angle. Wait for the workpiece. Plug the saw . Remove the blade guard and anti-kickback pawls. Place riving knife in . boards when making a non-through cuts to the correct depth for the blade to come to lock the angle. The use push blocks, ...

Operation Manual
Page 37
...nut. Place release lever in the "up to full speed before feeding the workpiece into the blade with your saw. Reinstall the riving knife in locked position. Install the dado throat plate and rotate the blade by hand to avoid the risk of the wood, use a push stick.... DADO CUT Fig. 54 Remove the riving knife. Mount the dado blade, according to manufacturer instructions, using the blade and chippers appropriate for the blade to come to the tool. WARNING: ...
...nut. Place release lever in the "up to full speed before feeding the workpiece into the blade with your saw. Reinstall the riving knife in locked position. Install the dado throat plate and rotate the blade by hand to avoid the risk of the wood, use a push stick.... DADO CUT Fig. 54 Remove the riving knife. Mount the dado blade, according to manufacturer instructions, using the blade and chippers appropriate for the blade to come to the tool. WARNING: ...

Operation Manual
Page 38
... the blade with an accessory blade, follow the instructions provided with a square and made . To install a standard blade: Place the new blade on the riving knife. Unplug the saw. Lower the saw blade and remove the throat plate. Raise the saw blade to full height then remove the...
... the blade with an accessory blade, follow the instructions provided with a square and made . To install a standard blade: Place the new blade on the riving knife. Unplug the saw. Lower the saw blade and remove the throat plate. Raise the saw blade to full height then remove the...
Operation Manual
Page 45
.... Adjusting nut is fed too fast. Replace the wood. Rip fence is out of adjustment. Check and adjust the rip fence. Remount the rip fence. Riving knife is misaligned. Align the rip fence. See To Check and Align the Blade Guard Assembly in the Assembly section. Replace blade. Rip fence does not...
.... Adjusting nut is fed too fast. Replace the wood. Rip fence is out of adjustment. Check and adjust the rip fence. Remount the rip fence. Riving knife is misaligned. Align the rip fence. See To Check and Align the Blade Guard Assembly in the Assembly section. Replace blade. Rip fence does not...
Repair Sheet
Page 3
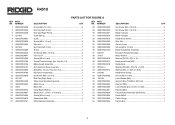
.... Key No. 12 1 14 089037004706 Blade Guard Assembly 1 15 089037004707 Anti-Kickback Pawl Assembly 1 16 089037004052 Bolt (M6 x 16 mm, Hex Soc. Hd 2 17 089037004708 Riving Knife Assembly 1 18 089037004045 Set Screw (M5 x 12 mm 1 19 827470 End Cap (Right Rear 1 20 089037004700 Table Assembly (See Figure H 1 21 089037004044 Blade Cover 1...Nut (M4 4 51 089037004024 Circuit Board Assembly (Soft Start 1 52 089037004025 Strain Relief 2 53 089037004036 Cable Clamp 1 54 089037004023 Switch Box 1 3 NUMBER DESCRIPTION QTY. R4510 PARTS LIST FOR FIGURE A KEY PART NO.
.... Key No. 12 1 14 089037004706 Blade Guard Assembly 1 15 089037004707 Anti-Kickback Pawl Assembly 1 16 089037004052 Bolt (M6 x 16 mm, Hex Soc. Hd 2 17 089037004708 Riving Knife Assembly 1 18 089037004045 Set Screw (M5 x 12 mm 1 19 827470 End Cap (Right Rear 1 20 089037004700 Table Assembly (See Figure H 1 21 089037004044 Blade Cover 1...Nut (M4 4 51 089037004024 Circuit Board Assembly (Soft Start 1 52 089037004025 Strain Relief 2 53 089037004036 Cable Clamp 1 54 089037004023 Switch Box 1 3 NUMBER DESCRIPTION QTY. R4510 PARTS LIST FOR FIGURE A KEY PART NO.
