Owners Manual
Page 2
... power cord Unplug from • Do not leave Vac when plugged in minor or moderate injury. These may pass through the filter and be exhausted back into the air. SP6747-1 RIDGID 3 gallon 6/21/10 9:26 PM Page 2 Table of Contents Section Page Important Safety Instructions 2 Introduction 4 Checking Carton Contents 4 Getting to Know...
... power cord Unplug from • Do not leave Vac when plugged in minor or moderate injury. These may pass through the filter and be exhausted back into the air. SP6747-1 RIDGID 3 gallon 6/21/10 9:26 PM Page 2 Table of Contents Section Page Important Safety Instructions 2 Introduction 4 Checking Carton Contents 4 Getting to Know...

Owners Manual
Page 4
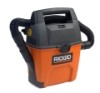
... allows usage for household use. SP6747-1 RIDGID 3 gallon 6/21/10 9:26 PM Page 4 Introduction This Wet/Dry Vac is intended for most small household vacuuming chores. Carton Contents List Key Description Qty A 3-Gallon Wet/Dry Vac 1 B* Filter 1 C Car Nozzle 1 D Hose Assembly (Flex 1 E Owner's Manual 1 * The filter comes preassembled to Know Your Vac Familiarize...
... allows usage for household use. SP6747-1 RIDGID 3 gallon 6/21/10 9:26 PM Page 4 Introduction This Wet/Dry Vac is intended for most small household vacuuming chores. Carton Contents List Key Description Qty A 3-Gallon Wet/Dry Vac 1 B* Filter 1 C Car Nozzle 1 D Hose Assembly (Flex 1 E Owner's Manual 1 * The filter comes preassembled to Know Your Vac Familiarize...

Owners Manual
Page 5
... source outlet until the rubber gasket on the bottom of the filter seats securely around the base of the filter cage and against the lid. 2. Filter Installation: 1. Carefully slide the Qwik Lock™ filter over the ball on the stud. 3. SP6747-1 RIDGID 3 gallon 6/21/10 9:26 PM Page 5 Filter Removal and Installation ! Slide filter off the drum.
... source outlet until the rubber gasket on the bottom of the filter seats securely around the base of the filter cage and against the lid. 2. Filter Installation: 1. Carefully slide the Qwik Lock™ filter over the ball on the stud. 3. SP6747-1 RIDGID 3 gallon 6/21/10 9:26 PM Page 5 Filter Removal and Installation ! Slide filter off the drum.

Owners Manual
Page 7
...Slowly pull the drum latches away from entering the impeller and damaging the motor. 7 Power Head Pull Out and Lift Up Vacuuming Liquids 1. SP6747-1 RIDGID 3 gallon 6/21/10 9:26 PM Page 7 Operation (continued) Familiarize yourself with the accessories included with the Vac. Here is necessary to pick...this happens, turn off the drum. Dump the drum contents into the proper waste disposal container. ! When the liquid in pitch, due to the filter. Latch (2) Drum 2. After using your Vac to pick up very fine dust, it will clog quickly and be removed. Grasp the drum latches...
...Slowly pull the drum latches away from entering the impeller and damaging the motor. 7 Power Head Pull Out and Lift Up Vacuuming Liquids 1. SP6747-1 RIDGID 3 gallon 6/21/10 9:26 PM Page 7 Operation (continued) Familiarize yourself with the accessories included with the Vac. Here is necessary to pick...this happens, turn off the drum. Dump the drum contents into the proper waste disposal container. ! When the liquid in pitch, due to the filter. Latch (2) Drum 2. After using your Vac to pick up very fine dust, it will clog quickly and be removed. Grasp the drum latches...
Owners Manual
Page 9
... accumulated dust, clean the filter in it . Handle the filter carefully when removing to page 5 "Filter Removal and Installation" Section of a dry filter with holes or tears in an open area. Cleaning A Dry Filter NOTE: For best cleaning results due to damage filter. Remove filter from accidental starting, unplug power cord before using RIDGID replacement parts. Even a small...
... accumulated dust, clean the filter in it . Handle the filter carefully when removing to page 5 "Filter Removal and Installation" Section of a dry filter with holes or tears in an open area. Cleaning A Dry Filter NOTE: For best cleaning results due to damage filter. Remove filter from accidental starting, unplug power cord before using RIDGID replacement parts. Even a small...

Owners Manual
Page 10
Allow the filter to dry before sealing the motor on the drum. Cleaning and Disinfecting the Wet/Dry Vac To keep your Vac, the drum should be kept ... the cord wrap knobs and the hose should be wrapped around the cord wrap knobs. To disinfect the drum: 1. Empty drum after 20 minutes. SP6747-1 RIDGID 3 gallon 6/21/10 9:26 PM Page 10 Maintenance (continued) Installation Refer to page 5 "Filter Removal and Installation" Section of this manual.
Allow the filter to dry before sealing the motor on the drum. Cleaning and Disinfecting the Wet/Dry Vac To keep your Vac, the drum should be kept ... the cord wrap knobs and the hose should be wrapped around the cord wrap knobs. To disinfect the drum: 1. Empty drum after 20 minutes. SP6747-1 RIDGID 3 gallon 6/21/10 9:26 PM Page 10 Maintenance (continued) Installation Refer to page 5 "Filter Removal and Installation" Section of this manual.

Owners Manual
Page 11
Part No. Description 1 831388 Float 2 818977-1 Filter Cage 3 VF3500 † Filter 4 832086 Switch 5 833165 Dust Pan Key No. Gallon/11 Liter Wet/Dry Vac Model Number WD30500/WD3050M0 RIDGID parts are provided instead of the system, and should a means for a double-insulated Wet/Dry Vac must be added. Servicing a double- To ...service personnel. Your double-insulated Wet/Dry Vac is provided on a double-insulated appliance, nor should be available where you purchased your Vac. 1 4 6 7 2 8 3 RIDGID 5 9 11 SP6747-1 RIDGID 3 gallon 6/21/10 9:26 PM Page 11 Repair Parts...
Part No. Description 1 831388 Float 2 818977-1 Filter Cage 3 VF3500 † Filter 4 832086 Switch 5 833165 Dust Pan Key No. Gallon/11 Liter Wet/Dry Vac Model Number WD30500/WD3050M0 RIDGID parts are provided instead of the system, and should a means for a double-insulated Wet/Dry Vac must be added. Servicing a double- To ...service personnel. Your double-insulated Wet/Dry Vac is provided on a double-insulated appliance, nor should be available where you purchased your Vac. 1 4 6 7 2 8 3 RIDGID 5 9 11 SP6747-1 RIDGID 3 gallon 6/21/10 9:26 PM Page 11 Repair Parts...


