
User Guide
Page 1
19" to prevent any damage. TILT RF-HTVMTAB For wood-stud and concrete wall installations Safety information and specifications 2 Tools needed 2 Package contents 3 Installation instructions 5 ASSEMBLY GUIDE Before using your new product, please read these instructions to 39" TV WALL MOUNT -
19" to prevent any damage. TILT RF-HTVMTAB For wood-stud and concrete wall installations Safety information and specifications 2 Tools needed 2 Package contents 3 Installation instructions 5 ASSEMBLY GUIDE Before using your new product, please read these instructions to 39" TV WALL MOUNT -

User Guide
Page 2
... away from young children! The wall must not exceed 50 lbs. (22.6 kg). and Canada) Rocketfish is not responsible for damage or injury caused by Rocketfish. and Canada) directions, or have doubts about the safety of the installation, contact Customer Service or call : 1-800-620-2790 (U.S. The weight of your TV must be...
... away from young children! The wall must not exceed 50 lbs. (22.6 kg). and Canada) Rocketfish is not responsible for damage or injury caused by Rocketfish. and Canada) directions, or have doubts about the safety of the installation, contact Customer Service or call : 1-800-620-2790 (U.S. The weight of your TV must be...

User Guide
Page 4
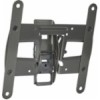
... screw 4 10 Universal spacers 4 5 M4 × 35 mm screw 4 6 M6 × 35 mm screw 4 13 5/16" × 2 3/4" lag bolt 2 7 4 M8 × 35 mm screw Concrete Installation Kit CMK1 (not included) Contact customer service at 1-800-359-5520 to have these additional parts shipped directly to you. and Canada) Call 1-800-620...
... screw 4 10 Universal spacers 4 5 M4 × 35 mm screw 4 6 M6 × 35 mm screw 4 13 5/16" × 2 3/4" lag bolt 2 7 4 M8 × 35 mm screw Concrete Installation Kit CMK1 (not included) Contact customer service at 1-800-359-5520 to have these additional parts shipped directly to you. and Canada) Call 1-800-620...

User Guide
Page 5
... in centimeters to determine which TV bracket configuration to use this TV mount to mount your measurements in cm: Width ______cm x Height ______cm. and Canada) 5 RF-HTVMTAB Installation instructions STEP 1 - W H inches cm 2 Record your TV to the wall. Need help?
... in centimeters to determine which TV bracket configuration to use this TV mount to mount your measurements in cm: Width ______cm x Height ______cm. and Canada) 5 RF-HTVMTAB Installation instructions STEP 1 - W H inches cm 2 Record your TV to the wall. Need help?
User Guide
Page 12
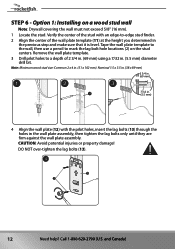
...: Minimum wood stud size: Common 2 x 4 in . CAUTION: Avoid potential injuries or property damage! DO NOT over-tighten the lag bolts (13). 12 Need help? Option 1: Installing on the stud centers. Y UP (5.5 mm) 4 Align the wall plate (12) with an edge-to a depth of the wall plate template (11) at the height...
...: Minimum wood stud size: Common 2 x 4 in . CAUTION: Avoid potential injuries or property damage! DO NOT over-tighten the lag bolts (13). 12 Need help? Option 1: Installing on the stud centers. Y UP (5.5 mm) 4 Align the wall plate (12) with an edge-to a depth of the wall plate template (11) at the height...

User Guide
Page 14
... ! 4 Align the wall plate (12) with the concrete surface. 3 in . (10 mm) diameter masonry drill bit. 3 Insert the concrete wall anchors (refer to Concrete Installation Kit CMK1 (not included) on a solid concrete or concrete block wall CAUTION: To prevent property damage or personal injury, never drill into the pilot holes... solid concrete thickness: 8 in the wall plate assembly, then tighten the lag bolts only until they are firm against the wall plate. STEP 6 - Option 2: Installing on page 4) into mortar between blocks. CAUTION: Avoid potential injuries or property damage!
... ! 4 Align the wall plate (12) with the concrete surface. 3 in . (10 mm) diameter masonry drill bit. 3 Insert the concrete wall anchors (refer to Concrete Installation Kit CMK1 (not included) on a solid concrete or concrete block wall CAUTION: To prevent property damage or personal injury, never drill into the pilot holes... solid concrete thickness: 8 in the wall plate assembly, then tighten the lag bolts only until they are firm against the wall plate. STEP 6 - Option 2: Installing on page 4) into mortar between blocks. CAUTION: Avoid potential injuries or property damage!