
User Manual (English)
Page 1
Universal Wireless Rear Speaker Kit RF-WHTIB User Guide
Universal Wireless Rear Speaker Kit RF-WHTIB User Guide

User Manual (English)
Page 2
... to correctly install, operate, and get the best performance from your system for reliable and trouble-free performance. Rocketfish RF-WHTIB Universal Wireless Rear Speaker Kit Contents Introduction 2 Features 4 Setting up your universal wireless rear speaker kit.. 7 Using your universal wireless rear speaker kit .........12 Troubleshooting 14 Specifications 15 Legal notices 15 One-Year Limited Warranty 17 Introduction Congratulations...
... to correctly install, operate, and get the best performance from your system for reliable and trouble-free performance. Rocketfish RF-WHTIB Universal Wireless Rear Speaker Kit Contents Introduction 2 Features 4 Setting up your universal wireless rear speaker kit.. 7 Using your universal wireless rear speaker kit .........12 Troubleshooting 14 Specifications 15 Legal notices 15 One-Year Limited Warranty 17 Introduction Congratulations...

User Manual (English)
Page 5
...contain: • A sender unit • A receiver unit • A holder for the receiver unit • An AC power adapter (for your RF-WHTIB Universal Wireless Rear Speaker Kit. Front view Back view 1 2 34 5 Bottom view 6 # Feature 1 Power indicator LED 2 Power button 3 Right speaker input ...terminals 4 Left speaker input terminals 5 DC IN jack 6 Manual connect button RF-WHTIB 5 Package contents Examine the contents of the box for the sender unit) • Two 2-foot speaker wires • A User Guide Sender unit ...
...contain: • A sender unit • A receiver unit • A holder for the receiver unit • An AC power adapter (for your RF-WHTIB Universal Wireless Rear Speaker Kit. Front view Back view 1 2 34 5 Bottom view 6 # Feature 1 Power indicator LED 2 Power button 3 Right speaker input ...terminals 4 Left speaker input terminals 5 DC IN jack 6 Manual connect button RF-WHTIB 5 Package contents Examine the contents of the box for the sender unit) • Two 2-foot speaker wires • A User Guide Sender unit ...

User Manual (English)
Page 7
RF-WHTIB 7 Setting up your universal wireless rear speaker kit Left speaker Center speaker Right speaker Right surround Receiver Left surround Amplifier Subwoofer Left surround Receiver Sender Right surround Note: If you need to mount the receiver, make sure that the left and right speaker cords are correctly connected to the speaker terminals of the receiver by checking the labels on the rear panel of the receiver.
RF-WHTIB 7 Setting up your universal wireless rear speaker kit Left speaker Center speaker Right speaker Right surround Receiver Left surround Amplifier Subwoofer Left surround Receiver Sender Right surround Note: If you need to mount the receiver, make sure that the left and right speaker cords are correctly connected to the speaker terminals of the receiver by checking the labels on the rear panel of the receiver.
User Manual (English)
Page 9
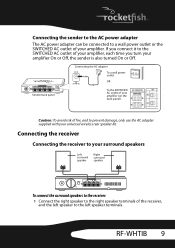
... to prevent damage, only use the AC adapter supplied with your amplifier. RF-WHTIB 9 Connecting the sender to the AC power adapter The AC power adapter can be connected to a wall power outlet or the SWITCHED AC outlet of your universal wireless rear speaker kit. If you connect it to the SWITCHED AC outlet...
... to prevent damage, only use the AC adapter supplied with your amplifier. RF-WHTIB 9 Connecting the sender to the AC power adapter The AC power adapter can be connected to a wall power outlet or the SWITCHED AC outlet of your universal wireless rear speaker kit. If you connect it to the SWITCHED AC outlet...

User Manual (English)
Page 12
... there is plugged in and in Standby mode. Try to the system: 1 Power on your amplifier, then play the audio or video source through your universal wireless rear speaker kit Establishing communications between the sender and receiver. Blinking LED The sender and receiver were pre-paired at the factory. The LED indicator...
... there is plugged in and in Standby mode. Try to the system: 1 Power on your amplifier, then play the audio or video source through your universal wireless rear speaker kit Establishing communications between the sender and receiver. Blinking LED The sender and receiver were pre-paired at the factory. The LED indicator...

User Manual (English)
Page 13
... After the volume of -the-art 2.4 GHz technology to digitally send audio data from the sender to the rear speakers by 15-20 ms. RF-WHTIB 13 The LED indicator will blink quickly first and then go off to indicate that you adjust the volume balance one time. Optimizing your surround.... To turn on the amplifier and adjust it to your normal listening level. 2 Adjust the volume on when not in your surround sound The RocketFish Universal Wireless Rear Speaker Kit uses state-of the receiver is set up , always adjust the volume using the volume control knob, to indicate that the receiver...
... After the volume of -the-art 2.4 GHz technology to digitally send audio data from the sender to the rear speakers by 15-20 ms. RF-WHTIB 13 The LED indicator will blink quickly first and then go off to indicate that you adjust the volume balance one time. Optimizing your surround.... To turn on the amplifier and adjust it to your normal listening level. 2 Adjust the volume on when not in your surround sound The RocketFish Universal Wireless Rear Speaker Kit uses state-of the receiver is set up , always adjust the volume using the volume control knob, to indicate that the receiver...

User Manual (English)
Page 14
... this User Guide carefully before calling for service. receiver • After the power buttons have been pressed to find the best reception position for your universal wireless rear speaker kit. The system proceeds with the connection process between your system. Troubleshooting Please read this list for a possible troubleshooting solution before using your...
... this User Guide carefully before calling for service. receiver • After the power buttons have been pressed to find the best reception position for your universal wireless rear speaker kit. The system proceeds with the connection process between your system. Troubleshooting Please read this list for a possible troubleshooting solution before using your...