
User Guide
Page 3
... the basics for sharing digital media from a wide selection of memory cards and watch your HDTV come to -date information about the updates.) In This Guide . . . 2 The Roku HD1000 4 Roku HD1000 Feature Summary 7 Connecting the HD1000 13 Using the HD1000 13 Main Menu 14 Viewing Pictures 15 Viewing MPEG Video 15 Playing Music 17 Photo, Video and Music Sharing...
... the basics for sharing digital media from a wide selection of memory cards and watch your HDTV come to -date information about the updates.) In This Guide . . . 2 The Roku HD1000 4 Roku HD1000 Feature Summary 7 Connecting the HD1000 13 Using the HD1000 13 Main Menu 14 Viewing Pictures 15 Viewing MPEG Video 15 Playing Music 17 Photo, Video and Music Sharing...

User Guide
Page 4
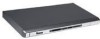
... the Select key to display the Main Menu, from which you install batteries in the remote before setting up your HD1000. Package Contents • Roku HD1000 • Component Video Cable • Remote Control • Two AAA Batteries • Audio Cable • Power Cable Optional Accessories ...• Rack Ears • Wi-Fi Adapter • Roku Art Packs • Crestron Driver Visit www.rokulabs.com for more information...
... the Select key to display the Main Menu, from which you install batteries in the remote before setting up your HD1000. Package Contents • Roku HD1000 • Component Video Cable • Remote Control • Two AAA Batteries • Audio Cable • Power Cable Optional Accessories ...• Rack Ears • Wi-Fi Adapter • Roku Art Packs • Crestron Driver Visit www.rokulabs.com for more information...

User Guide
Page 5
... for audio passthrough or to generate audio visualizer displays from digital cameras and MP3 players. VGA Connect to a 10baseT or 100Mbps home network. Digital Audio OUT Connect to an electrical outlet. * Check www.rokulabs.com for viewing photos, art or MPEG2 video. Power Connect the HD1000 to compatible S/PDIF audio devices. Select Choose an on...
... for audio passthrough or to generate audio visualizer displays from digital cameras and MP3 players. VGA Connect to a 10baseT or 100Mbps home network. Digital Audio OUT Connect to an electrical outlet. * Check www.rokulabs.com for viewing photos, art or MPEG2 video. Power Connect the HD1000 to compatible S/PDIF audio devices. Select Choose an on...
User Guide
Page 6
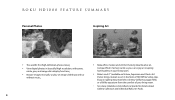
Roku HD1000 Feature summ ary Personal Photos Inspiring Art • The world's first high-definition photo viewer. • View digital photos in beautiful high resolution, with zoom, rotate, pan, and image data display functions. • Browse images manually or play an image slideshow, with or without music. • Roku...can enjoy an inspiring home gallery in your living room. • Roku LiveArt™ (available on Nature, Aquarium and Clocks Art Packs)...for details about Gallery Collection and individual Roku Art Packs. 4 Enjoy a rippling mountain lake, a breezy California poppy field...
Roku HD1000 Feature summ ary Personal Photos Inspiring Art • The world's first high-definition photo viewer. • View digital photos in beautiful high resolution, with zoom, rotate, pan, and image data display functions. • Browse images manually or play an image slideshow, with or without music. • Roku...can enjoy an inspiring home gallery in your living room. • Roku LiveArt™ (available on Nature, Aquarium and Clocks Art Packs)...for details about Gallery Collection and individual Roku Art Packs. 4 Enjoy a rippling mountain lake, a breezy California poppy field...

User Guide
Page 7
... PLS formats) when you connect the Roku through the Roku HD1000. • Third-party applications are available to create innovative new applications. • See www.rokulabs.com/developers for digital media. • Software Developer Kit (SDK) enables developers to support additional formats. Digital Music • Play your favorite songs. Video Playback • Play HD ATSC-compliant...
... PLS formats) when you connect the Roku through the Roku HD1000. • Third-party applications are available to create innovative new applications. • See www.rokulabs.com/developers for digital media. • Software Developer Kit (SDK) enables developers to support additional formats. Digital Music • Play your favorite songs. Video Playback • Play HD ATSC-compliant...
User Guide
Page 9
..."Connecting Your HD1000 to Use the Video Pass-Through Feature" below . 6 Component 1080i Best Separate AV Source Connect the appropriate HD1000 audio and video outputs to the corresponding inputs on your TV or AV receiver. When in this connection method, see the chart). The HD1000 offers four ...method, you connect the HD1000 like you would a DVD player or any other options yield superior results and are discussed in more information on this mode your HD1000 monitors the incoming video signal and automatically gener- Preparing to Connect In-Line/Video Pass Through When using...
..."Connecting Your HD1000 to Use the Video Pass-Through Feature" below . 6 Component 1080i Best Separate AV Source Connect the appropriate HD1000 audio and video outputs to the corresponding inputs on your TV or AV receiver. When in this connection method, see the chart). The HD1000 offers four ...method, you connect the HD1000 like you would a DVD player or any other options yield superior results and are discussed in more information on this mode your HD1000 monitors the incoming video signal and automatically gener- Preparing to Connect In-Line/Video Pass Through When using...
User Guide
Page 10
... see the initial setup screen. 6. Connect a VGA cable to the HD1000, taking care to connect to the Video Out connectors and being certain to the HDTV or HD Component connectors. 3. If your component AV receiver), again being certain to match the colors of the cables to the...with the mode number referenced in their proper aspect ratio without distortion. Connect the other end of the connectors. 2. *Note: Generally, the Roku HD1000 supports wide-screen resolutions (1280x720, 1920x1080), but the display may appear in this point, and it also supports 1024x768 in standard 4: 3 ...
... see the initial setup screen. 6. Connect a VGA cable to the HD1000, taking care to connect to the Video Out connectors and being certain to the HDTV or HD Component connectors. 3. If your component AV receiver), again being certain to match the colors of the cables to the...with the mode number referenced in their proper aspect ratio without distortion. Connect the other end of the connectors. 2. *Note: Generally, the Roku HD1000 supports wide-screen resolutions (1280x720, 1920x1080), but the display may appear in this point, and it also supports 1024x768 in standard 4: 3 ...

User Guide
Page 11
...to the current mode. 9. The screen may go dark when cycling through non-VGA modes. Connect an S-Video cable to the back of the HD1000. 2. Connecting via S-Video Most S-Video displays are able to confirm your choice. Note: The Power LED should read "Component 480i." Then use the...the Accept button, and press the Select key to display the HD1000's initial setup screen when connected via Composite Most Composite capable displays are able to display the HD1000's initial setup screens when connected via the S-Video cable, but the display will see the initial setup screen. 6....
...to the current mode. 9. The screen may go dark when cycling through non-VGA modes. Connect an S-Video cable to the back of the HD1000. 2. Connecting via S-Video Most S-Video displays are able to confirm your choice. Note: The Power LED should read "Component 480i." Then use the...the Accept button, and press the Select key to display the HD1000's initial setup screen when connected via Composite Most Composite capable displays are able to display the HD1000's initial setup screens when connected via the S-Video cable, but the display will see the initial setup screen. 6....
User Guide
Page 12
... it should see the initial setup screen. 6. Ensure that selection. Connect the power cable to the display. 2. Connect a composite video cable to the HD1000, making sure the cable is still no picture appears after about five seconds, press the right arrow again. If there is connected... selections. 9. Note: Each time you change the number of times it blinks to correspond to the back of the HD1000 and check the display for Component video - Repeat this process until your display at that the appropriate cable(s) are connected to the back of the Composite cable...
... it should see the initial setup screen. 6. Ensure that selection. Connect the power cable to the display. 2. Connect a composite video cable to the HD1000, making sure the cable is still no picture appears after about five seconds, press the right arrow again. If there is connected... selections. 9. Note: Each time you change the number of times it blinks to correspond to the back of the HD1000 and check the display for Component video - Repeat this process until your display at that the appropriate cable(s) are connected to the back of the Composite cable...
User Guide
Page 13
... is passed through mode, follow these steps: 1. Decide on the type of input you to connect the HD1000 between an existing source component (like a DVD player or AV receiver) and your stereo. listed in pass-through to the stereo Audio Out connectors. Once the proper format...HD1000 To Use the Video Pass-Through Feature Your HD1000 comes equipped with powered speakers or an external set of the cable to enjoy music playback. Connect the other end of powered speakers to an S/PDIF-compatible audio input on your HD1000. A 10/100 Ethernet port is already connected to the Digital...
... is passed through mode, follow these steps: 1. Decide on the type of input you to connect the HD1000 between an existing source component (like a DVD player or AV receiver) and your stereo. listed in pass-through to the stereo Audio Out connectors. Once the proper format...HD1000 To Use the Video Pass-Through Feature Your HD1000 comes equipped with powered speakers or an external set of the cable to enjoy music playback. Connect the other end of powered speakers to an S/PDIF-compatible audio input on your HD1000. A 10/100 Ethernet port is already connected to the Digital...

User Guide
Page 14
... the same type of cable (S-Video or Component). no conversion or transformation is in the "Connecting the HD1000" sections above to connect the HD1000 Video-Out to the appropriate Video-In connector(s) on page 29. When your HD1000 is applied to connect the HD1000 video output. Pressing the Power key...display device and connect it to your display. Use the Setup option on the Video In connector will be sent to your HD1000 displays the HD1000's signal. The video input used for your HD1000 inputs. Video pass-through is not available in Standby mode, this source will now be "...
... the same type of cable (S-Video or Component). no conversion or transformation is in the "Connecting the HD1000" sections above to connect the HD1000 Video-Out to the appropriate Video-In connector(s) on page 29. When your HD1000 is applied to connect the HD1000 video output. Pressing the Power key...display device and connect it to your display. Use the Setup option on the Video In connector will be sent to your HD1000 displays the HD1000's signal. The video input used for your HD1000 inputs. Video pass-through is not available in Standby mode, this source will now be "...

User Guide
Page 15
..., art, video, music, or Roku applications. These options will be used from the HD1000 to choose Slideshow, Browse or Listen. You'll have the option to choose to -use digital media applications for this platform, as a Slideshow or Browse through a series of each media source. Roku Applications. Roku writes applications for the home. The Roku HD1000 uses Roku's Open...
..., art, video, music, or Roku applications. These options will be used from the HD1000 to choose Slideshow, Browse or Listen. You'll have the option to choose to -use digital media applications for this platform, as a Slideshow or Browse through a series of each media source. Roku Applications. Roku writes applications for the home. The Roku HD1000 uses Roku's Open...

User Guide
Page 16
...the Browse screen, you can be adjusted in a thumbnail representation. If your HD1000 is highlighted, move the yellow highlight into the left-hand column. 2. Images...screen. 14 Notice that card. Browse. If you have more than one below. Refer to "The Roku Remote" on page 2 to learn how to control image viewing. When the desired media source is currently... showing the Main Menu and you insert a memory card with photos, art or MPEG video, the slideshow begins automatically, displaying the content from . . . 1. Viewing Pictures, Art and LiveArt™...
...the Browse screen, you can be adjusted in a thumbnail representation. If your HD1000 is highlighted, move the yellow highlight into the left-hand column. 2. Images...screen. 14 Notice that card. Browse. If you have more than one below. Refer to "The Roku Remote" on page 2 to learn how to control image viewing. When the desired media source is currently... showing the Main Menu and you insert a memory card with photos, art or MPEG video, the slideshow begins automatically, displaying the content from . . . 1. Viewing Pictures, Art and LiveArt™...

User Guide
Page 17
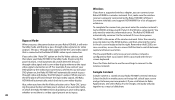
..., then choose the Listen option; The music player screen shows the songs on the media source along with the artist and album. 15 Exit takes you play a slideshow that contains a supported video clip, the clip will play from Roku's website, allows playback of ATSC MPEG2 transport ...page down. • To rotate an image to the prior screen. Viewing MPEG Video The HD1000 has the capability of digital broadcast television to a shared media source that may include multichannel audio (Dolby Digital 5.1). This is quicker than the selected delay time, it will play the clip all...
..., then choose the Listen option; The music player screen shows the songs on the media source along with the artist and album. 15 Exit takes you play a slideshow that contains a supported video clip, the clip will play from Roku's website, allows playback of ATSC MPEG2 transport ...page down. • To rotate an image to the prior screen. Viewing MPEG Video The HD1000 has the capability of digital broadcast television to a shared media source that may include multichannel audio (Dolby Digital 5.1). This is quicker than the selected delay time, it will play the clip all...

User Guide
Page 19
...After highlighting the media source from your PC requires: • Wired or wireless Ethernet network (Networked HD video playback requires a wired network; Notice how your path location is required for networking setup instructions specific to ... Mac must be 12 or fewer characters in one list (Roku "flattens" directory structures and shows one combined list of its subfolders). Sharing photos, video and music from the Main Menu, navigate to Browse or Listen...the shared media source, making it contains. Browsing Directories Your Roku HD1000 scans each supported platform.
...After highlighting the media source from your PC requires: • Wired or wireless Ethernet network (Networked HD video playback requires a wired network; Notice how your path location is required for networking setup instructions specific to ... Mac must be 12 or fewer characters in one list (Roku "flattens" directory structures and shows one combined list of its subfolders). Sharing photos, video and music from the Main Menu, navigate to Browse or Listen...the shared media source, making it contains. Browsing Directories Your Roku HD1000 scans each supported platform.

User Guide
Page 20
Need help? Any browsing will be used for viewing high-definition MPEG2 video and LiveArt.™ Only CompactFlash cards or the network drive connected via 100MBps wired Ethernet may notice that media type until you exit to www.... may be confined to that once you begin browsing images, you enter Image Viewer mode (or Music Player mode if you once again have a sustained read speed of 3 MBps or more for high-definition video playback. From the Main Menu, you began by pressing Menu or Exit. Memory Card Specifications CompactFlash cards...
Need help? Any browsing will be used for viewing high-definition MPEG2 video and LiveArt.™ Only CompactFlash cards or the network drive connected via 100MBps wired Ethernet may notice that media type until you exit to www.... may be confined to that once you begin browsing images, you enter Image Viewer mode (or Music Player mode if you once again have a sustained read speed of 3 MBps or more for high-definition video playback. From the Main Menu, you began by pressing Menu or Exit. Memory Card Specifications CompactFlash cards...

User Guide
Page 27
...you can modify settings in the following categories: • Date and Time • General • Network Servers • Screen Saver • Video Format • Video Placement Move the yellow highlight to select a category of settings to modify, then press Select to autoplay when inserting a memory card, and options...on your remote to reach the Main Menu, then use the arrow keys to move the yellow highlight to specify which network shares your Roku HD1000 should use as a source for that category appears. When you do not have an Internet connection. This setup panel may be updated ...
...you can modify settings in the following categories: • Date and Time • General • Network Servers • Screen Saver • Video Format • Video Placement Move the yellow highlight to select a category of settings to modify, then press Select to autoplay when inserting a memory card, and options...on your remote to reach the Main Menu, then use the arrow keys to move the yellow highlight to specify which network shares your Roku HD1000 should use as a source for that category appears. When you do not have an Internet connection. This setup panel may be updated ...
User Guide
Page 28
... square. You should strive to a 16:9 display, your television screen. If you wish, you to run the Roku HD1000's video placement wizard. In this setup panel. Video Placement This setup panel allows you may hold a ruler up to your television screen and measure the sides of the...your television screen. When finished with your television's settings for your television or monitor in this manual entitled "Connecting Your HD1000 to Use the Video Pass-Through Feature"), then rather than resetting your television to its native 4:3 aspect ratio, and the circle will not fill...
... square. You should strive to a 16:9 display, your television screen. If you wish, you to run the Roku HD1000's video placement wizard. In this setup panel. Video Placement This setup panel allows you may hold a ruler up to your television screen and measure the sides of the...your television screen. When finished with your television's settings for your television or monitor in this manual entitled "Connecting Your HD1000 to Use the Video Pass-Through Feature"), then rather than resetting your television to its native 4:3 aspect ratio, and the circle will not fill...

User Guide
Page 29
...the delay between the options and the Right/Left arrows to a 16: 9 aspect ratio. No problem! Just wait 30 seconds, and the HD1000 will automatically return to the Setup button and press Select. SmartDisplay automatically selects the most appropriate option based on the remote control. • ...to open . Note: These options may go blank or show a garbled picture. If this window, you may then make video placement adjustments to fit the Roku HD1000's video output to the full screen and use your images are rotated when using the Rotate button on the orientation of the image...
...the delay between the options and the Right/Left arrows to a 16: 9 aspect ratio. No problem! Just wait 30 seconds, and the HD1000 will automatically return to the Setup button and press Select. SmartDisplay automatically selects the most appropriate option based on the remote control. • ...to open . Note: These options may go blank or show a garbled picture. If this window, you may then make video placement adjustments to fit the Roku HD1000's video output to the full screen and use your images are rotated when using the Rotate button on the orientation of the image...
User Guide
Page 30
... the name When you press the power button on your new product. that ESSIDs are Standby mode and display a pass-through video and display the DVD player's output. then place your Roku HD1000 in the on , the Roku HD1000 will automatically switch between outputs. power button), it ever loses power. Select the Built-in which the...
... the name When you press the power button on your new product. that ESSIDs are Standby mode and display a pass-through video and display the DVD player's output. then place your Roku HD1000 in the on , the Roku HD1000 will automatically switch between outputs. power button), it ever loses power. Select the Built-in which the...