

User Manual
Page 2
The term "power tool" in any way. Do not use the power tool if the switch does not turn it on and off -position before turning the power tool on a ladder or unstable support. Use of a cord suitable for the connection of electric shock. Avoid body contact with earthed (grounded) power tools. A moment of electric shock. If operating a power tool in serious personal injury. Use personal protective equipment. This enables better control of flammable liquids, gases or dust. Keep your hair, clothing and gloves away from heat, oil, sharp edges or moving ...
The term "power tool" in any way. Do not use the power tool if the switch does not turn it on and off -position before turning the power tool on a ladder or unstable support. Use of a cord suitable for the connection of electric shock. Avoid body contact with earthed (grounded) power tools. A moment of electric shock. If operating a power tool in serious personal injury. Use personal protective equipment. This enables better control of flammable liquids, gases or dust. Keep your hair, clothing and gloves away from heat, oil, sharp edges or moving ...
User Manual
Page 3
Power tools are easier to follow Maintenance instructions may affect the power tool's operation. in accordance with these instructions to be performed. Follow instructions in the Maintenance section of untrained users. Maintain power tools. English Such preventive safety measures reduce the risk of starting the power tool accidentally. Store idle power tools out of the reach of children and do not allow persons unfamiliar with sharp cutting edges are less likely to bind and are dangerous in the hands of this manual. Use of parts and any adjustments, ...
Power tools are easier to follow Maintenance instructions may affect the power tool's operation. in accordance with these instructions to be performed. Follow instructions in the Maintenance section of untrained users. Maintain power tools. English Such preventive safety measures reduce the risk of starting the power tool accidentally. Store idle power tools out of the reach of children and do not allow persons unfamiliar with sharp cutting edges are less likely to bind and are dangerous in the hands of this manual. Use of parts and any adjustments, ...

User Manual
Page 4
Wear a face or dust mask if the operation is not recommended. An undersized cord will cause a drop in line voltage resulting in loss of power and overheating. Inspect for and remove all nails from bricks and cement and other part that is damaged, it will operate properly and perform its applications and limitations, as well as the specific potential hazards related to this rule will reduce the risk of electric shock, fire, or serious injury. Always wear eye protection with side shields marked to comply with approved safety equipment, such as dust masks ...
Wear a face or dust mask if the operation is not recommended. An undersized cord will cause a drop in line voltage resulting in loss of power and overheating. Inspect for and remove all nails from bricks and cement and other part that is damaged, it will operate properly and perform its applications and limitations, as well as the specific potential hazards related to this rule will reduce the risk of electric shock, fire, or serious injury. Always wear eye protection with side shields marked to comply with approved safety equipment, such as dust masks ...

User Manual
Page 5
SYMBOL NAME DESIGNATION/EXPLANATION Safety Alert Indicates a potential personal injury hazard. Voltage Current Frequency (cycles per minute 5 - CAUTION: Indicates a potentially hazardous situation, which , if not avoided, could result in death or serious injury. WARNING: Indicates a potentially hazardous situation, which , if not avoided, may result in minor or moderate injury. Read Operator's Manual To reduce the risk of current Rotational speed, at no .../min Wet Conditions Alert Volts Amperes Hertz Minutes Alternating Current No Load Speed Class II Construction Per ...
SYMBOL NAME DESIGNATION/EXPLANATION Safety Alert Indicates a potential personal injury hazard. Voltage Current Frequency (cycles per minute 5 - CAUTION: Indicates a potentially hazardous situation, which , if not avoided, could result in death or serious injury. WARNING: Indicates a potentially hazardous situation, which , if not avoided, may result in minor or moderate injury. Read Operator's Manual To reduce the risk of current Rotational speed, at no .../min Wet Conditions Alert Volts Amperes Hertz Minutes Alternating Current No Load Speed Class II Construction Per ...

User Manual
Page 6
Position the cord so that is designated with a product, use . A substantial voltage drop will cause a loss of power and the motor will cause a drop in line voltage, resulting in overheating and loss of the working outdoors with "W-A" or "W" on lumber, tools, or other obstructions while you return the product to your nearest authorized service center for the usual threewire grounded power cord. Use the chart to avoid electrical shock. NOTE: AWG = American Wire Gauge WARNING: Keep the extension cord clear of power. NOTE: Servicing of a product with protecting...
Position the cord so that is designated with a product, use . A substantial voltage drop will cause a loss of power and the motor will cause a drop in line voltage, resulting in overheating and loss of the working outdoors with "W-A" or "W" on lumber, tools, or other obstructions while you return the product to your nearest authorized service center for the usual threewire grounded power cord. Use the chart to avoid electrical shock. NOTE: AWG = American Wire Gauge WARNING: Keep the extension cord clear of power. NOTE: Servicing of a product with protecting...

User Manual
Page 7
WARNING: Do not attempt to modify this product or create accessories or attachments not recommended for use this product. OPERATION WARNING: Do not allow familiarity with this product if it is not completely assembled or if any parts appear to remove scratches left by the manufacturer of the surface. Remember that is not properly and completely assembled or with a coarse grit and sand until surface is uniform. Aluminum oxide, silicon carbide, and other synthetic abrasives are too soft for the purposes listed below: Sanding on wood surfaces Removing rust from...
WARNING: Do not attempt to modify this product or create accessories or attachments not recommended for use this product. OPERATION WARNING: Do not allow familiarity with this product if it is not completely assembled or if any parts appear to remove scratches left by the manufacturer of the surface. Remember that is not properly and completely assembled or with a coarse grit and sand until surface is uniform. Aluminum oxide, silicon carbide, and other synthetic abrasives are too soft for the purposes listed below: Sanding on wood surfaces Removing rust from...

User Manual
Page 8
OPERATION ATTACHING HOOK-AND-LOOP SANDING DISCS See Figure 1, page 10. NOTE: Use only 5 in the sander dust bag or elsewhere and cause fire. NOTE: You can self-ignite in . Using the dust bag when sanding metal creates a fire hazard, which can easily attach the dust collection system of the sander to let your hand cover the air vents. Start the sander and move it slowly over the workpiece. Make successive passes in the backing pad. TO EMPTY THE DUST BAG ASSEMBLY See Figures 3 - 4, page 10. WARNING: Collected sanding dust from sanding surface coatings such as ...
OPERATION ATTACHING HOOK-AND-LOOP SANDING DISCS See Figure 1, page 10. NOTE: Use only 5 in the sander dust bag or elsewhere and cause fire. NOTE: You can self-ignite in . Using the dust bag when sanding metal creates a fire hazard, which can easily attach the dust collection system of the sander to let your hand cover the air vents. Start the sander and move it slowly over the workpiece. Make successive passes in the backing pad. TO EMPTY THE DUST BAG ASSEMBLY See Figures 3 - 4, page 10. WARNING: Collected sanding dust from sanding surface coatings such as ...

User Manual
Page 9
Any finish or resin on one spot too long as the sander's rapid action may soften from workpiece. Remove the hand from vent area, remove sanding disc, then with the hand removed from vent area, turn sander off and wait until sanding disc comes to a complete stop, then remove it from the frictional heat. LUBRICATION All of the bearings in contact with a sufficient amount of the unit under normal operating conditions. English Applying additional pressure only slows the motor, rapidly wears sanding disc, and greatly reduces sander speed. Do not allow sanding on wood may ...
Any finish or resin on one spot too long as the sander's rapid action may soften from workpiece. Remove the hand from vent area, remove sanding disc, then with the hand removed from vent area, turn sander off and wait until sanding disc comes to a complete stop, then remove it from the frictional heat. LUBRICATION All of the bearings in contact with a sufficient amount of the unit under normal operating conditions. English Applying additional pressure only slows the motor, rapidly wears sanding disc, and greatly reduces sander speed. Do not allow sanding on wood may ...

User Manual 2
Page 2
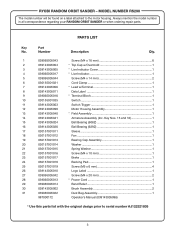
MODEL NUMBER RS290 Use this exploded view with original design prior to serial number AJ122321805 5 6 8 12 1 2 3 4 7 10 9 11 13 15 12 14 1 1 26 27 28 29 16 17 18 30 30 19 31 20 21 22 23 24 25 2 RYOBI RANDOM ORBIT SANDER -
MODEL NUMBER RS290 Use this exploded view with original design prior to serial number AJ122321805 5 6 8 12 1 2 3 4 7 10 9 11 13 15 12 14 1 1 26 27 28 29 16 17 18 30 30 19 31 20 21 22 23 24 25 2 RYOBI RANDOM ORBIT SANDER -
User Manual 2
Page 3
MODEL NUMBER RS290 The model number will be found on a label attached to serial number AJ122321805 3 RYOBI RANDOM ORBIT SANDER - Always mention the model number in all correspondence regarding your RANDOM ORBIT SANDER or when ordering repair parts. PARTS LIST Key Part ...
MODEL NUMBER RS290 The model number will be found on a label attached to serial number AJ122321805 3 RYOBI RANDOM ORBIT SANDER - Always mention the model number in all correspondence regarding your RANDOM ORBIT SANDER or when ordering repair parts. PARTS LIST Key Part ...

User Manual 2
Page 4
For the service center nearest you call 1-800-5252579. 4 MODEL NUMBER RS290 Use this exploded view for tools after serial number AJ122321805 1 27 2 26 3 7 25 4 1 8 7 5 10 9 10 11 6 1 24 23 12 13 14 15 16 17 22 18 19 20 21 NOTE: To avoid the possibility of alteration or damage to this product, service should be performed by your nearest Ryobi Authorized Service Center. RYOBI RANDOM ORBIT SANDER -
For the service center nearest you call 1-800-5252579. 4 MODEL NUMBER RS290 Use this exploded view for tools after serial number AJ122321805 1 27 2 26 3 7 25 4 1 8 7 5 10 9 10 11 6 1 24 23 12 13 14 15 16 17 22 18 19 20 21 NOTE: To avoid the possibility of alteration or damage to this product, service should be performed by your nearest Ryobi Authorized Service Center. RYOBI RANDOM ORBIT SANDER -

User Manual 2
Page 5
... 1 10 039143005002 Brush Assembly 2 11 039143005041 Armature Assembly (Inc. MODEL NUMBER RS290 The model number will be found on a label attached to the motor housing. RYOBI RANDOM ORBIT SANDER -
... 1 10 039143005002 Brush Assembly 2 11 039143005041 Armature Assembly (Inc. MODEL NUMBER RS290 The model number will be found on a label attached to the motor housing. RYOBI RANDOM ORBIT SANDER -

User Manual 2
Page 6
MODEL NUMBER RS290 BLACK LEAD SWITCH MOTOR RED LEAD RED LEAD BLACK LEAD WHITE LEAD BRUSH ASSEMBLY BLACK LEAD TERMINAL BLOCK BLACK LEAD POWER CORD Use this wiring diagram with original design prior to serial number AJ122321805 WIRING DIAGRAM 6 RYOBI RANDOM ORBIT SANDER -
MODEL NUMBER RS290 BLACK LEAD SWITCH MOTOR RED LEAD RED LEAD BLACK LEAD WHITE LEAD BRUSH ASSEMBLY BLACK LEAD TERMINAL BLOCK BLACK LEAD POWER CORD Use this wiring diagram with original design prior to serial number AJ122321805 WIRING DIAGRAM 6 RYOBI RANDOM ORBIT SANDER -

User Manual 2
Page 7
MODEL NUMBER RS290 RED LEAD SWITCH BLACK LEAD BRUSH ASSEMBLIES MOTOR WHITE LEAD POWER CORD BLACK LEAD Use this wiring diagram for tools after serial number AJ122321805 WIRING DIAGRAM 7 RYOBI RANDOM ORBIT SANDER -
MODEL NUMBER RS290 RED LEAD SWITCH BLACK LEAD BRUSH ASSEMBLIES MOTOR WHITE LEAD POWER CORD BLACK LEAD Use this wiring diagram for tools after serial number AJ122321805 WIRING DIAGRAM 7 RYOBI RANDOM ORBIT SANDER -

User Manual 3
Page 2
MODEL NUMBER RS290G 1 27 2 26 3 7 25 4 1 8 7 5 10 9 10 11 6 1 24 23 12 13 14 15 16 17 22 18 19 20 21 NOTE: To avoid the possibility of alteration or damage to this product, service should be performed by your nearest Ryobi Authorized Service Center. For the service center nearest you call 1-800-525-2579. 2 RYOBI RANDOM ORBIT SANDER -
MODEL NUMBER RS290G 1 27 2 26 3 7 25 4 1 8 7 5 10 9 10 11 6 1 24 23 12 13 14 15 16 17 22 18 19 20 21 NOTE: To avoid the possibility of alteration or damage to this product, service should be performed by your nearest Ryobi Authorized Service Center. For the service center nearest you call 1-800-525-2579. 2 RYOBI RANDOM ORBIT SANDER -

User Manual 3
Page 3
... Logo Label 1 039065005042 Screw (M4 x 20 mm 2 039143012001 Motor Housing Assembly 1 039143005042 Field Assembly 1 039143005024 Ball Bearing (608z 1 039143005002 Brush Assembly 2 039143005041 Armature Assembly (Inc. RYOBI RANDOM ORBIT SANDER -
... Logo Label 1 039065005042 Screw (M4 x 20 mm 2 039143012001 Motor Housing Assembly 1 039143005042 Field Assembly 1 039143005024 Ball Bearing (608z 1 039143005002 Brush Assembly 2 039143005041 Armature Assembly (Inc. RYOBI RANDOM ORBIT SANDER -

User Manual 3
Page 4
RYOBI RANDOM ORBIT SANDER - MODEL NUMBER RS290G RED LEAD SWITCH BLACK LEAD BRUSH ASSEMBLIES MOTOR WHITE LEAD POWER CORD BLACK LEAD WIRING DIAGRAM 4
RYOBI RANDOM ORBIT SANDER - MODEL NUMBER RS290G RED LEAD SWITCH BLACK LEAD BRUSH ASSEMBLIES MOTOR WHITE LEAD POWER CORD BLACK LEAD WIRING DIAGRAM 4
