

User Manual (user Manual) (English)
Page 15
... back of the monitor. 2. Pin Press the button on the back of the stand in order to lock down . DVI port Connect the DVI Cable to the unit. AudioPower - Power on the stand) before locking it down the stand. Note : Always have your monitor faced front side down on a level surface (not...
... back of the monitor. 2. Pin Press the button on the back of the stand in order to lock down . DVI port Connect the DVI Cable to the unit. AudioPower - Power on the stand) before locking it down the stand. Note : Always have your monitor faced front side down on a level surface (not...

User Manual (user Manual) (English)
Page 16
SyncMaster 170N/171N/172N/173N/191N/192N/193N/150N/151N/152N Unpacking Front Rear (The configuration at the back of the stand in order to lock down . Power port 2. Signal port 4. Pin a. Press the button on the bottom rear of the monitor may cause your monitor to topple or fall and ... side down on a level surface (not resting on /off Switch Connect the DC Adapter for further information regarding cable connections. Power on the stand) before locking it down the stand. Note : Always have your monitor.
SyncMaster 170N/171N/172N/173N/191N/192N/193N/150N/151N/152N Unpacking Front Rear (The configuration at the back of the stand in order to lock down . Power port 2. Signal port 4. Pin a. Press the button on the bottom rear of the monitor may cause your monitor to topple or fall and ... side down on a level surface (not resting on /off Switch Connect the DC Adapter for further information regarding cable connections. Power on the stand) before locking it down the stand. Note : Always have your monitor.

User Manual (user Manual) (English)
Page 31
...Push the Menu button to fine tune and get the best image by removing noises that creates unstable images with jitters and shimmers. Image Lock is used to open the Fine adjustment screen. 4. Push the Menu button twice to remove any noise. If satisfactory results are not ...obtained using the Fine adjustment, use the Coarse adjustment and then use Fine again. 1. Push the [ - ] button or [ + ] button until the Image Lock screen is displayed. 3. Use the [ - ] button or [ + ] button to open the Coarse adjustment screen. 5. Push the [ - ] button or [ + ] ...
...Push the Menu button to fine tune and get the best image by removing noises that creates unstable images with jitters and shimmers. Image Lock is used to open the Fine adjustment screen. 4. Push the Menu button twice to remove any noise. If satisfactory results are not ...obtained using the Fine adjustment, use the Coarse adjustment and then use Fine again. 1. Push the [ - ] button or [ + ] button until the Image Lock screen is displayed. 3. Use the [ - ] button or [ + ] button to open the Coarse adjustment screen. 5. Push the [ - ] button or [ + ] ...
User Manual (user Manual) (English)
Page 38
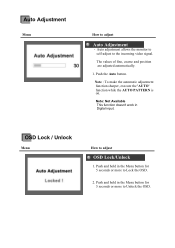
... adjusted automatically. 1. Push the Auto button. Note : To make the automatic adjustment function sharper, execute the 'AUTO' function while the AUTO PATTERN is on. OSD Lock / Unlock Menu How to the incoming video signal. Push and hold in the Menu button for 5 seconds or more to adjust Auto Adjustment - Push and... Menu button for 5 seconds or more to Unlock the OSD. Note: Not Available This function doesn't work in Digital input. Auto Adjustment Menu How to Lock the OSD. 2.
... adjusted automatically. 1. Push the Auto button. Note : To make the automatic adjustment function sharper, execute the 'AUTO' function while the AUTO PATTERN is on. OSD Lock / Unlock Menu How to the incoming video signal. Push and hold in the Menu button for 5 seconds or more to adjust Auto Adjustment - Push and... Menu button for 5 seconds or more to Unlock the OSD. Note: Not Available This function doesn't work in Digital input. Auto Adjustment Menu How to Lock the OSD. 2.

User Manual (user Manual) (English)
Page 40
... if the monitor status is no image, press the 'Source' button. Check List Solutions Is the power cord connected properly? Can you see if you locked the On Screen If there is in PowerSaver mode. The monitor is still no image on the screen. Have you can remedy any key on...
... if the monitor status is no image, press the 'Source' button. Check List Solutions Is the power cord connected properly? Can you see if you locked the On Screen If there is in PowerSaver mode. The monitor is still no image on the screen. Have you can remedy any key on...

User Manual (user Manual) (English)
Page 43
... Cable" on the screen. Has the video card been set properly? Adjust screen image position and size using the OSD. I cannot see if you locked the On Screen Unlock the OSD by referring to the video card manual. Check the signal cable connection. Check the signal cable connection. If the... move the mouse to activate the monitor and restore the image on the screen. The screen shows strange colors or just black and white. SyncMaster 170N/171N/172N/173N/191N/192N/193N/150N/151N/152N Check List Q & A Self-Test Feature Check Before calling for Windows ME/XP/2000 ) and ...
... Cable" on the screen. Has the video card been set properly? Adjust screen image position and size using the OSD. I cannot see if you locked the On Screen Unlock the OSD by referring to the video card manual. Check the signal cable connection. Check the signal cable connection. If the... move the mouse to activate the monitor and restore the image on the screen. The screen shows strange colors or just black and white. SyncMaster 170N/171N/172N/173N/191N/192N/193N/150N/151N/152N Check List Q & A Self-Test Feature Check Before calling for Windows ME/XP/2000 ) and ...


