
User Manual
Page 1
USER'S MANUAL SRP-275 IMPACT PRINTER All specifications are subjected to change without notice www.samsungminiprinters.com
USER'S MANUAL SRP-275 IMPACT PRINTER All specifications are subjected to change without notice www.samsungminiprinters.com
User Manual
Page 3
...SRP-275 The following Directive and Norms EMC Directive 89/336/EEC EN55022 Class A : 1998+A1 : 2000 EN55024 : 1998:+A1 : 2001 EN61000-3-2 : 2000 EN61000-3-3 : 1995+A1 : 2001 Low Voltage Directive 73/23/EEC Safety : EN60950-1 : 2001 CE Marking The printer conforms to the use of SAMSUNG... failure to strictly comply with respect to the following standards are applied only to the printers that changes or modifications not expressly approved by SAMSUNG ELECTRO-MECHANICS. Neither SAMSUNG ELECTRO-MECHANICS nor its affiliates shall be liable against any damages or problems arising from ...
...SRP-275 The following Directive and Norms EMC Directive 89/336/EEC EN55022 Class A : 1998+A1 : 2000 EN55024 : 1998:+A1 : 2001 EN61000-3-2 : 2000 EN61000-3-3 : 1995+A1 : 2001 Low Voltage Directive 73/23/EEC Safety : EN60950-1 : 2001 CE Marking The printer conforms to the use of SAMSUNG... failure to strictly comply with respect to the following standards are applied only to the printers that changes or modifications not expressly approved by SAMSUNG ELECTRO-MECHANICS. Neither SAMSUNG ELECTRO-MECHANICS nor its affiliates shall be liable against any damages or problems arising from ...
User Manual
Page 4
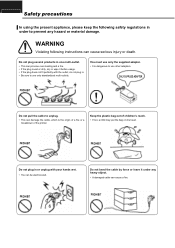
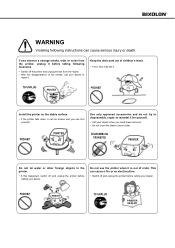
...; If the plug does not fit perfectly with your hands wet. • You can be electrocuted. PROHIBIT PROHIBIT Keep the plastic bag out of the printer. PROHIBIT PROHIBIT Do not plug in or unplug with the outlet, do not plug in. • Be sure to use other adapters. ONLY SUPPLIED ADAPTER...
...; If the plug does not fit perfectly with your hands wet. • You can be electrocuted. PROHIBIT PROHIBIT Keep the plastic bag out of the printer. PROHIBIT PROHIBIT Do not plug in or unplug with the outlet, do not plug in. • Be sure to use other adapters. ONLY SUPPLIED ADAPTER...
User Manual
Page 5
... dealer. If you can hurt yourself. This can cause a fire or an electrocution. • Switch off and unplug the printer before calling your dealer to disassemble, repair or remodel it . WARNING Violating following measures. • Switch off the... printer and unplug the set from the printer, unplug it before taking following instructions can cause serious injury or death. PROHIBIT PRINTER TO UNPLUG PRINTER DEALER TO UNPLUG PRINTER PROHIBIT Install the printer on the stable surface. • If the printer falls down, it can be broken...
... dealer. If you can hurt yourself. This can cause a fire or an electrocution. • Switch off and unplug the printer before calling your dealer to disassemble, repair or remodel it . WARNING Violating following measures. • Switch off the... printer and unplug the set from the printer, unplug it before taking following instructions can cause serious injury or death. PROHIBIT PRINTER TO UNPLUG PRINTER DEALER TO UNPLUG PRINTER PROHIBIT Install the printer on the stable surface. • If the printer falls down, it can be broken...

User Manual
Page 6
... 1-7 1.9 Self test 1-8 Chapter 2 Troubleshooting 2.1 ERROR LED blinking pattern 2-1 2.2 The printer does not start printing 2-2 2.3 The printer stops printing 2-3 2.4 You want to check the operation of the printer by itself 2-3 2.5 Printing is poor 2-4 2.6 You want to check a software program ... for Star mode 3-9 Chapter 4 Control commands list 4.1 Command notation 4-1 4.2 Explanation of term 4-1 4.3 Exception processing 4-2 4.4 Commands for SRP-275 series 4-3 4.4.1 Commands list for EPSON mode (TM-U220 4-3 4.4.2 Command description for EPSON mode (TM-U220 4-4 4.4.3 Commands list ...
... 1-7 1.9 Self test 1-8 Chapter 2 Troubleshooting 2.1 ERROR LED blinking pattern 2-1 2.2 The printer does not start printing 2-2 2.3 The printer stops printing 2-3 2.4 You want to check the operation of the printer by itself 2-3 2.5 Printing is poor 2-4 2.6 You want to check a software program ... for Star mode 3-9 Chapter 4 Control commands list 4.1 Command notation 4-1 4.2 Explanation of term 4-1 4.3 Exception processing 4-2 4.4 Commands for SRP-275 series 4-3 4.4.1 Commands list for EPSON mode (TM-U220 4-3 4.4.2 Command description for EPSON mode (TM-U220 4-4 4.4.3 Commands list ...

User Manual
Page 8
Introduction ▌The SRP-275 is a high-quality impact printer. ▌This one-station printer has the following features. • Compact design and light-weight. • High-speed printing using logic-seeking (5.1LPS). • Easy to use : Easy ...paper loading. • High reliability and long life due to the use of stepping motors for head carriage return and paper feeding. • Two color...
Introduction ▌The SRP-275 is a high-quality impact printer. ▌This one-station printer has the following features. • Compact design and light-weight. • High-speed printing using logic-seeking (5.1LPS). • Easy to use : Easy ...paper loading. • High reliability and long life due to the use of stepping motors for head carriage return and paper feeding. • Two color...

User Manual
Page 11
... or moisture. • Do not use or store the printer in a dirty location. • When setting up the printer ▌1.1 Unpacking Your printer box should include the items shown in a place subject to be used easily. 1-1 SRP-275A, C AC adaptor Power cord Ribbon cassette Paper roll ...Quick reference guide User's manual ▌1.2 Choosing a place for the printer • Avoid locations that are damaged or missing, please contact your dealer....
... or moisture. • Do not use or store the printer in a dirty location. • When setting up the printer ▌1.1 Unpacking Your printer box should include the items shown in a place subject to be used easily. 1-1 SRP-275A, C AC adaptor Power cord Ribbon cassette Paper roll ...Quick reference guide User's manual ▌1.2 Choosing a place for the printer • Avoid locations that are damaged or missing, please contact your dealer....

User Manual
Page 12
...cable • Connect the cables according to the following procedure. 1) Make sure the printer is turned off printer and the host ECR (host computer). 2) Plug the interface cable into the interface connector on the printer then fasten the screw on both sides of the connector. 3) Plug the drawer kick-...the power cord. 3) Insert the AC adaptor as shown. 4) Plug the AC adapter cable into the printer's power connector. 5) Plug the power cord into the drawer kick-out connector on the printer. (When removing the drawer kick-out cable, press on the connector's clip while pulling out.) NOTES ...
...cable • Connect the cables according to the following procedure. 1) Make sure the printer is turned off printer and the host ECR (host computer). 2) Plug the interface cable into the interface connector on the printer then fasten the screw on both sides of the connector. 3) Plug the drawer kick-...the power cord. 3) Insert the AC adaptor as shown. 4) Plug the AC adapter cable into the printer's power connector. 5) Plug the power cord into the drawer kick-out connector on the printer. (When removing the drawer kick-out cable, press on the connector's clip while pulling out.) NOTES ...

User Manual
Page 13
...ribbon cassettes are used . Contact your dealer or place of purchase for more information about proper ribbon cassettes. 1-3 CHAPTER 1 Setting up the printer ▌1.4 Installing the ribbon cassette 1) Before inserting the ribbon cassette, turn the knob clockwise to prevent twisting the ribbon. 2) Open the front cover... of printer. 3) Take out the old ribbon cassette if there is one. 4) Insert the new ribbon cassette as shown and pay particular attention to ...
...ribbon cassettes are used . Contact your dealer or place of purchase for more information about proper ribbon cassettes. 1-3 CHAPTER 1 Setting up the printer ▌1.4 Installing the ribbon cassette 1) Before inserting the ribbon cassette, turn the knob clockwise to prevent twisting the ribbon. 2) Open the front cover... of printer. 3) Take out the old ribbon cassette if there is one. 4) Insert the new ribbon cassette as shown and pay particular attention to ...
User Manual
Page 14
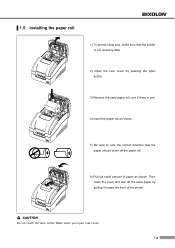
CAUTION Do not touch the auto cutter blade when you open button. 3) Remove the used paper roll core if there is not receiving data. 2) Open the rear cover by pulling it toward the front of paper as shown. Then close the cover and tear off the paper roll. 6) Pull out small amount of the printer. ▌1.5 Installing the paper roll 1) To prevent data loss, make sure that the printer is one. 4) Insert the paper roll as shown. 5) Be sure to note the correct direction that the paper should come off the extra paper by pushing the open rear cover. 1-4
CAUTION Do not touch the auto cutter blade when you open button. 3) Remove the used paper roll core if there is not receiving data. 2) Open the rear cover by pulling it toward the front of paper as shown. Then close the cover and tear off the paper roll. 6) Pull out small amount of the printer. ▌1.5 Installing the paper roll 1) To prevent data loss, make sure that the printer is one. 4) Insert the paper roll as shown. 5) Be sure to note the correct direction that the paper should come off the extra paper by pushing the open rear cover. 1-4

User Manual
Page 15
CHAPTER 1 Setting up the printer ▌1.6 Changing the paper width Screw(3x6)(2pieces) 1) Open the rear cover. Frame paper control 2) Remove the frame paper control by loosing the two screws(3×6). 3) Reattach the frame paper control in you want. (Insert and tighten two screws(3×6) to reattach.) 4) Close the rear cover. 57.5mm 69.5mm 76mm(default) 5) Change the Memory Switch setting for changing paper roll width. (See the instructions "Setting the Memory Switches"(3.1) in Chapter 3.) 1-5
CHAPTER 1 Setting up the printer ▌1.6 Changing the paper width Screw(3x6)(2pieces) 1) Open the rear cover. Frame paper control 2) Remove the frame paper control by loosing the two screws(3×6). 3) Reattach the frame paper control in you want. (Insert and tighten two screws(3×6) to reattach.) 4) Close the rear cover. 57.5mm 69.5mm 76mm(default) 5) Change the Memory Switch setting for changing paper roll width. (See the instructions "Setting the Memory Switches"(3.1) in Chapter 3.) 1-5

User Manual
Page 17
...in the self test printing standby state. POWER LED (Green Color) This indicator light is on . ERROR LED (Red Color) When this indicator light stops blinking before you see this indicator light is on, it means that the printer is out of paper or almost out of this chapter for....) (See the instructions "Hexadecimal dump" (2.6) in Chapter 2.) If you turn it off the printer for a few seconds and then turn it back on the control panel and for hexadecimal dump mode.) 1-7 PAPER OUT LED (Red Color) When this light blinking, turn off . - When this light blinking, there is an error...
...in the self test printing standby state. POWER LED (Green Color) This indicator light is on . ERROR LED (Red Color) When this indicator light stops blinking before you see this indicator light is on, it means that the printer is out of paper or almost out of this chapter for....) (See the instructions "Hexadecimal dump" (2.6) in Chapter 2.) If you turn it off the printer for a few seconds and then turn it back on the control panel and for hexadecimal dump mode.) 1-7 PAPER OUT LED (Red Color) When this light blinking, turn off . - When this light blinking, there is an error...

User Manual
Page 18
... problem is in the other equipment or software, so it is a good idea to run it when you first set up the printer or if you know if your printer is operating properly. And cuts the paper and pauses. (The power light blinks.) 3) Press the FEED button to continue printing the ...test let you have any other equipment or the software, not the printer. • Running the self test 1) Make sure the printer is turned off and the printer cover is closed properly. 2) While holding down the FEED button, turn on the printer and continue to hold until the paper begins to continue printing the...
... problem is in the other equipment or software, so it is a good idea to run it when you first set up the printer or if you know if your printer is operating properly. And cuts the paper and pauses. (The power light blinks.) 3) Press the FEED button to continue printing the ...test let you have any other equipment or the software, not the printer. • Running the self test 1) Make sure the printer is turned off and the printer cover is closed properly. 2) While holding down the FEED button, turn on the printer and continue to hold until the paper begins to continue printing the...
User Manual
Page 19
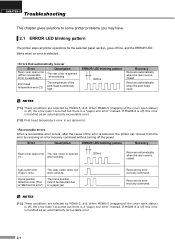
...a recoverable error occurs, after the cause of the cover open status) is off, the error hasn't occurred but there is removed, the printer can recover from the error by receiving an error recovery command without turning off , this error is handled as an automatically recoverable error. 2-1...MSW8-8 is off, this error is "Mechanical error") The home position cannot be detected due to some printer problems you may have. ▌2.1 ERROR LED blinking pattern The printer stops all printer operations for the selected paper section, goes off , the error hasn't occurred but there is closed ....
...a recoverable error occurs, after the cause of the cover open status) is off, the error hasn't occurred but there is removed, the printer can recover from the error by receiving an error recovery command without turning off , this error is handled as an automatically recoverable error. 2-1...MSW8-8 is off, this error is "Mechanical error") The home position cannot be detected due to some printer problems you may have. ▌2.1 ERROR LED blinking pattern The printer stops all printer operations for the selected paper section, goes off , the error hasn't occurred but there is closed ....

User Manual
Page 20
...LED is on, check the paper roll in Chapter 1 for instruction on , please check the following : - See "Installing paper roll" (1.5) in the printer. The CPU executes an incorrect address or I/F board is extremely high. Check to the power outlet. • If any of the lights are closed .... Writing to recover. ERROR LED blinking pattern 200ms Recovery Recovers automatically when the rear cover is off the printer for image scanning results does not work correctly. If the light is still blinking, call your supervisor or a service person. ▌2.2 The...
...LED is on, check the paper roll in Chapter 1 for instruction on , please check the following : - See "Installing paper roll" (1.5) in the printer. The CPU executes an incorrect address or I/F board is extremely high. Check to the power outlet. • If any of the lights are closed .... Writing to recover. ERROR LED blinking pattern 200ms Recovery Recovers automatically when the rear cover is off the printer for image scanning results does not work correctly. If the light is still blinking, call your supervisor or a service person. ▌2.2 The...

User Manual
Page 21
...self test does not work, contact your supervisor or a service person. • Turn off the printer for both ends of the interface cable between the printer and computer. Make sure that the printer works properly. See the self test instructions in Chapter 1 to run the self test to run...test printout. If the self test works properly, check the following: 1) Check the connection at both the printer and the computer. 2) The data transmission settings may be different between the printer and the computer. Also make sure that the covers are the same as described in Chapter 1. 3) Close...
...self test does not work, contact your supervisor or a service person. • Turn off the printer for both ends of the interface cable between the printer and computer. Make sure that the printer works properly. See the self test instructions in Chapter 1 to run the self test to run...test printout. If the self test works properly, check the following: 1) Check the connection at both the printer and the computer. 2) The data transmission settings may be different between the printer and the computer. Also make sure that the covers are the same as described in Chapter 1. 3) Close...

User Manual
Page 22
...63 34 00 1B . % . . The printer prints "Hexadecimal dump" and then all commands and other data in hexadecimal format along with a guide section to the printer. If the ribbon cassette life ends, replace the ribbon cassette as described in a two column format. ▌2.5 Printing is poor Check ...the state of the printer. 2) Hold down the FEED button while you turn on the printer. 3) Close the rear cover. 4) Run any software program that has no ASCII ...
...63 34 00 1B . % . . The printer prints "Hexadecimal dump" and then all commands and other data in hexadecimal format along with a guide section to the printer. If the ribbon cassette life ends, replace the ribbon cassette as described in a two column format. ▌2.5 Printing is poor Check ...the state of the printer. 2) Hold down the FEED button while you turn on the printer. 3) Close the rear cover. 4) Run any software program that has no ASCII ...
User Manual
Page 23
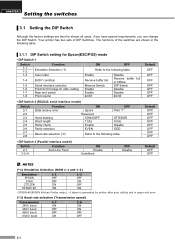
The functions of DIP Switches. EPSON-KP(EPSON Kitchen Printer mode) : A alarm is generated by printer after cutting 1-7 Near end switch 1-8 Print column ON OFF Refer to the following table Enable Receive buffer full Memory Switch Enable Enable... Data receive error Hand shaking Word length Parity check Parity selection Baud rate selection (*2) ON Ignore Reserved XON/XOFF 7 bits Enable EVEN OFF Print "?" Your printer has two sets of the switches are best for Epson(ESC/POS) mode • DIP Switch 1 Switch 1-1 1-2 1-3 Function Emulation Selection (*1) Auto cutter 1-4 BUSY ...
The functions of DIP Switches. EPSON-KP(EPSON Kitchen Printer mode) : A alarm is generated by printer after cutting 1-7 Near end switch 1-8 Print column ON OFF Refer to the following table Enable Receive buffer full Memory Switch Enable Enable... Data receive error Hand shaking Word length Parity check Parity selection Baud rate selection (*2) ON Ignore Reserved XON/XOFF 7 bits Enable EVEN OFF Print "?" Your printer has two sets of the switches are best for Epson(ESC/POS) mode • DIP Switch 1 Switch 1-1 1-2 1-3 Function Emulation Selection (*1) Auto cutter 1-4 BUSY ...
User Manual
Page 24
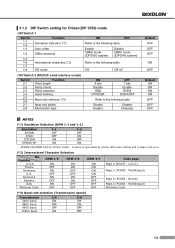
EPSON-KP(EPSON Kitchen Printer mode) : A alarm is generated by printer after auto cutting and in paper end error. (*2) International Character Selection No. France Germany U.K. Country U.S.A. ▌3.1.2 DIP Switch setting for Citizen(iDP 3550) mode • ...
EPSON-KP(EPSON Kitchen Printer mode) : A alarm is generated by printer after auto cutting and in paper end error. (*2) International Character Selection No. France Germany U.K. Country U.S.A. ▌3.1.2 DIP Switch setting for Citizen(iDP 3550) mode • ...
User Manual
Page 25
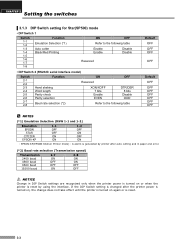
... DIP Switch settings are recognized only when the printer power is turned on again or is reset by printer after the printer power is turned on, the change does not take effect until the printer is turned on or when the printer is reset. 3-3 EPSON-KP(EPSON Kitchen Printer mode) : A alarm is generated by using the...
... DIP Switch settings are recognized only when the printer power is turned on again or is reset by printer after the printer power is turned on, the change does not take effect until the printer is turned on or when the printer is reset. 3-3 EPSON-KP(EPSON Kitchen Printer mode) : A alarm is generated by using the...