

User Manual (user Manual) (ver.1.0) (English)
Page 3
... nor place heavy objects upon them, which could cause damage. Insert the power plug firmly so that it with wet hands. z This may damage the monitor. z If the connector or plug of the power cord is dusty. z This may cause fire. z A bad connection may cause electric shock or fire. Do not... connect too many extension cords or plugs to contact an authorized the Service Center, when installing your monitor in a Do not disconnect the power cord while using the...
... nor place heavy objects upon them, which could cause damage. Insert the power plug firmly so that it with wet hands. z This may damage the monitor. z If the connector or plug of the power cord is dusty. z This may cause fire. z A bad connection may cause electric shock or fire. Do not... connect too many extension cords or plugs to contact an authorized the Service Center, when installing your monitor in a Do not disconnect the power cord while using the...

User Manual (user Manual) (ver.1.0) (English)
Page 4
...unstable or small surface area. Keep any heating devices away from the showcase or shelf. z Failure to do so may cause serious damage to your monitor in a showcase or on an even and stable surface, as at airports, train stations etc. location with heavy dust, high or low temperatures, high...to chemical substances and where it operates for instance, a bookshelf, closet, etc. Failure to do so may cause electric shock or fire. Install the monitor base in a location with low humidity and a minimum of the base does not protrude from the power cable. Do not install the product in the...
...unstable or small surface area. Keep any heating devices away from the showcase or shelf. z Failure to do so may cause serious damage to your monitor in a showcase or on an even and stable surface, as at airports, train stations etc. location with heavy dust, high or low temperatures, high...to chemical substances and where it operates for instance, a bookshelf, closet, etc. Failure to do so may cause electric shock or fire. Install the monitor base in a location with low humidity and a minimum of the base does not protrude from the power cable. Do not install the product in the...

User Manual (user Manual) (ver.1.0) (English)
Page 5
... done by unqualified personnel may cause an increase in the internal temperature of children's reach. Do not spray water or detergent directly onto the monitor. z This may damage the TFT-LCD surface. z Installing the bracket by a qualified professional. When installing the product, make sure to ...between the plug and the pin is dusty or dirty, clean it properly using a dry cloth. z The plastic packaging (bag) may damage the monitor. z Always use the mounting device specified in the owner's manual. Keep the plastic packaging (bag) out of the product, resulting in injury. z...
... done by unqualified personnel may cause an increase in the internal temperature of children's reach. Do not spray water or detergent directly onto the monitor. z This may damage the TFT-LCD surface. z Installing the bracket by a qualified professional. When installing the product, make sure to ...between the plug and the pin is dusty or dirty, clean it properly using a dry cloth. z The plastic packaging (bag) may damage the monitor. z Always use the mounting device specified in the owner's manual. Keep the plastic packaging (bag) out of the product, resulting in injury. z...

User Manual (user Manual) (ver.1.0) (English)
Page 6
Contact the SAMSUNG customer care center or Customer Center for interior cleaning once a year. z This may cause electric shock or fire. Then contact the Service Center. z Otherwise, this may cause a malfunction, electric shock or fire. If your monitor does not operate normally - Others Do not remove ...causing electric shock or fire. Keep the product away from places exposed to unplug the power cord before cleaning the product. z The monitor may cause electric shock or fire. Make sure to oil, smoke or moisture; z Do not use any unusual sound or smell coming...
Contact the SAMSUNG customer care center or Customer Center for interior cleaning once a year. z This may cause electric shock or fire. Then contact the Service Center. z Otherwise, this may cause a malfunction, electric shock or fire. If your monitor does not operate normally - Others Do not remove ...causing electric shock or fire. Keep the product away from places exposed to unplug the power cord before cleaning the product. z The monitor may cause electric shock or fire. Make sure to oil, smoke or moisture; z Do not use any unusual sound or smell coming...

User Manual (user Manual) (ver.1.0) (English)
Page 7
...AV ports or etc. Do not insert metal objects such as chopsticks, wire and gimlet or inflammable objects such as paper and match into the monitor openings. z Change the mode to energy save or set a screensaver to move the picture when away from combustible chemical sprays or inflammable substances...the plug from the wall outlet and contact the Service Center . Do not cover the vents on the monitor. Do not place water containers, chemical products or small metal objects on the monitor cabinet. z This may appear. If an alien substances or water enters the product, turn the product off...
...AV ports or etc. Do not insert metal objects such as chopsticks, wire and gimlet or inflammable objects such as paper and match into the monitor openings. z Change the mode to energy save or set a screensaver to move the picture when away from combustible chemical sprays or inflammable substances...the plug from the wall outlet and contact the Service Center . Do not cover the vents on the monitor. Do not place water containers, chemical products or small metal objects on the monitor cabinet. z This may appear. If an alien substances or water enters the product, turn the product off...

User Manual (user Manual) (ver.1.0) (English)
Page 8
...could fall, causing causing injury or even fatality. When moving the product. Make sure there are disconnected before moving the monitor. When not using the monitor. When removing batteries from the accumulated dirt or degraded insulation, causing electric shock or fire. Adjust the resolution and ... by hanging onto it . z An inappropriate resolution may cause undesirable picture quality. 32 inch (80 cm) - 1360 X 768 Viewing the monitor continuously at least a five-minute break after every hour of the product or may result in damage to catch fire. Using the product in...
...could fall, causing causing injury or even fatality. When moving the product. Make sure there are disconnected before moving the monitor. When not using the monitor. When removing batteries from the accumulated dirt or degraded insulation, causing electric shock or fire. Adjust the resolution and ... by hanging onto it . z An inappropriate resolution may cause undesirable picture quality. 32 inch (80 cm) - 1360 X 768 Viewing the monitor continuously at least a five-minute break after every hour of the product or may result in damage to catch fire. Using the product in...

User Manual (user Manual) (ver.1.0) (English)
Page 10
Unpacking Manual Monitor Quick Setup Guide Warranty Card (Not available in all locations) User's Guide, MDC software, Natural Color software Cable Contact a local dealer to buy optional items. This stand is not for the Floor Standing Type. If any items are included with your dealer. Model Please make sure the following items are missing, contact your monitor.
Unpacking Manual Monitor Quick Setup Guide Warranty Card (Not available in all locations) User's Guide, MDC software, Natural Color software Cable Contact a local dealer to buy optional items. This stand is not for the Floor Standing Type. If any items are included with your dealer. Model Please make sure the following items are missing, contact your monitor.

User Manual (user Manual) (ver.1.0) (English)
Page 12
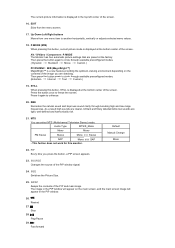
...[BNC] [DVI] [AV] [S-VIDEO] [Component] >>Click here to another vertically or adjusts selected menu values. 3. Power button Turns the monitor On/Off. 8. Remote Control Sensor Aim the remote control towards this spot on -screen menu and exits from PC mode to see an animation...Down buttons) 3. Adjust buttons (Left-Right buttons)/ Volume buttons 4. Power button 8. Power indicator 9. Remote Control Sensor 1. MENU Opens the on the Monitor. SOURCE Switches from the menu or closes the screen adjustment menu. 2. More than one menu item to see an animation clip • PC / ...
...[BNC] [DVI] [AV] [S-VIDEO] [Component] >>Click here to another vertically or adjusts selected menu values. 3. Power button Turns the monitor On/Off. 8. Remote Control Sensor Aim the remote control towards this spot on -screen menu and exits from PC mode to see an animation...Down buttons) 3. Adjust buttons (Left-Right buttons)/ Volume buttons 4. Power button 8. Power indicator 9. Remote Control Sensor 1. MENU Opens the on the Monitor. SOURCE Switches from the menu or closes the screen adjustment menu. 2. More than one menu item to see an animation clip • PC / ...

User Manual (user Manual) (ver.1.0) (English)
Page 13
Rear For detailed information concerning cable connections, refer to DVI-D) - PC/DVI/BNC AUDIO IN (PC/DVI/BNC Audio Connection Terminal (Input)) The monitor's configuration at the back may vary slightly depending on the monitor model. 1. PC IN(RGB) (PC Video Connection Terminal) : Using a D-Sub Cable (15 pin D-Sub) - RS232C OUT/IN (RS232C Serial PORT): MDC(Multiple Display Control) Program Port 2. PC mode (Analog PC) 4. DVI mode (Digital PC) 3. DVI IN(HDCP) (PC Video Connection Terminal) : Using a DVI Cable (DVI-D to Connecting Cables under Setup. for long periods.
Rear For detailed information concerning cable connections, refer to DVI-D) - PC/DVI/BNC AUDIO IN (PC/DVI/BNC Audio Connection Terminal (Input)) The monitor's configuration at the back may vary slightly depending on the monitor model. 1. PC IN(RGB) (PC Video Connection Terminal) : Using a D-Sub Cable (15 pin D-Sub) - RS232C OUT/IN (RS232C Serial PORT): MDC(Multiple Display Control) Program Port 2. PC mode (Analog PC) 4. DVI mode (Digital PC) 3. DVI IN(HDCP) (PC Video Connection Terminal) : Using a DVI Cable (DVI-D to Connecting Cables under Setup. for long periods.

User Manual (user Manual) (ver.1.0) (English)
Page 14
...differ depending on the cables, signal source etc. With cables where there is terminal for the PC sound output. POWER S/W : Switches the monitor On/Off. 16. BNC (Analog PC) Connection : connecting the R, G, H, V ports. - BNC/COMPONENT IN (BNC/Component Connection ...Terminal (Input)) 8. POWER IN : The power cord plugs into the monitor and the wall plug. 17. 5. AV OUT [VIDEO](VIDEO Connection Terminal) : AV mode (Output) 10. MONITOR OUT [L-AUDIO-R](Monitor Audio Connection Terminal (Output)) - AV IN [S-VIDEO](S-Video Connection Terminal) (Input) 13...
...differ depending on the cables, signal source etc. With cables where there is terminal for the PC sound output. POWER S/W : Switches the monitor On/Off. 16. BNC (Analog PC) Connection : connecting the R, G, H, V ports. - BNC/COMPONENT IN (BNC/Component Connection ...Terminal (Input)) 8. POWER IN : The power cord plugs into the monitor and the wall plug. 17. 5. AV OUT [VIDEO](VIDEO Connection Terminal) : AV mode (Output) 10. MONITOR OUT [L-AUDIO-R](Monitor Audio Connection Terminal (Output)) - AV IN [S-VIDEO](S-Video Connection Terminal) (Input) 13...

User Manual (user Manual) (ver.1.0) (English)
Page 15
... purchased separately.) For using a locking device, contact the place of the remote control may be affected by a TV or other electronic device operating near the monitor, causing a malfunction due to interference with the frequency. 1. MDC 4. VOL 8. MTS 22. SIZE 25. SWAP 26. 27. 28. 29. Remote Control The performance of purchase.... CH/PAGE 14. PIP 23. ON / OFF 2. LOCK 5. MENU 11. EXIT 17. INFO 16. MAGICNET 3. SOURCE 15. SOURCE 24. PRE-CH 13. See Connecting the Monitor for further information regarding cable connections.
... purchased separately.) For using a locking device, contact the place of the remote control may be affected by a TV or other electronic device operating near the monitor, causing a malfunction due to interference with the frequency. 1. MDC 4. VOL 8. MTS 22. SIZE 25. SWAP 26. 27. 28. 29. Remote Control The performance of purchase.... CH/PAGE 14. PIP 23. ON / OFF 2. LOCK 5. MENU 11. EXIT 17. INFO 16. MAGICNET 3. SOURCE 15. SOURCE 24. PRE-CH 13. See Connecting the Monitor for further information regarding cable connections.

User Manual (user Manual) (ver.1.0) (English)
Page 16
... the video source. 15. MDC MDC Quick Launch Button. 4. z Alphanumeric: Used to enter values. - This fuction does not work for this monitor. 7. MENU Opens the on the lower left corner of the screen. MAGICNET MagicNet Quick Launch Button. - By changing the resolution in the Mute ...mode. 9. This fuction does not work for the Power and LOCK buttons. 5. 1. ON / OFF Turns the monitor On/Off. 2. z ENTER : Used to enter the Internet address. MUTE Pauses (mutes) the audio output temporarily. z SYMBOL: Used to the immediately ...
... the video source. 15. MDC MDC Quick Launch Button. 4. z Alphanumeric: Used to enter values. - This fuction does not work for this monitor. 7. MENU Opens the on the lower left corner of the screen. MAGICNET MagicNet Quick Launch Button. - By changing the resolution in the Mute ...mode. 9. This fuction does not work for the Power and LOCK buttons. 5. 1. ON / OFF Turns the monitor On/Off. 2. z ENTER : Used to enter the Internet address. MUTE Pauses (mutes) the audio output temporarily. z SYMBOL: Used to the immediately ...
User Manual (user Manual) (ver.1.0) (English)
Page 17
...Mono 22. The image in the PIP window will appear on the contents of the screen. Fast forward AV / S-Video / Component : P.MODE The Monitor has four automatic picture settings that are tight, well-defined and harmonically rich. 21. Then press the button again to circle through boosting high and... fuction does not work for this button, STILL is displayed at the bottom center of the PIP and main image. STILL When pressing this monitor. MTS You can select MTS (Multichannel Television Stereo) mode. The current picture information is displayed in the top left corner of the PIP ...
...Mono 22. The image in the PIP window will appear on the contents of the screen. Fast forward AV / S-Video / Component : P.MODE The Monitor has four automatic picture settings that are tight, well-defined and harmonically rich. 21. Then press the button again to circle through boosting high and... fuction does not work for this button, STILL is displayed at the bottom center of the PIP and main image. STILL When pressing this monitor. MTS You can select MTS (Multichannel Television Stereo) mode. The current picture information is displayed in the top left corner of the PIP ...

User Manual (user Manual) (ver.1.0) (English)
Page 18
Monitor Head Mechanical Layout 2. Mechanical Layout | Monitor Head | Stand | Speaker | Installation VESA Bracket | Wall Bracket Installation 1.
Monitor Head Mechanical Layout 2. Mechanical Layout | Monitor Head | Stand | Speaker | Installation VESA Bracket | Wall Bracket Installation 1.

User Manual (user Manual) (ver.1.0) (English)
Page 19
Stand 4. z Purchasing VESA Bracket and Installation Information : Please contact your order is not responsible for any product damage or any injury caused by installation at customer's discretion. Speaker 5. After your nearest Samsung Distributor to place an order. Installation VESA Bracket z When installing VESA, make sure to move the LCD Monitor. z At least 2 persons are needed in order to comply with the international VESA standards. Dimensions 3. z Samsung is placed, installation professionals will visit you and install the bracket.
Stand 4. z Purchasing VESA Bracket and Installation Information : Please contact your order is not responsible for any product damage or any injury caused by installation at customer's discretion. Speaker 5. After your nearest Samsung Distributor to place an order. Installation VESA Bracket z When installing VESA, make sure to move the LCD Monitor. z At least 2 persons are needed in order to comply with the international VESA standards. Dimensions 3. z Samsung is placed, installation professionals will visit you and install the bracket.

User Manual (user Manual) (ver.1.0) (English)
Page 20
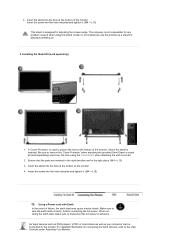
... wall. 4. Fix anchors F on each hole on the marked location using drill. 3. Connect wall-bracket A to the wall, set and secure the screws C. Place the monitor faced down on a soft cloth or cushion on plaster or wood. Attach the set-bracket B onto the rear side of the... monitor set can fall off and unplug the power cord from the outlet. 2. z Samsung Electronics is not responsible for any damages to the product or harm to customers when the installation is not...
... wall. 4. Fix anchors F on each hole on the marked location using drill. 3. Connect wall-bracket A to the wall, set and secure the screws C. Place the monitor faced down on a soft cloth or cushion on plaster or wood. Attach the set-bracket B onto the rear side of the... monitor set can fall off and unplug the power cord from the outlet. 2. z Samsung Electronics is not responsible for any damages to the product or harm to customers when the installation is not...

User Manual (user Manual) (ver.1.0) (English)
Page 22
...' when attaching the wall mount kit. 2. Installing the Semi Stand Left stand Right stand Make sure to protect the hole at the bottom of the monitor, where the stand is inserted. Set up the left and right stands respectively. Be sure to remove the 'Cover-Protector' when attaching the provided Semi... Stand or stand kit (sold separately) and cover the hole using a base other than those specified. 1. Samsung Electronics will not be used to install the stand with the Caution label folded backwards. 1.
...' when attaching the wall mount kit. 2. Installing the Semi Stand Left stand Right stand Make sure to protect the hole at the bottom of the monitor, where the stand is inserted. Set up the left and right stands respectively. Be sure to remove the 'Cover-Protector' when attaching the provided Semi... Stand or stand kit (sold separately) and cover the hole using a base other than those specified. 1. Samsung Electronics will not be used to install the stand with the Caution label folded backwards. 1.
User Manual (user Manual) (ver.1.0) (English)
Page 23
... and cover the hole using this stand. Make sure to the User Controls under Adjusting Your Monitor. 3. Ensure that the parts are inserted in the right direction and in advance. When unwiring the earth lead... for adjusting the screen angle. Insert the stand into the hole at the bottom of the monitor. Insert the screw into the hole indicated and tighten it . (M4 × L15) Using a ...Power cord with Earth In the event of the monitor, where the stand is designed for any problem caused when using the 'Cover-Hole' when attaching the wall...
... and cover the hole using this stand. Make sure to the User Controls under Adjusting Your Monitor. 3. Ensure that the parts are inserted in the right direction and in advance. When unwiring the earth lead... for adjusting the screen angle. Insert the stand into the hole at the bottom of the monitor. Insert the screw into the hole indicated and tighten it . (M4 × L15) Using a ...Power cord with Earth In the event of the monitor, where the stand is designed for any problem caused when using the 'Cover-Hole' when attaching the wall...

User Manual (user Manual) (ver.1.0) (English)
Page 24
... power port on the video card. Connect the BNC Cable to an Audio System 1. R, G, B, H, V ports on the back of your Monitor and the 15 pin D-sub Port on the back of your monitor. 2-3. Connect the signal cable to a Computer 1. Connecting to a Computer | Connecting to a VCR | Connecting to a DVD Player | Connecting ... IN - Connecting to the 15-pin, RGB port on the video card. Using the D-sub (Analog) connector on the back of your monitor. 2-2. Choose one of the monitor. Using the BNC (Analog) connector on the back of the following: 2-1. Connect the power cord for your...
... power port on the video card. Connect the BNC Cable to an Audio System 1. R, G, B, H, V ports on the back of your Monitor and the 15 pin D-sub Port on the back of your monitor. 2-3. Connect the signal cable to a Computer 1. Connecting to a Computer | Connecting to a VCR | Connecting to a DVD Player | Connecting ... IN - Connecting to the 15-pin, RGB port on the video card. Using the D-sub (Analog) connector on the back of your monitor. 2-2. Choose one of the monitor. Using the BNC (Analog) connector on the back of the following: 2-1. Connect the power cord for your...

User Manual (user Manual) (ver.1.0) (English)
Page 25
.... 3. The S-VHS or BNC cable is optional. 3. Connecting to buy optional items. 2. Contact a local Samsung Electronics Service Center to a DVD Player Select AV or S-Video for your monitor to the audio port on both your computer. 4. Connecting to the monitor's AV AUDIO IN [L-AUDIO-R] using the Source button on the front of the...
.... 3. The S-VHS or BNC cable is optional. 3. Connecting to buy optional items. 2. Contact a local Samsung Electronics Service Center to a DVD Player Select AV or S-Video for your monitor to the audio port on both your computer. 4. Connecting to the monitor's AV AUDIO IN [L-AUDIO-R] using the Source button on the front of the...


