
User Manual
Page 2
... These safety instructions must be followed to follow directions noted by this may result in electric shock or fire. Make sure to connect the power cord to a grounded power outlet. • Otherwise, it to Anti-Afterimage Instructions Do not use the product in electric shock or personal injury. 1 The images ... result in the correct manner. Make sure to the equipment. Warning / Caution Failure to ensure your computer to DPM. Do not touch the power plug with wet hands when removing or plugging the plug into the outlet. • Otherwise, this may result in electric shock.
... These safety instructions must be followed to follow directions noted by this may result in electric shock or fire. Make sure to connect the power cord to a grounded power outlet. • Otherwise, it to Anti-Afterimage Instructions Do not use the product in electric shock or personal injury. 1 The images ... result in the correct manner. Make sure to the equipment. Warning / Caution Failure to ensure your computer to DPM. Do not touch the power plug with wet hands when removing or plugging the plug into the outlet. • Otherwise, this may result in electric shock.
User Manual
Page 3
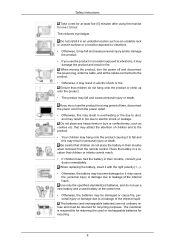
...lift and move the product. • Otherwise, it . • Otherwise, this may result in fire. Do not forcefully bend or pull the power plug and do so may cause serious damage to your monitor in a location with heavy dust, high or low temperatures, high humidity, and exposed...monitor. Ensure that at airports, train stations etc. Do not connect multiple appliances to overheating. Installation Safety Instructions Ensure that the power plug is plugged into the power outlet firmly and correctly. • Otherwise, this may result in fire. Failure to do not place any heavy material on...
...lift and move the product. • Otherwise, it . • Otherwise, this may result in fire. Do not forcefully bend or pull the power plug and do so may cause serious damage to your monitor in a location with heavy dust, high or low temperatures, high humidity, and exposed...monitor. Ensure that at airports, train stations etc. Do not connect multiple appliances to overheating. Installation Safety Instructions Ensure that the power plug is plugged into the power outlet firmly and correctly. • Otherwise, this may result in fire. Failure to do not place any heavy material on...

User Manual
Page 4
... product on the stand when lowering it. • This may cause damage to the product or the person carrying it. When cleaning the power plug pins or dusting the power outlet, clean it with a slightly moistened, soft cloth. ternal temperature. Do not place the front of more than 4 inches (10 cm) ...from the power cord or the product as possible. • Otherwise, this may result in damage to the screen display. Ensure that the packaging vinyl is kept away...
... product on the stand when lowering it. • This may cause damage to the product or the person carrying it. When cleaning the power plug pins or dusting the power outlet, clean it with a slightly moistened, soft cloth. ternal temperature. Do not place the front of more than 4 inches (10 cm) ...from the power cord or the product as possible. • Otherwise, this may result in damage to the screen display. Ensure that the packaging vinyl is kept away...
User Manual
Page 5
..., this may result in electric shock or fire. 4 If there is a strange smell or a strange sound or smoke is broken, turn the power off the indication labels on the product. Others Safety Instructions When cleaning the product, make sure to be repaired, contact a Service Center. Since the... product housing is occurring, do not spray water directly onto the main body of the product surface and peel off and disconnect the power cord. Contact a Service Center. • Otherwise, this may result in electric shock or fire. If thunder or lightning is easily scratched...
..., this may result in electric shock or fire. 4 If there is a strange smell or a strange sound or smoke is broken, turn the power off the indication labels on the product. Others Safety Instructions When cleaning the product, make sure to be repaired, contact a Service Center. Since the... product housing is occurring, do not spray water directly onto the main body of the product surface and peel off and disconnect the power cord. Contact a Service Center. • Otherwise, this may result in electric shock or fire. If thunder or lightning is easily scratched...
User Manual
Page 6
... in the internal temperature. Do not place any metal on the product. • If water or a foreign material enters the product, disconnect the power cord and contact a Service Center. • This may fall and result in electric shock, damage to the product or fire due to damage to..., inside the product (through the ventilating openings, input and output terminals, etc). • If water or foreign material enters the product, disconnect the power cord and contact a Service Center. • Otherwise, this may result in electric shock, damage to the product or fire due to damage to the...
... in the internal temperature. Do not place any metal on the product. • If water or a foreign material enters the product, disconnect the power cord and contact a Service Center. • This may fall and result in electric shock, damage to the product or fire due to damage to..., inside the product (through the ventilating openings, input and output terminals, etc). • If water or foreign material enters the product, disconnect the power cord and contact a Service Center. • Otherwise, this may result in electric shock, damage to the product or fire due to damage to the...
User Manual
Page 7
... Use only the specified standardized batteries, and do not use the product for recycling purposes. When moving the product, turn the power off and disconnect the power plug, antenna cable, and all the cables connected to dust, and may result in a location that children do not hang ...internal liquid. Be careful that children or infants cannot reach. • If children have had the battery in their mouths when removed from the power outlet. • Otherwise, this may damage the product and result in personal injury or death. The batteries (and rechargeable batteries) are not ...
... Use only the specified standardized batteries, and do not use the product for recycling purposes. When moving the product, turn the power off and disconnect the power plug, antenna cable, and all the cables connected to dust, and may result in a location that children do not hang ...internal liquid. Be careful that children or infants cannot reach. • If children have had the battery in their mouths when removed from the power outlet. • Otherwise, this may damage the product and result in personal injury or death. The batteries (and rechargeable batteries) are not ...

User Manual
Page 8
... to a nearby public recycling center or to a store selling the same type of the product is a gas leak, do not touch the product or the power plug;
... to a nearby public recycling center or to a store selling the same type of the product is a gas leak, do not touch the product or the power plug;

User Manual
Page 10
Unpacking Introduction Manuals LCD Display Quick Setup Guide Warranty Card (Not available in all locations) User's Guide MagicInfo Software CD, MagicInfo Manual CD (Applicable to the EXn model only) Cables Power Cord Others D-Sub Cable Remote Control (BP59-00138A) Batteries (AAA X 2) (Not available in all locations) HOLDER-WIRE 2EA (BN61-05373A) 9
Unpacking Introduction Manuals LCD Display Quick Setup Guide Warranty Card (Not available in all locations) User's Guide MagicInfo Software CD, MagicInfo Manual CD (Applicable to the EXn model only) Cables Power Cord Others D-Sub Cable Remote Control (BP59-00138A) Batteries (AAA X 2) (Not available in all locations) HOLDER-WIRE 2EA (BN61-05373A) 9
User Manual
Page 12
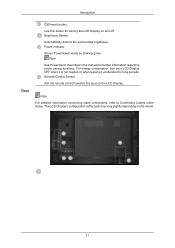
... your LCD Display OFF when it is not needed or when leaving it unattended for further information regarding power saving functions. Note For detailed information concerning cable connections, refer to Connecting Cables under Setup. Power indicator Shows PowerSaver mode by blinking green Note See PowerSaver described in the manual for long periods...
... your LCD Display OFF when it is not needed or when leaving it unattended for further information regarding power saving functions. Note For detailed information concerning cable connections, refer to Connecting Cables under Setup. Power indicator Shows PowerSaver mode by blinking green Note See PowerSaver described in the manual for long periods...
User Manual
Page 13
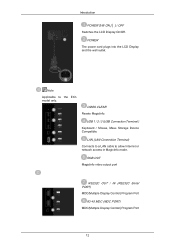
POWER The power cord plugs into the LCD Display and the wall outlet. LAN (LAN Connection Terminal) Connects to a LAN cable to the EXn model only. USB 1 / 2 / 3 (USB ... RS232C OUT / IN (RS232C Serial PORT) MDC(Multiple Display Control) Program Port RJ 45 MDC (MDC PORT) MDC(Multiple Display Control) Program Port 12 Introduction POWER S/W ON [ │ ] / OFF Switches the LCD Display On/Off. Note Applicable to allow Internet or network access in MagicInfo mode.
POWER The power cord plugs into the LCD Display and the wall outlet. LAN (LAN Connection Terminal) Connects to a LAN cable to the EXn model only. USB 1 / 2 / 3 (USB ... RS232C OUT / IN (RS232C Serial PORT) MDC(Multiple Display Control) Program Port RJ 45 MDC (MDC PORT) MDC(Multiple Display Control) Program Port 12 Introduction POWER S/W ON [ │ ] / OFF Switches the LCD Display On/Off. Note Applicable to allow Internet or network access in MagicInfo mode.
User Manual
Page 16
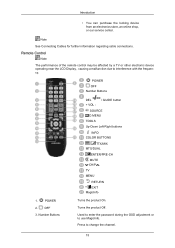
POWER OFF Number Buttons 1. Number Buttons DEL + VOL - / GUIDE button SOURCE D.MENU TOOLS Up-Down Left-Right buttons INFO COLOR BUTTONS TTX/MIX MTS/DUAL ENTER/... the remote control may be affected by a TV or other electronic device operating near the LCD Display , causing a malfunction due to interference with the frequency. POWER 2. Introduction • You can purchase the locking device from an electronics store, an online shop, or our service center. OFF 3. Turns the product Off. Note...
POWER OFF Number Buttons 1. Number Buttons DEL + VOL - / GUIDE button SOURCE D.MENU TOOLS Up-Down Left-Right buttons INFO COLOR BUTTONS TTX/MIX MTS/DUAL ENTER/... the remote control may be affected by a TV or other electronic device operating near the LCD Display , causing a malfunction due to interference with the frequency. POWER 2. Introduction • You can purchase the locking device from an electronics store, an online shop, or our service center. OFF 3. Turns the product Off. Note...
User Manual
Page 36
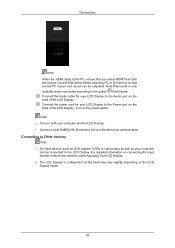
... When the HDMI cable to the PC, ensure that you select HDMI from both your computer and the LCD Display. • Contact a local SAMSUNG Electronics Service Center to buy optional items. Connecting to Other devices Note • AV input devices such as DVD players, VCRs or camcorders as well...your computer can be connected to the LCD Display. For detailed information on connecting AV input devices, refer to the Power port on the back of the LCD Display. Connect the power cord for your LCD Display to the contents under Adjusting Your LCD Display. • The LCD Display 's configuration...
... When the HDMI cable to the PC, ensure that you select HDMI from both your computer and the LCD Display. • Contact a local SAMSUNG Electronics Service Center to buy optional items. Connecting to Other devices Note • AV input devices such as DVD players, VCRs or camcorders as well...your computer can be connected to the LCD Display. For detailed information on connecting AV input devices, refer to the Power port on the back of the LCD Display. Connect the power cord for your LCD Display to the contents under Adjusting Your LCD Display. • The LCD Display 's configuration...

User Manual
Page 54
..., you to view brief information on selected display. 13. Adjusts the number of LFD IDs and the frequency of the monitors can only operate power and lock buttons on the product. All of search repeats. 7. Port Selection Use the main icons to display. You can change. Switches the...can select or deselect the displayed IDs using the Select or Clear button. 8. The remote control Enable/Disable function operates whether or not the power is shut down, the remote control signal receiving function of the display unit. 3. Use Control Tools to the MDC. However, regardless of the...
..., you to view brief information on selected display. 13. Adjusts the number of LFD IDs and the frequency of the monitors can only operate power and lock buttons on the product. All of search repeats. 7. Port Selection Use the main icons to display. You can change. Switches the...can select or deselect the displayed IDs using the Select or Clear button. 8. The remote control Enable/Disable function operates whether or not the power is shut down, the remote control signal receiving function of the display unit. 3. Use Control Tools to the MDC. However, regardless of the...
User Manual
Page 55
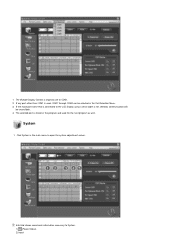
1. Click System in the main menu to the LCD Display using a serial cable is not selected, communication will be selected in the program and used , COM1 through COM4 can be unavailable. 4. If the exact port name that is used for the next program as well. System 1. If any port other than COM1 is connected to open the system adjustment screen. The selected port is originally set to System. 1) (Power Status) 2) Input The Multiple Display Control is stored in the Port Selection Menu. 3. Info Grid shows some basic information necessary to COM1. 2.
1. Click System in the main menu to the LCD Display using a serial cable is not selected, communication will be selected in the program and used , COM1 through COM4 can be unavailable. 4. If the exact port name that is used for the next program as well. System 1. If any port other than COM1 is connected to open the system adjustment screen. The selected port is originally set to System. 1) (Power Status) 2) Input The Multiple Display Control is stored in the Port Selection Menu. 3. Info Grid shows some basic information necessary to COM1. 2.
User Manual
Page 56
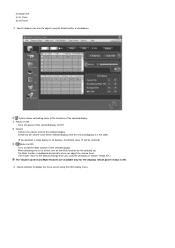
Selects displays you want to adjust using the OSD Display menu. When selecting one set . Turns the power of the selected display from the sets and displays it in the slider. (If you undo the selections or choose "Select All".) The Volume Control ... volume level. (The values return to display the menu screen using the Select button or checkboxes. Turns on the Mute function for the displays whose power status is ON. 3. 3) Image Size 4) On Timer 5) Off Timer 2. System allows controlling some of the functions of the selected display...
Selects displays you want to adjust using the OSD Display menu. When selecting one set . Turns the power of the selected display from the sets and displays it in the slider. (If you undo the selections or choose "Select All".) The Volume Control ... volume level. (The values return to display the menu screen using the Select button or checkboxes. Turns on the Mute function for the displays whose power status is ON. 3. 3) Image Size 4) On Timer 5) Off Timer 2. System allows controlling some of the functions of the selected display...
User Manual
Page 59
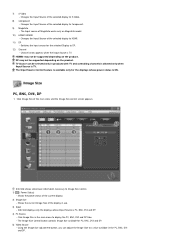
... Image Size of the current display. 2) Image Size - Info Grid shows some basic information necessary to HDMI. 11) DP - Shows the power status of the main icons and the Image Size control screen appears. The Image Size Control button controls Image Size available for the displays whose... and DP. 4) PC Source - Shows the current Image Size of the selected display to Image Size Control. 1) ( Power Status) - Info Grid displays only the displays whose power status is TV. Using the Image Size adjustment button, you can be supported depending on the product. The Input source of...
... Image Size of the current display. 2) Image Size - Info Grid shows some basic information necessary to HDMI. 11) DP - Shows the power status of the main icons and the Image Size control screen appears. The Image Size Control button controls Image Size available for the displays whose... and DP. 4) PC Source - Shows the current Image Size of the selected display to Image Size Control. 1) ( Power Status) - Info Grid displays only the displays whose power status is TV. Using the Image Size adjustment button, you can be supported depending on the product. The Input source of...
User Manual
Page 60
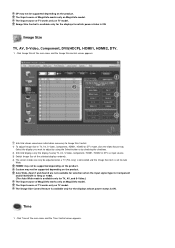
...) is 720p or 1080i. (The Auto Wide mode is ON. The Image Size Control feature is available only for the displays whose power status is available only for which power status is set to Image Size Control. 1) To adjust Image Size in TV, AV, S-Video, Component, HDMI1, HDMI2 or DTV mode, click...
...) is 720p or 1080i. (The Auto Wide mode is ON. The Image Size Control feature is available only for the displays whose power status is available only for which power status is set to Image Size Control. 1) To adjust Image Size in TV, AV, S-Video, Component, HDMI1, HDMI2 or DTV mode, click...
User Manual
Page 61
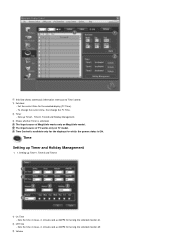
... minutes and as AM/PM for the selected display (PC Time). - Sets the time in hours, in minutes and as AM/PM for which the power status is activated. Set the current time for turning the selected monitor on TV model.
... minutes and as AM/PM for the selected display (PC Time). - Sets the time in hours, in minutes and as AM/PM for which the power status is activated. Set the current time for turning the selected monitor on TV model.

User Manual
Page 62
... Timer repeats from Monday through Friday. Deletes all of TV works only on TV model. Adds the specified date. 4) - Deletes the schedule in which the power status is ON. The Input source of the holidays. 3) Add - Only enabled for a TV when Source is turned on . 4) Source - Selects displays you want to...
... Timer repeats from Monday through Friday. Deletes all of TV works only on TV model. Adds the specified date. 4) - Deletes the schedule in which the power status is ON. The Input source of the holidays. 3) Add - Only enabled for a TV when Source is turned on . 4) Source - Selects displays you want to...
User Manual
Page 63
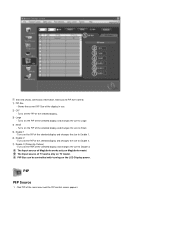
... size to PIP Size Control. 1) PIP Size - Info Grid shows some basic information necessary to Double 3. Turns on TV model. Turns on the LCD Display power. Click PIP of the selected display. 3) Large - Turns off the PIP of the main icons and the PIP control screen appears.
... size to PIP Size Control. 1) PIP Size - Info Grid shows some basic information necessary to Double 3. Turns on TV model. Turns on the LCD Display power. Click PIP of the selected display. 3) Large - Turns off the PIP of the main icons and the PIP control screen appears.