

User Manual
Page 10
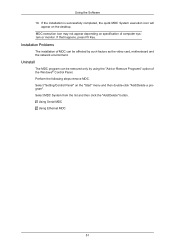
Unpacking Introduction Manuals LCD Display Quick Setup Guide Warranty Card (Not available in all locations) User's Guide MagicInfo Software CD, MagicInfo Manual CD (Applicable to the EXn model only) Cables Power Cord Others D-Sub Cable Remote Control (BP59-00138A) Batteries (AAA X 2) (Not available in all locations) HOLDER-WIRE 2EA (BN61-05373A) 9
Unpacking Introduction Manuals LCD Display Quick Setup Guide Warranty Card (Not available in all locations) User's Guide MagicInfo Software CD, MagicInfo Manual CD (Applicable to the EXn model only) Cables Power Cord Others D-Sub Cable Remote Control (BP59-00138A) Batteries (AAA X 2) (Not available in all locations) HOLDER-WIRE 2EA (BN61-05373A) 9

User Manual
Page 43
Internet web site : http://www.samsung.com/ Installing the Monitor Driver (Automatic) 1. Choose your monitor model in the Control Panel settings. Using the Software Monitor Driver Note When prompted by the operating system for the operating system you have. Follow the directions appropriate for the monitor driver, insert the ...
Internet web site : http://www.samsung.com/ Installing the Monitor Driver (Automatic) 1. Choose your monitor model in the Control Panel settings. Using the Software Monitor Driver Note When prompted by the operating system for the operating system you have. Follow the directions appropriate for the monitor driver, insert the ...

User Manual
Page 44
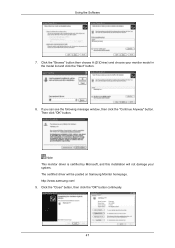
...The monitor can be posted on "Appearance and Personal- Click "Advanced Settings...". 5. Then, double-click on Samsung Monitor homepage. Click "Properties" in the "Monitor" tab. Using the Software Note This monitor driver is certified by Microsoft, and installing it means the configuration for your CD-ROM ...drive. 2. Insert your Manual CD into your monitor is . 43 http://www.samsung.com/ Installing the Monitor Driver (Manual)...
...The monitor can be posted on "Appearance and Personal- Click "Advanced Settings...". 5. Then, double-click on Samsung Monitor homepage. Click "Properties" in the "Monitor" tab. Using the Software Note This monitor driver is certified by Microsoft, and installing it means the configuration for your CD-ROM ...drive. 2. Insert your Manual CD into your monitor is . 43 http://www.samsung.com/ Installing the Monitor Driver (Manual)...

User Manual
Page 45
... driver setup file is displayed, as shown in the "Driver" tab. 7. Click "Update Driver..." Using the Software If the message "Windows needs..." and select the folder (for driver software" checkbox and click "Let me pick from a list of device drivers on Samsung Monitor homepage. 6. Click "Have Disk..." is located, and click "OK". 44
... driver setup file is displayed, as shown in the "Driver" tab. 7. Click "Update Driver..." Using the Software If the message "Windows needs..." and select the folder (for driver software" checkbox and click "Let me pick from a list of device drivers on Samsung Monitor homepage. 6. Click "Have Disk..." is located, and click "OK". 44
User Manual
Page 46
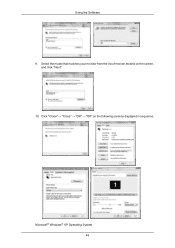
Click "Close" → "Close" → "OK" → "OK" on the screen, and click "Next". 10. Using the Software 9. Select the model that matches your monitor from the list of monitor models on the following screens displayed in sequence. Microsoft® Windows® XP Operating System 45
Click "Close" → "Close" → "OK" → "OK" on the screen, and click "Next". 10. Using the Software 9. Select the model that matches your monitor from the list of monitor models on the following screens displayed in sequence. Microsoft® Windows® XP Operating System 45

User Manual
Page 47
Insert CD into the CD-ROM drive. 2. Click the "Properties" button on the "Monitor" tab and select "Driver" tab. 5. Select "Don't search, I will...", then click "Next" and then click "Have disk". 46 Click "Update Driver..." Click "Start" → "Control Panel", then click the "Appearance and Themes" icon. 3. and select "Install from a list or..." Click "Display" icon and choose the "Settings" tab then click "Advanced...". 4. then click "Next" button. 6. Using the Software 1.
Insert CD into the CD-ROM drive. 2. Click the "Properties" button on the "Monitor" tab and select "Driver" tab. 5. Select "Don't search, I will...", then click "Next" and then click "Have disk". 46 Click "Update Driver..." Click "Start" → "Control Panel", then click the "Appearance and Themes" icon. 3. and select "Install from a list or..." Click "Display" icon and choose the "Settings" tab then click "Advanced...". 4. then click "Next" button. 6. Using the Software 1.
User Manual
Page 48
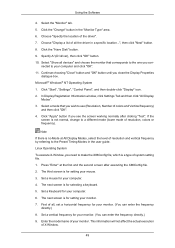
Using the Software 7. The certified driver will not damage your monitor model in the model list and click the "Next" button. 8. http://www.samsung.com/ 9. Click the "Browse" button then choose A:(D:\Driver) and choose your system. Note This monitor driver is certified by Microsoft, and this installation will be posted on Samsung Monitor homepage. Click the "Close" button, then click the "OK" button continually. 47 Then click "OK" button. If you can see the following message window, then click the "Continue Anyway" button.
Using the Software 7. The certified driver will not damage your monitor model in the model list and click the "Next" button. 8. http://www.samsung.com/ 9. Click the "Browse" button then choose A:(D:\Driver) and choose your system. Note This monitor driver is certified by Microsoft, and this installation will be posted on Samsung Monitor homepage. Click the "Close" button, then click the "OK" button continually. 47 Then click "OK" button. If you can see the following message window, then click the "Continue Anyway" button.

User Manual
Page 49
......", then click on the "File Needed" window. 3. Then click the "Finish" button and the "Close" button. Microsoft® Windows® Millennium Operating System 1. Using the Software 10. Choose A:(D:\Driver), then click the "Open" button and then click "OK" button. Select the "Settings" tab and click "Advanced Properties" button. 4. Double click the...
......", then click on the "File Needed" window. 3. Then click the "Finish" button and the "Close" button. Microsoft® Windows® Millennium Operating System 1. Using the Software 10. Choose A:(D:\Driver), then click the "Open" button and then click "OK" button. Select the "Settings" tab and click "Advanced Properties" button. 4. Double click the...
User Manual
Page 50
... close the Display Properties dialogue box. Linux Operating System To execute X-Window, you see the screen working normally after executing the X86Config file. 2. Using the Software 4. Choose "Specify the location of system setting file. 1. Click the "Have Disk" button. 9. Continue choosing "Close" button and "OK" button until you con- In Display...
... close the Display Properties dialogue box. Linux Operating System To execute X-Window, you see the screen working normally after executing the X86Config file. 2. Using the Software 4. Choose "Specify the location of system setting file. 1. Click the "Have Disk" button. 9. Continue choosing "Close" button and "OK" button until you con- In Display...
User Manual
Page 51
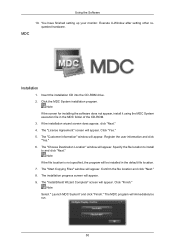
... specified, the program will appear. The "Start Copying Files" window will be run. 50 The MDC program will appear. 9. Using the Software MDC 10. If the installation wizard screen does appear, click "Next." 4. Register the user information and click "Yes." 6. The installation ...." 5. The "Choose Destination Location" window will appear. The "InstallShield Wizard Complete" screen will appear. Note If the screen for installing the software does not appear, install it using the MDC System execution file in the default file location. 7. The "Customer Information" window will appear....
... specified, the program will appear. The "Start Copying Files" window will be run. 50 The MDC program will appear. 9. Using the Software MDC 10. If the installation wizard screen does appear, click "Next." 4. Register the user information and click "Yes." 6. The installation ...." 5. The "Choose Destination Location" window will appear. The "InstallShield Wizard Complete" screen will appear. Note If the screen for installing the software does not appear, install it using the MDC System execution file in the default file location. 7. The "Customer Information" window will appear....
User Manual
Page 52
... the video card, motherboard and the network environment. Select "Setting/Control Panel" on the "Start" menu and then double-click "Add/Delete a program". Using the Software 10. If that happens, press F5 Key. Select MDC System from the list and then click the "Add/Delete" button. Perform the following steps remove...
... the video card, motherboard and the network environment. Select "Setting/Control Panel" on the "Start" menu and then double-click "Add/Delete a program". Using the Software 10. If that happens, press F5 Key. Select MDC System from the list and then click the "Add/Delete" button. Perform the following steps remove...
User Manual
Page 121
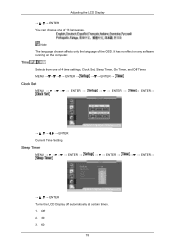
... can choose one of 4 time settings, Clock Set, Sleep Timer, On Timer, and Off Timer. Off 2. 30 3. 60 78 It has no effect on any software running on the computer. Time Selects from one of the OSD. Sleep Timer MENU ENTER → → → ENTER → → → ENTER→ →...
... can choose one of 4 time settings, Clock Set, Sleep Timer, On Timer, and Off Timer. Off 2. 30 3. 60 78 It has no effect on any software running on the computer. Time Selects from one of the OSD. Sleep Timer MENU ENTER → → → ENTER → → → ENTER→ →...
User Manual
Page 143
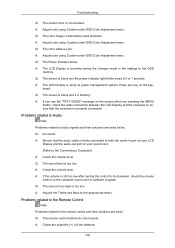
... every 0.5 or 1 seconds. A: Check the polarities (+/-) of the batteries. 100 A: Adjust color using its maximum, check the volume control on the computer sound card or software program. Q: The screen is too high or too low. Problems related to Audio Note Problems related to audio signals and their solutions are listed below...
... every 0.5 or 1 seconds. A: Check the polarities (+/-) of the batteries. 100 A: Adjust color using its maximum, check the volume control on the computer sound card or software program. Q: The screen is too high or too low. Problems related to Audio Note Problems related to audio signals and their solutions are listed below...

User Manual
Page 147
..., turn your LCD Display to be bright sometimes or some black pixels may be installed on your computer. Use the software utility installed on any problems. For example, the number of 1ppm (one millionth) above are used for this product. Class A Equipment... computer to set up this product are subject to normal operation when you can be seen. Temperature : 50°F ~ 104°F (10°C ~ 40°C) 400EXn ing Humidity : 10 % ~ 80 %, non-condensing SyncMaster 460EXn Storage Temperature : -4°F ~ 113°F (-20°C ~ 45°C) SyncMaster 550EXn Humidity : 5...
..., turn your LCD Display to be bright sometimes or some black pixels may be installed on your computer. Use the software utility installed on any problems. For example, the number of 1ppm (one millionth) above are used for this product. Class A Equipment... computer to set up this product are subject to normal operation when you can be seen. Temperature : 50°F ~ 104°F (10°C ~ 40°C) 400EXn ing Humidity : 10 % ~ 80 %, non-condensing SyncMaster 460EXn Storage Temperature : -4°F ~ 113°F (-20°C ~ 45°C) SyncMaster 550EXn Humidity : 5...
