
User Manual
Page 13
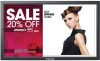
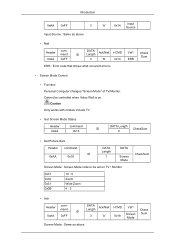
... a TV tuner is connected and otherwise, the PIP button is not needed or when leaving it is enabled. Power button [ ] Use this spot on the model. Introduction Rear • MagicInfo can only be enabled when a network box is connected. • A TV tuner box (sold separately) must be connected to turn your...
... a TV tuner is connected and otherwise, the PIP button is not needed or when leaving it is enabled. Power button [ ] Use this spot on the model. Introduction Rear • MagicInfo can only be enabled when a network box is connected. • A TV tuner box (sold separately) must be connected to turn your...
User Manual
Page 16
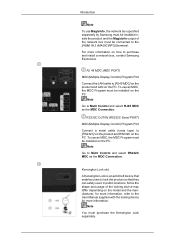
...(RS232C Serial PORT) MDC(Multiple Display Control) Program Port Connect a serial cable (cross type) to [RS232C] on the product and RS232C on the model and the manufacturer, for more information on the PC. RJ 45 MDC (MDC PORT) MDC(Multiple Display Control) Program Port Connect the LAN cable to... to Multi Control and select RS232C MDC as the MDC Connection. For more information. Note Go to purchase and install a network box, contact Samsung Electronics. To use an MDC, the MDC Program must be connected to the User Manual supplied with the locking device for more information, refer ...
...(RS232C Serial PORT) MDC(Multiple Display Control) Program Port Connect a serial cable (cross type) to [RS232C] on the product and RS232C on the model and the manufacturer, for more information on the PC. RJ 45 MDC (MDC PORT) MDC(Multiple Display Control) Program Port Connect the LAN cable to... to Multi Control and select RS232C MDC as the MDC Connection. For more information. Note Go to purchase and install a network box, contact Samsung Electronics. To use an MDC, the MDC Program must be connected to the User Manual supplied with the locking device for more information, refer ...
User Manual
Page 28
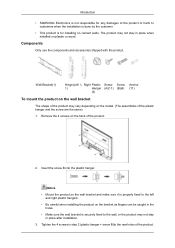
... 4 screws on the back of the plastic hanger and the screw are the same) 1. Insert the screw B into the plastic hanger. Introduction • SAMSUNG Electronics is not responsible for installing on cement walls. Wall Bracket(1) Hinge(Left 1, Right Plastic Screw Screw 1) Hanger (A)(11) (B)(4) (4) Anchor (11) To... bracket and make sure it is properly fixed to the left and right plastic hangers. • Be careful when installing the product on the model. (The assemblies of the product. 2. Tighten the 4 screws in step 2 (plastic hanger + screw B)to the wall, or the product...
... 4 screws on the back of the plastic hanger and the screw are the same) 1. Insert the screw B into the plastic hanger. Introduction • SAMSUNG Electronics is not responsible for installing on cement walls. Wall Bracket(1) Hinge(Left 1, Right Plastic Screw Screw 1) Hanger (A)(11) (B)(4) (4) Anchor (11) To... bracket and make sure it is properly fixed to the left and right plastic hangers. • Be careful when installing the product on the model. (The assemblies of the product. 2. Tighten the 4 screws in step 2 (plastic hanger + screw B)to the wall, or the product...
User Manual
Page 34
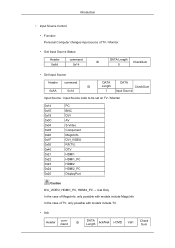
... MagicInfo DVI_VIDEO RF(TV) DTV HDMI1 HDMI1_PC HDMI2 HDMI2_PC DisplayPort Caution DVI_VIDEO, HDMI1_PC, HDMI2_PC → Get Only In the case of MagicInfo, only possible with models include MagicInfo In the case of TV, only possible with models include TV. • Ack Header command ID DATA Length Ack/Nak r-CMD Val1 Check Sum
... MagicInfo DVI_VIDEO RF(TV) DTV HDMI1 HDMI1_PC HDMI2 HDMI2_PC DisplayPort Caution DVI_VIDEO, HDMI1_PC, HDMI2_PC → Get Only In the case of MagicInfo, only possible with models include MagicInfo In the case of TV, only possible with models include TV. • Ack Header command ID DATA Length Ack/Nak r-CMD Val1 Check Sum
User Manual
Page 35
Caution Only works with models include TV. • Get Screen Mode Status Header 0xAA command 0x18 DATA Length ID CheckSum 0 • Set Picture Size Header command ID 0xAA 0x18 DATA ...
Caution Only works with models include TV. • Get Screen Mode Status Header 0xAA command 0x18 DATA Length ID CheckSum 0 • Set Picture Size Header command ID 0xAA 0x18 DATA ...
User Manual
Page 41
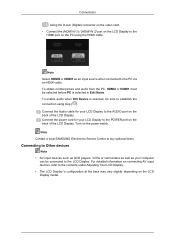
... sure to establish the connection using the HDMI cable. Turn on the LCD Display model. Connect the Audio cable for your LCD Display to the AUDIO port on the back of the LCD Display. Note Contact a local SAMSUNG Electronics Service Center to buy optional items. Connecting to Other devices Note • AV...
... sure to establish the connection using the HDMI cable. Turn on the LCD Display model. Connect the Audio cable for your LCD Display to the AUDIO port on the back of the LCD Display. Note Contact a local SAMSUNG Electronics Service Center to buy optional items. Connecting to Other devices Note • AV...

User Manual
Page 49
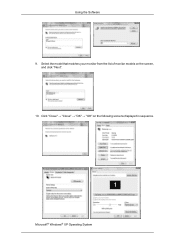
... file at the Internet web site shown here. Choose your monitor model in the model list, then click the "OK" button. 4. If you have. Then click "OK" button (Microsoft® Windows® XP/2000 Operating System). Internet web site : http://www.samsung.com/ Installing the Monitor Driver (Automatic) 1. Click "Windows". 3. Using the Software...
... file at the Internet web site shown here. Choose your monitor model in the model list, then click the "OK" button. 4. If you have. Then click "OK" button (Microsoft® Windows® XP/2000 Operating System). Internet web site : http://www.samsung.com/ Installing the Monitor Driver (Automatic) 1. Click "Windows". 3. Using the Software...
User Manual
Page 52
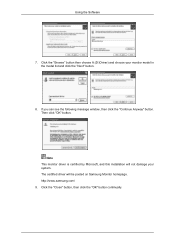
Click "Close" → "Close" → "OK" → "OK" on the screen, and click "Next". 10. Using the Software 9. Select the model that matches your monitor from the list of monitor models on the following screens displayed in sequence. Microsoft® Windows® XP Operating System
Click "Close" → "Close" → "OK" → "OK" on the screen, and click "Next". 10. Using the Software 9. Select the model that matches your monitor from the list of monitor models on the following screens displayed in sequence. Microsoft® Windows® XP Operating System
User Manual
Page 54
If you can see the following message window, then click the "Continue Anyway" button. Click the "Close" button, then click the "OK" button continually. http://www.samsung.com/ 9. The certified driver will not damage your monitor model in the model list and click the "Next" button. 8. Note This monitor driver is certified by Microsoft, and this installation will be posted on Samsung Monitor homepage. Using the Software 7. Click the "Browse" button then choose A:(D:\Driver) and choose your system. Then click "OK" button.
If you can see the following message window, then click the "Continue Anyway" button. Click the "Close" button, then click the "OK" button continually. http://www.samsung.com/ 9. The certified driver will not damage your monitor model in the model list and click the "Next" button. 8. Note This monitor driver is certified by Microsoft, and this installation will be posted on Samsung Monitor homepage. Using the Software 7. Click the "Browse" button then choose A:(D:\Driver) and choose your system. Then click "OK" button.

User Manual
Page 55
Monitor driver installation is inactive, it means your monitor model and click the "Next" button. Click the "Browse" button on the "Next" button. 6. Double click the "Display" icon. 3. Please stop installation Case2 : If the "Properties" ...
Monitor driver installation is inactive, it means your monitor model and click the "Next" button. Click the "Browse" button on the "Next" button. 6. Double click the "Display" icon. 3. Please stop installation Case2 : If the "Properties" ...

User Manual
Page 57
Set a vertical frequency for your monitor. (You can enter the frequency directly.) 8. This information will not affect the actual execution of your monitor. First of all, set a horizontal frequency for your monitor. (You can enter the frequency directly.) 9. Enter the model name of X-Window. 10. You have finished setting up your monitor. Execute X-Window after setting other requested hardware. Using the Software 5. Set a Keyboard for setting your computer. 6. The next screen is for your monitor. 7.
Set a vertical frequency for your monitor. (You can enter the frequency directly.) 8. This information will not affect the actual execution of your monitor. First of all, set a horizontal frequency for your monitor. (You can enter the frequency directly.) 9. Enter the model name of X-Window. 10. You have finished setting up your monitor. Execute X-Window after setting other requested hardware. Using the Software 5. Set a Keyboard for setting your computer. 6. The next screen is for your monitor. 7.

User Manual
Page 67
... can power on or off a selected dis Input z Input Source : Change the input source. † Input sources available can vary depending on the Display Device Models. † The input source can be muted only for displays that are turned on.
... can power on or off a selected dis Input z Input Source : Change the input source. † Input sources available can vary depending on the Display Device Models. † The input source can be muted only for displays that are turned on.
User Manual
Page 74
... assigned to a new position. A maximum of 15 displays can be arranged in a row. Screen Position and Preview are selected, Preview is assigned to on the model. The range of the selected sets. V Select the number of horizontal display devices. H Select the number of vertical display devices. Screen Position View the layout...
... assigned to a new position. A maximum of 15 displays can be arranged in a row. Screen Position and Preview are selected, Preview is assigned to on the model. The range of the selected sets. V Select the number of horizontal display devices. H Select the number of vertical display devices. Screen Position View the layout...

User Manual
Page 137
... Audio In/Out, Audio In(L/R), RJ45, (RS232C, USB, LAN, D-sub out, HDMI out, Audio out → Slide in Network Box) Dimensions (W x H x D) / Weight 400MX-3, 400FP-3 971.0 mm x 641.5 mm x 311.0 mm / 38.2 x 25.3 x 12.2 inches (With Stand) 971.0 mm x 582.0 mm x 119.0 mm / 38.2 x 22.9.../ 47.6 lbs (With Network Box) 19.3 Kg / 42.5 lbs (Without Network Box) Specifications General General Model Name 400MX-3 , 460MX-3, 400FP-3, 460FP-3 LCD Panel Size Display Area 400MX-3, 400FP-3 460MX-3, 460FP-3 400MX-3, 400FP-3 460MX-3, 460FP-3 40.0 inch / 101 cm 46.0 inch / 116 cm 885.6 mm(H) x 498.15...
... Audio In/Out, Audio In(L/R), RJ45, (RS232C, USB, LAN, D-sub out, HDMI out, Audio out → Slide in Network Box) Dimensions (W x H x D) / Weight 400MX-3, 400FP-3 971.0 mm x 641.5 mm x 311.0 mm / 38.2 x 25.3 x 12.2 inches (With Stand) 971.0 mm x 582.0 mm x 119.0 mm / 38.2 x 22.9.../ 47.6 lbs (With Network Box) 19.3 Kg / 42.5 lbs (Without Network Box) Specifications General General Model Name 400MX-3 , 460MX-3, 400FP-3, 460FP-3 LCD Panel Size Display Area 400MX-3, 400FP-3 460MX-3, 460FP-3 400MX-3, 400FP-3 460MX-3, 460FP-3 40.0 inch / 101 cm 46.0 inch / 116 cm 885.6 mm(H) x 498.15...