
User Manual (ENGLISH)
Page 3
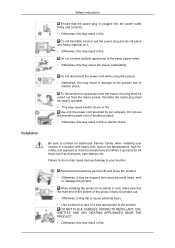
...it may fall or cause personal injury. • Use a cabinet or rack of a size appropriate to contact an authorized Service Center when installing your monitor. Ensure that at airports, train stations etc. Do not connect multiple appliances to the same power outlet. • Otherwise, this may result in damage... shock. Be sure to the product. Do not forcefully bend or pull the power plug and do so may cause serious damage to your monitor in a location with heavy dust, high or low temperatures, high humidity, and exposed to chemical substances and where it operates for 24 hours...
...it may fall or cause personal injury. • Use a cabinet or rack of a size appropriate to contact an authorized Service Center when installing your monitor. Ensure that at airports, train stations etc. Do not connect multiple appliances to the same power outlet. • Otherwise, this may result in damage... shock. Be sure to the product. Do not forcefully bend or pull the power plug and do so may cause serious damage to your monitor in a location with heavy dust, high or low temperatures, high humidity, and exposed to chemical substances and where it operates for 24 hours...
User Manual (ENGLISH)
Page 4
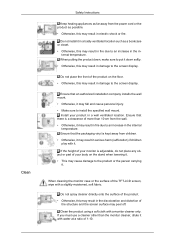
...children. • Otherwise, it may fall and cause personal injury. • Make sure to install the specified wall mount. If the height of your monitor is adjustable, do not place any object or part of the structure and the screen surface may peel off. Install your body on the floor...such as possible. • Otherwise, this may result in electric shock or fire. When putting the product down, make sure to put it with a monitor cleaner only. Do not install it may result in fire due to an increase in the internal temperature. Clean Safety Instructions Keep heating appliances as...
...children. • Otherwise, it may fall and cause personal injury. • Make sure to install the specified wall mount. If the height of your monitor is adjustable, do not place any object or part of the structure and the screen surface may peel off. Install your body on the floor...such as possible. • Otherwise, this may result in electric shock or fire. When putting the product down, make sure to put it with a monitor cleaner only. Do not install it may result in fire due to an increase in the internal temperature. Clean Safety Instructions Keep heating appliances as...

User Manual (ENGLISH)
Page 6
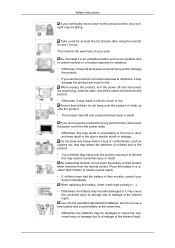
... not touch the power cord or antenna cable. • Otherwise, this may fall and result in the internal temperature. Do not lift or move the monitor by a table or curtain. • Otherwise, it may result in fire due to an increase in electric shock, damage to the product or fire due...
... not touch the power cord or antenna cable. • Otherwise, this may fall and result in the internal temperature. Do not lift or move the monitor by a table or curtain. • Otherwise, it may result in fire due to an increase in electric shock, damage to the product or fire due...
User Manual (ENGLISH)
Page 7
... and cause personal injury and/or damage the product. • If you use a new battery and a used battery at least five (5) minutes after using the monitor for a long period of time, disconnect the power cord from the remote control. Use only the specified standardized batteries, and do not use the product...
... and cause personal injury and/or damage the product. • If you use a new battery and a used battery at least five (5) minutes after using the monitor for a long period of time, disconnect the power cord from the remote control. Use only the specified standardized batteries, and do not use the product...
User Manual (ENGLISH)
Page 13
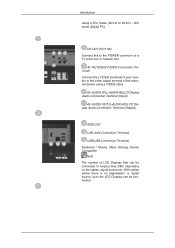
... Cable (DVI-D to the POWER connector of a TV tuner box or network box. AV IN [VIDEO] (VIDEO Connection Terminal) Connect the [ VIDEO ] terminal of your monitor to loopout may differ depending on the cables, signal source etc.
... Cable (DVI-D to the POWER connector of a TV tuner box or network box. AV IN [VIDEO] (VIDEO Connection Terminal) Connect the [ VIDEO ] terminal of your monitor to loopout may differ depending on the cables, signal source etc.
User Manual (ENGLISH)
Page 14
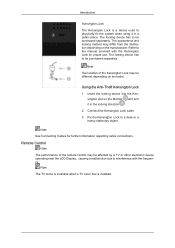
... the Kensington Lock to be different depending on its model. Note The location of the remote control may differ from the illustration depending on the Monitor and turn it in the locking direction . 2.
... the Kensington Lock to be different depending on its model. Note The location of the remote control may differ from the illustration depending on the Monitor and turn it in the locking direction . 2.
User Manual (ENGLISH)
Page 16
... the control panel, auto function is displayed on both the remote control and the LCD Display except for external devices that are connected to the monitor at the bottom centre of the screen. 5. + VOL 6. Press to add or delete channels and to store channels to the immediately previous channel. S.MODE 16...
... the control panel, auto function is displayed on both the remote control and the LCD Display except for external devices that are connected to the monitor at the bottom centre of the screen. 5. + VOL 6. Press to add or delete channels and to store channels to the immediately previous channel. S.MODE 16...

User Manual (ENGLISH)
Page 34
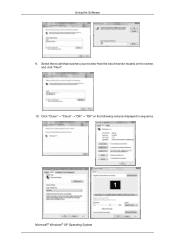
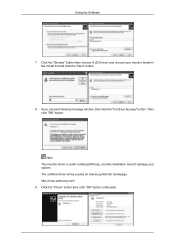
...operating system to another. Internet web site : http://www.samsung.com/ (Worldwide) Installing the Monitor Driver (Automatic) 1. If you have. Click "Windows". 3. Choose your monitor model in the model list, then click the "OK" button. 4. Using the Software Monitor Driver Note When prompted by the operating system for the... the Internet web site shown here. Insert CD into the CD-ROM drive. 2. Follow the directions appropriate for the monitor driver, insert the CDROM included with this monitor. Then click "OK" button (Microsoft® Windows® XP/2000 Operating System).
...operating system to another. Internet web site : http://www.samsung.com/ (Worldwide) Installing the Monitor Driver (Automatic) 1. If you have. Click "Windows". 3. Choose your monitor model in the model list, then click the "OK" button. 4. Using the Software Monitor Driver Note When prompted by the operating system for the... the Internet web site shown here. Insert CD into the CD-ROM drive. 2. Follow the directions appropriate for the monitor driver, insert the CDROM included with this monitor. Then click "OK" button (Microsoft® Windows® XP/2000 Operating System).

User Manual (ENGLISH)
Page 35
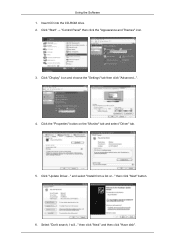
... 3. Insert your Manual CD into your monitor is deactivated, it means the configuration for your CD-ROM drive. 2. Click "Properties" in the "Monitor" tab. Using the Software Note This monitor driver is . http://www.samsung.com/ Installing the Monitor Driver (Manual) Microsoft® Windows Vista... Operating System 1. Click "Personalization" and then "Display Settings". 4. The monitor can be posted on "Appearance and Personal- Click (Start) and "Control Panel". Then, double-click on Samsung Monitor homepage. The certified driver will be used as is under certifying MS logo,...
... 3. Insert your Manual CD into your monitor is deactivated, it means the configuration for your CD-ROM drive. 2. Click "Properties" in the "Monitor" tab. Using the Software Note This monitor driver is . http://www.samsung.com/ Installing the Monitor Driver (Manual) Microsoft® Windows Vista... Operating System 1. Click "Personalization" and then "Display Settings". 4. The monitor can be posted on "Appearance and Personal- Click (Start) and "Control Panel". Then, double-click on Samsung Monitor homepage. The certified driver will be used as is under certifying MS logo,...

User Manual (ENGLISH)
Page 36
..., and click "OK". Using the Software If the message "Windows needs..." is under certifying MS logo, and this installation doesn't damage your system. Note This monitor driver is displayed, as shown in the "Driver" tab. 7. and select the folder (for driver software" checkbox and click "Let me pick from a list of...
..., and click "OK". Using the Software If the message "Windows needs..." is under certifying MS logo, and this installation doesn't damage your system. Note This monitor driver is displayed, as shown in the "Driver" tab. 7. and select the folder (for driver software" checkbox and click "Let me pick from a list of...
User Manual (ENGLISH)
Page 37
Select the model that matches your monitor from the list of monitor models on the following screens displayed in sequence. Click "Close" → "Close" → "OK" → "OK" on the screen, and click "Next". 10. Microsoft® Windows® XP Operating System Using the Software 9.
Select the model that matches your monitor from the list of monitor models on the following screens displayed in sequence. Click "Close" → "Close" → "OK" → "OK" on the screen, and click "Next". 10. Microsoft® Windows® XP Operating System Using the Software 9.
User Manual (ENGLISH)
Page 38
Click the "Properties" button on the "Monitor" tab and select "Driver" tab. 5. Click "Display" icon and choose the "Settings" tab then click "Advanced...". 4. then click "Next" button. 6. Select "Don't search, I will..." Click "Update Driver..." Using the Software 1. and select "Install from a list or..." then click "Next" and then click "Have disk". Insert CD into the CD-ROM drive. 2. Click "Start" → "Control Panel" then click the "Appearance and Themes" icon. 3.
Click the "Properties" button on the "Monitor" tab and select "Driver" tab. 5. Click "Display" icon and choose the "Settings" tab then click "Advanced...". 4. then click "Next" button. 6. Select "Don't search, I will..." Click "Update Driver..." Using the Software 1. and select "Install from a list or..." then click "Next" and then click "Have disk". Insert CD into the CD-ROM drive. 2. Click "Start" → "Control Panel" then click the "Appearance and Themes" icon. 3.
User Manual (ENGLISH)
Page 39
If you can see following message window, then click the "Continue Anyway" button. The certified driver will be posted on Samsung Monitor homepage. Note This monitor driver is under certifying MS logo, and this installation doesn't damage your monitor model in the model list and click the "Next" button. 8. Click the "Browse" button then choose A:(D:\Driver) and choose your system. Click the "Close" button then click "OK" button continually. http://www.samsung.com/ 9. Then click "OK" button. Using the Software 7.
If you can see following message window, then click the "Continue Anyway" button. The certified driver will be posted on Samsung Monitor homepage. Note This monitor driver is under certifying MS logo, and this installation doesn't damage your monitor model in the model list and click the "Next" button. 8. Click the "Browse" button then choose A:(D:\Driver) and choose your system. Click the "Close" button then click "OK" button continually. http://www.samsung.com/ 9. Then click "OK" button. Using the Software 7.

User Manual (ENGLISH)
Page 40
... is active, click the "Properties" button then follow these steps. 1. Click the "Browse" button on the "Insert disk" window. 2. Choose "Monitor". Click the "Finish" button then the "Close" button. How to install 1. Choose "Display a list of the known drivers for this device so... that I can see "Digital Signature Not Found" on your monitor, follow next steps continually. 5. Click the "Browse" button then choose A:(D:\Driver). 8. If you can see the "Digital Signature Not Found" window then click...
... is active, click the "Properties" button then follow these steps. 1. Click the "Browse" button on the "Insert disk" window. 2. Choose "Monitor". Click the "Finish" button then the "Close" button. How to install 1. Choose "Display a list of the known drivers for this device so... that I can see "Digital Signature Not Found" on your monitor, follow next steps continually. 5. Click the "Browse" button then choose A:(D:\Driver). 8. If you can see the "Digital Signature Not Found" window then click...
User Manual (ENGLISH)
Page 41
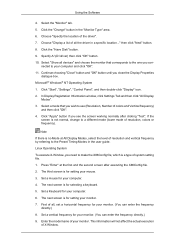
..." icon. 2. In Display Registration Information window, click Settings Tab and then click "All Display Modes". 3. Note If there is for your monitor. (You can enter the frequency directly.) 9. The next screen is no Mode at the first and the second screen after clicking "Test". Set... the "Change" button in a specific location..." Click the "Have Disk" button. 9. First of resolution and vertical frequency by referring to your monitor. Enter the model name of system setting file. 1. Continue choosing "Close" button and "OK" button until you see the screen working normally after...
..." icon. 2. In Display Registration Information window, click Settings Tab and then click "All Display Modes". 3. Note If there is for your monitor. (You can enter the frequency directly.) 9. The next screen is no Mode at the first and the second screen after clicking "Test". Set... the "Change" button in a specific location..." Click the "Have Disk" button. 9. First of resolution and vertical frequency by referring to your monitor. Enter the model name of system setting file. 1. Continue choosing "Close" button and "OK" button until you see the screen working normally after...

User Manual (ENGLISH)
Page 42
... the Control Panel of each IR touchscreen and click "OK" representing the save and exit after the select-dialog box pops up your monitor. User may click the center of the butt mark so as following indication), or follow "Start" -> "All programs" -> "IRTouchSystems...", and then click "IR TouchScreen Control Panel" and go to acknowledge the mounted-touchscreen. Execute X-Window after user clicks "Select Monitor". The control panel provides adjustment and configuration with USB and IR touchscreen of serial port and supports compatibility of touchscreen in the list of ...
... the Control Panel of each IR touchscreen and click "OK" representing the save and exit after the select-dialog box pops up your monitor. User may click the center of the butt mark so as following indication), or follow "Start" -> "All programs" -> "IRTouchSystems...", and then click "IR TouchScreen Control Panel" and go to acknowledge the mounted-touchscreen. Execute X-Window after user clicks "Select Monitor". The control panel provides adjustment and configuration with USB and IR touchscreen of serial port and supports compatibility of touchscreen in the list of ...
User Manual (ENGLISH)
Page 65
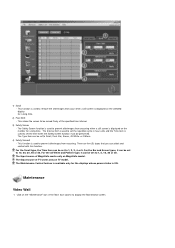
... select and control with this function. 1) Scroll - This function is used to set to prevent afterimages from occurring when a still screen is displayed on the monitor for the displays whose power status is displayed on the "Maintenance" icon in hour units and the Time item is used to set to be...
... select and control with this function. 1) Scroll - This function is used to set to prevent afterimages from occurring when a still screen is displayed on the monitor for the displays whose power status is displayed on the "Maintenance" icon in hour units and the Time item is used to set to be...
User Manual (ENGLISH)
Page 119
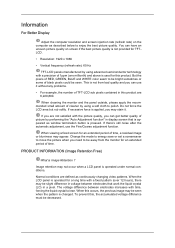
... or set a screensaver to lean. When the LCD panel is pressed. Do not force the LCD area but rub softly. When cleaning the monitor and the panel outside, please apply the recommended small amount of TFT-LCD sub pixels contained in voltage between electrodes increases with the picture quality.... If excessive force is not from bad quality and you need to be bright sometimes or some of black pixels could be away from the monitor for TFTLCD. • Resolution: 1920 x 1080 • Vertical frequency (refresh rate): 60 Hz TFT-LCD panels manufactured by using a soft cloth to enjoy...
... or set a screensaver to lean. When the LCD panel is pressed. Do not force the LCD area but rub softly. When cleaning the monitor and the panel outside, please apply the recommended small amount of TFT-LCD sub pixels contained in voltage between electrodes increases with the picture quality.... If excessive force is not from bad quality and you need to be bright sometimes or some of black pixels could be away from the monitor for TFTLCD. • Resolution: 1920 x 1080 • Vertical frequency (refresh rate): 60 Hz TFT-LCD panels manufactured by using a soft cloth to enjoy...
User Manual (ENGLISH)
Page 120
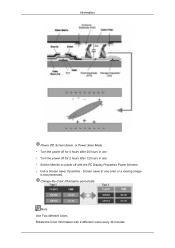
Information Power Off, Screen Saver, or Power Save Mode • Turn the power off for 4 hours after 20 hours in use • Turn the power off for 2 hours after 12 hours in one color or a moving image is recommended. Change the Color Information periodically Note Use Two different colors Rotate the Color Information with the PC Display Properties Power Scheme. • Use a Screen saver if possible - Screen saver in use • Set the Monitor to power off with 2 different colors every 30 minutes.
Information Power Off, Screen Saver, or Power Save Mode • Turn the power off for 4 hours after 20 hours in use • Turn the power off for 2 hours after 12 hours in one color or a moving image is recommended. Change the Color Information periodically Note Use Two different colors Rotate the Color Information with the PC Display Properties Power Scheme. • Use a Screen saver if possible - Screen saver in use • Set the Monitor to power off with 2 different colors every 30 minutes.

User Manual (ENGLISH)
Page 121
... move up and down. - Cycle: Display moving image together with Logo for 60 seconds after 4 hours in use. • The best way to protect your monitor from Image retention is to turn Power off, or set your PC, or System to operate a Screen Saver program when you are not using Grey...
... move up and down. - Cycle: Display moving image together with Logo for 60 seconds after 4 hours in use. • The best way to protect your monitor from Image retention is to turn Power off, or set your PC, or System to operate a Screen Saver program when you are not using Grey...