
User Manual
Page 4
...closet. • Otherwise, this may result in the discoloration and distortion of more than 4 inches (10 cm) from the wall. • Otherwise, it down , make sure to put it may peel off. ternal temperature. When putting the product down... floor. • Otherwise, this may result in electric shock or fire. Ensure that an authorized installation company installs the wall mount. • Otherwise, it with a slightly moistened, soft cloth. Do not install it . When cleaning the monitor case...may fall and cause personal injury. • Make sure to install the specified wall mount.
...closet. • Otherwise, this may result in the discoloration and distortion of more than 4 inches (10 cm) from the wall. • Otherwise, it down , make sure to put it may peel off. ternal temperature. When putting the product down... floor. • Otherwise, this may result in electric shock or fire. Ensure that an authorized installation company installs the wall mount. • Otherwise, it with a slightly moistened, soft cloth. Do not install it . When cleaning the monitor case...may fall and cause personal injury. • Make sure to install the specified wall mount.
User Manual
Page 11
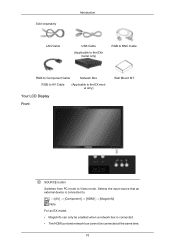
... only) RGB to BNC Cable RGB to Component Cable Network Box RGB to AV Cable (Applicable to the EX model only) Your LCD Display Front Wall Mount KIT SOURCE button Switches from PC mode to . [PC] → [AV] → [Component] → [HDMI] → [MagicInfo] Note For an EX model, • MagicInfo can...
... only) RGB to BNC Cable RGB to Component Cable Network Box RGB to AV Cable (Applicable to the EX model only) Your LCD Display Front Wall Mount KIT SOURCE button Switches from PC mode to . [PC] → [AV] → [Component] → [HDMI] → [MagicInfo] Note For an EX model, • MagicInfo can...

User Manual
Page 20
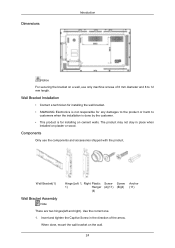
...plaster or wood. Hinge (Right) 2. Components Only use the components and accessories shipped with the product. When done, mount the wall bracket on cement walls. The product may not stay in the direction of the product is for any damages to the product or harm ... • This product is correct. 19 Hinge (Left) D - Use the correct one. 1. Wall Bracket C - Introduction • SAMSUNG Electronics is not responsible for installing on the wall. A - Before drilling into the wall, check if the length between the two locking holes at the back of the arrow. Captive Screw ...
...plaster or wood. Hinge (Right) 2. Components Only use the components and accessories shipped with the product. When done, mount the wall bracket on cement walls. The product may not stay in the direction of the product is for any damages to the product or harm ... • This product is correct. 19 Hinge (Left) D - Use the correct one. 1. Wall Bracket C - Introduction • SAMSUNG Electronics is not responsible for installing on the wall. A - Before drilling into the wall, check if the length between the two locking holes at the back of the arrow. Captive Screw ...
User Manual
Page 21
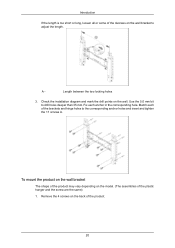
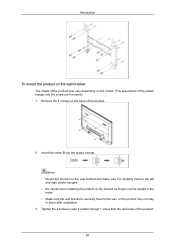
...locking holes 3. Check the installation diagram and mark the drill points on the wall bracket to adjust the length. Match each anchor in the corresponding hole. Fix...mm. Introduction If the length is too short or long, loosen all or some of the 4screws on the wall. Use the 5.0 mm bit to the corresponding anchor holes and insert and tighten the 11 screws A. Remove ...the 4 screws on the model. (The assemblies of the product. 20 To mount the product on the wall bracket The shape of the product may vary depending on the back of the plastic hanger and the screw...
...locking holes 3. Check the installation diagram and mark the drill points on the wall bracket to adjust the length. Match each anchor in the corresponding hole. Fix...mm. Introduction If the length is too short or long, loosen all or some of the 4screws on the wall. Use the 5.0 mm bit to the corresponding anchor holes and insert and tighten the 11 screws A. Remove ...the 4 screws on the model. (The assemblies of the product. 20 To mount the product on the wall bracket The shape of the product may vary depending on the back of the plastic hanger and the screw...
User Manual
Page 22
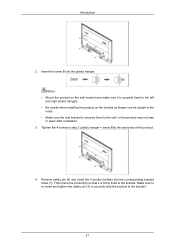
Notice • Mount the product on the wall bracket and make sure it is securely fixed to the wall, or the product may not stay in step 2 (plastic hanger + screw B)to the bracket. 21 Remove safety pin (3) and insert the 4 product holders into the ... right plastic hangers. • Be careful when installing the product on the bracket as fingers can be caught in the holes. • Make sure the wall bracket is firmly fixed to the bracket. Make sure to re-insert and tighten the safety pin (3) to securely hold the product to the rear...
Notice • Mount the product on the wall bracket and make sure it is securely fixed to the wall, or the product may not stay in step 2 (plastic hanger + screw B)to the bracket. 21 Remove safety pin (3) and insert the 4 product holders into the ... right plastic hangers. • Be careful when installing the product on the bracket as fingers can be caught in the holes. • Make sure the wall bracket is firmly fixed to the bracket. Make sure to re-insert and tighten the safety pin (3) to securely hold the product to the rear...
User Manual
Page 25
... • Contact a technician for installing the wall bracket. • SAMSUNG Electronics is not responsible for installing on cement walls. Use the correct one. 1. When done, mount the wall bracket on plaster or wood. Wall Bracket(1) Hinge(Left 1, Right Plastic Screw Screw 1) Hanger (A)(11) (B)(4) (4) Anchor (11) Wall Bracket Assembly Note There are two hinges(left and right). Components...
... • Contact a technician for installing the wall bracket. • SAMSUNG Electronics is not responsible for installing on cement walls. Use the correct one. 1. When done, mount the wall bracket on plaster or wood. Wall Bracket(1) Hinge(Left 1, Right Plastic Screw Screw 1) Hanger (A)(11) (B)(4) (4) Anchor (11) Wall Bracket Assembly Note There are two hinges(left and right). Components...
User Manual
Page 27
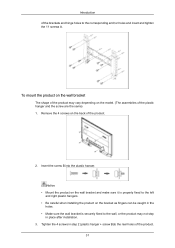
Notice • Mount the product on the wall bracket and make sure it is properly fixed to the left and right plastic hangers. • Be careful when installing the product on the bracket as fingers can be caught in the holes. • Make sure the wall bracket is securely fixed to the rear holes... of the product. 2. Remove the 4 screws on the back of the product. 26 Tighten the 4 screws in step 2 (plastic hanger + screw B)to the wall, or the product may vary depending on the model. (The assemblies of the plastic hanger and the screw are the same) 1. Introduction To...
Notice • Mount the product on the wall bracket and make sure it is properly fixed to the left and right plastic hangers. • Be careful when installing the product on the bracket as fingers can be caught in the holes. • Make sure the wall bracket is securely fixed to the rear holes... of the product. 2. Remove the 4 screws on the back of the product. 26 Tighten the 4 screws in step 2 (plastic hanger + screw B)to the wall, or the product may vary depending on the model. (The assemblies of the plastic hanger and the screw are the same) 1. Introduction To...

User Manual
Page 31
... each anchor in the direction of the 4screws on the wall bracket to drill holes deeper than 35 mm. Introduction Wall Bracket Assembly Note There are two hinges(left and right). Hinge (Left) D - Fix each 30 When done, mount the wall bracket on the wall. A - Hinge (Right) 2. Use the 5.0 mm bit to adjust the length...
... each anchor in the direction of the 4screws on the wall bracket to drill holes deeper than 35 mm. Introduction Wall Bracket Assembly Note There are two hinges(left and right). Hinge (Left) D - Fix each 30 When done, mount the wall bracket on the wall. A - Hinge (Right) 2. Use the 5.0 mm bit to adjust the length...
User Manual
Page 32
... + screw B)to the corresponding anchor holes and insert and tighten the 11 screws A. To mount the product on the wall bracket The shape of the product may not stay in the holes. • Make sure the wall bracket is properly fixed to the left and right plastic hangers. • Be careful when... 31 Remove the 4 screws on the bracket as fingers can be caught in place after installation. 3. Notice • Mount the product on the wall bracket and make sure it is securely fixed to the wall, or the product may vary depending on the model. (The assemblies of the brackets and hinge holes to...
... + screw B)to the corresponding anchor holes and insert and tighten the 11 screws A. To mount the product on the wall bracket The shape of the product may not stay in the holes. • Make sure the wall bracket is properly fixed to the left and right plastic hangers. • Be careful when... 31 Remove the 4 screws on the bracket as fingers can be caught in place after installation. 3. Notice • Mount the product on the wall bracket and make sure it is securely fixed to the wall, or the product may vary depending on the model. (The assemblies of the brackets and hinge holes to...