

User Manual (user Manual) (ver.1.0) (English)
Page 7
... 15 Logos of Discs that can be played 15 Accessories 16 Front Panel 17 Front Panel Display 18 Rear Panel 19 Remote Control 19 Tour of the Remote Control 20 Setting the Remote Control 20 Controllable Tv Codes Connections 21 Connecting to a TV 21 Case 1 : Connecting to a TV with DVI Cable - Best Quality...
... 15 Logos of Discs that can be played 15 Accessories 16 Front Panel 17 Front Panel Display 18 Rear Panel 19 Remote Control 19 Tour of the Remote Control 20 Setting the Remote Control 20 Controllable Tv Codes Connections 21 Connecting to a TV 21 Case 1 : Connecting to a TV with DVI Cable - Best Quality...
User Manual (user Manual) (ver.1.0) (English)
Page 10
Contents Basic Functions 50 Listening to Music 50 Buttons on the Remote Control used for Music Playback 51 Playing an Audio CD (CD-DA)/MP3 51 Repeat an Audio CD (CD-DA)/MP3 51 Playlist 52 Playing ... back a USB Storage Device 54 Notes on USB connection Network Services 55 Using Internet@TV 55 Getting Started with Internet@TV 57 Settings 58 Samsung Apps 59 BD-LIVE™ 59 Software Upgrade Notification 59 Using the AllShare Function Appendix 61 Troubleshooting 64 Index 65 Specifications 66 Compliance and Compatibility Notice 66...
Contents Basic Functions 50 Listening to Music 50 Buttons on the Remote Control used for Music Playback 51 Playing an Audio CD (CD-DA)/MP3 51 Repeat an Audio CD (CD-DA)/MP3 51 Playlist 52 Playing ... back a USB Storage Device 54 Notes on USB connection Network Services 55 Using Internet@TV 55 Getting Started with Internet@TV 57 Settings 58 Samsung Apps 59 BD-LIVE™ 59 Software Upgrade Notification 59 Using the AllShare Function Appendix 61 Troubleshooting 64 Index 65 Specifications 66 Compliance and Compatibility Notice 66...
User Manual (user Manual) (ver.1.0) (English)
Page 15
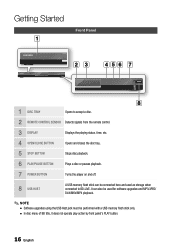
... Logos of Discs that can be played Blu-ray Disc 3D Blu-ray Disc DTS-HD Master Audio DivX BD-LIVE Dolby TrueHD NTSC broadcast system in U.S.A, Canada, Korea, Japan Accessories Check for Remote Control (AAA Size) (AC43-12002H) Java POWER BONUSVIEW TV POWER SOURCE SUBTITLE AUDIO DISC MENU MENU TITLE ...MENU POPUP TOOLS INFO RETURN EXIT INTERNET@ FULL SCREEN REPEAT 79 MUTE VOL CH AK59-00104R User Manual (AK68-01963N) Quick Guide (AK68-01855T) Remote Control (AK59-00104R) English 15 Audio/Video cable (AC39-00073A) Batteries for the supplied accessories below.
... Logos of Discs that can be played Blu-ray Disc 3D Blu-ray Disc DTS-HD Master Audio DivX BD-LIVE Dolby TrueHD NTSC broadcast system in U.S.A, Canada, Korea, Japan Accessories Check for Remote Control (AAA Size) (AC43-12002H) Java POWER BONUSVIEW TV POWER SOURCE SUBTITLE AUDIO DISC MENU MENU TITLE ...MENU POPUP TOOLS INFO RETURN EXIT INTERNET@ FULL SCREEN REPEAT 79 MUTE VOL CH AK59-00104R User Manual (AK68-01963N) Quick Guide (AK68-01855T) Remote Control (AK59-00104R) English 15 Audio/Video cable (AC39-00073A) Batteries for the supplied accessories below.
User Manual (user Manual) (ver.1.0) (English)
Page 16
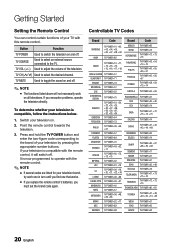
Getting Started a Front Panel b c def g h 1 DISC TRAY Opens to accept a disc. 2 REMOTE CONTROL SENSOR Detects signals from the remote control. 3 DISPLAY Displays the playing status, time, etc. 4 OPEN/CLOSE BUTTON Opens and closes the disc tray. 5 STOP BUTTON Stops disc playback. 6 PLAY/PAUSE ...NOTE ▪ Software upgrades using the USB Host jack must be connected here and used as storage when connected to BD-LIVE. It can be performed with a USB memory flash stick only. ▪ In disc menu of BD title, it does not operate play action by front panel's PLAY button. 16 English
Getting Started a Front Panel b c def g h 1 DISC TRAY Opens to accept a disc. 2 REMOTE CONTROL SENSOR Detects signals from the remote control. 3 DISPLAY Displays the playing status, time, etc. 4 OPEN/CLOSE BUTTON Opens and closes the disc tray. 5 STOP BUTTON Stops disc playback. 6 PLAY/PAUSE ...NOTE ▪ Software upgrades using the USB Host jack must be connected here and used as storage when connected to BD-LIVE. It can be performed with a USB memory flash stick only. ▪ In disc menu of BD title, it does not operate play action by front panel's PLAY button. 16 English

User Manual (user Manual) (ver.1.0) (English)
Page 19
...to link to stop a disc. These buttons are drained. • Check if remote sensor is blocked by obstacles. • Check if there is any fluorescent lighting nearby. 03 Getting Started Remote Control Tour of the Remote Control Turn the player on and off . (To operate your TV, please refer ... menu items and change menu value. English 19 Use this to enter the popup menu/title menu. Installing batteries ✎ NOTE ▪ If the remote does not operate properly : • Check the polarity +/- To open and close the disc tray. of the batteries (Dry-Cell) • Check...
...to link to stop a disc. These buttons are drained. • Check if remote sensor is blocked by obstacles. • Check if there is any fluorescent lighting nearby. 03 Getting Started Remote Control Tour of the Remote Control Turn the player on and off . (To operate your TV, please refer ... menu items and change menu value. English 19 Use this to enter the popup menu/title menu. Installing batteries ✎ NOTE ▪ If the remote does not operate properly : • Check the polarity +/- To open and close the disc tray. of the batteries (Dry-Cell) • Check...
User Manual (user Manual) (ver.1.0) (English)
Page 20
... you must set the brand code again. Switch your television is now programmed to adjust the volume of the television. Controllable Tv Codes Brand Code SAMSUNG TV POWER+01, +02, +03, +04, +05, +06, +07, +08, +09 AIWA TV POWER+82 ANAM TV POWER+10, +11, +12, +13, +14, +15, +16... TOSHIBA TV POWER+47, +48, +49, +50, +51, +52 WEGA YOKO ZENITH TV POWER+57 TV POWER+06 TV POWER+63 20 English Point the remote control towards the television. 3. To determine whether your television on all televisions. Button Function TV POWER TV SOURCE TV VOL (+/-) Used to toggle the sound...
... you must set the brand code again. Switch your television is now programmed to adjust the volume of the television. Controllable Tv Codes Brand Code SAMSUNG TV POWER+01, +02, +03, +04, +05, +06, +07, +08, +09 AIWA TV POWER+82 ANAM TV POWER+10, +11, +12, +13, +14, +15, +16... TOSHIBA TV POWER+47, +48, +49, +50, +51, +52 WEGA YOKO ZENITH TV POWER+57 TV POWER+06 TV POWER+63 20 English Point the remote control towards the television. 3. To determine whether your television on all televisions. Button Function TV POWER TV SOURCE TV VOL (+/-) Used to toggle the sound...
User Manual (user Manual) (ver.1.0) (English)
Page 21
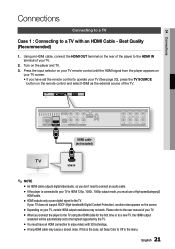
.... Please refer to the user manual of your TV. 2. Best Quality (Recommended) 1. Press the input selector on your TV remote control until the HDMI signal from the player appears on the remote control and select HDMI as the external source of your TV. ▪ When you connect the player to the TV... using the HDMI cable for the first time or to a new TV, the HDMI output resolution will be automatically set the remote control to enjoy videos with an HDMI Cable - If your TV, certain HDMI output resolutions may cause a screen noise. If this is connected to the...
.... Please refer to the user manual of your TV. 2. Best Quality (Recommended) 1. Press the input selector on your TV remote control until the HDMI signal from the player appears on the remote control and select HDMI as the external source of your TV. ▪ When you connect the player to the TV... using the HDMI cable for the first time or to a new TV, the HDMI output resolution will be automatically set the remote control to enjoy videos with an HDMI Cable - If your TV, certain HDMI output resolutions may cause a screen noise. If this is connected to the...

User Manual (user Manual) (ver.1.0) (English)
Page 22
... 2 : Connecting to the TV. Turn on the rear of the player to operate your TV (See page 20), press the TV SOURCE button on the remote control and select HDMI-DVI as the external source of your TV screen. • If you connect the player to the TV using the HDMI...-DVI cable for the first time or to a new TV, the HDMI output resolution will be automatically set the remote control to the AUDIO IN (red and white) terminals of the TV. Using the audio cables, connect the AUDIO OUT (red and white) terminals on...
... 2 : Connecting to the TV. Turn on the rear of the player to operate your TV (See page 20), press the TV SOURCE button on the remote control and select HDMI-DVI as the external source of your TV screen. • If you connect the player to the TV using the HDMI...-DVI cable for the first time or to a new TV, the HDMI output resolution will be automatically set the remote control to the AUDIO IN (red and white) terminals of the TV. Using the audio cables, connect the AUDIO OUT (red and white) terminals on...

User Manual (user Manual) (ver.1.0) (English)
Page 23
...1080i or 720p mode, the Display Setup menu will enjoy high quality images with accurate color reproduction. Press the input selector on your TV remote control until the "COMPONENT" signal from a variety of resolution settings for Blu-ray Discs such as 1080p, 1080i or 720p in the setup... images. (Audio signals are connected. 04 Connections Case 3 : Connecting to operate your TV (See page 20), press the TV SOURCE button on the remote control and select COMPONENT as the external source of "PB, PR, Y". Better Quality - Audio cable Component cable (not included) Red White Red Blue ...
...1080i or 720p mode, the Display Setup menu will enjoy high quality images with accurate color reproduction. Press the input selector on your TV remote control until the "COMPONENT" signal from a variety of resolution settings for Blu-ray Discs such as 1080p, 1080i or 720p in the setup... images. (Audio signals are connected. 04 Connections Case 3 : Connecting to operate your TV (See page 20), press the TV SOURCE button on the remote control and select COMPONENT as the external source of "PB, PR, Y". Better Quality - Audio cable Component cable (not included) Red White Red Blue ...

User Manual (user Manual) (ver.1.0) (English)
Page 24
... may be affected by copyright protection systems and the picture will be generated if the audio cable is only one audio input terminal on the remote control and select VIDEO as the external source of the player. ! Please refer to the AUDIO OUT(right/white) terminal of the TV. ...Press the input selector on your TV remote control until the "VIDEO" signal from the player appears on the player and TV. 3. Connections Case 4 : Connecting to the power cable. ▪ If you...
... may be affected by copyright protection systems and the picture will be generated if the audio cable is only one audio input terminal on the remote control and select VIDEO as the external source of the player. ! Please refer to the AUDIO OUT(right/white) terminal of the TV. ...Press the input selector on your TV remote control until the "VIDEO" signal from the player appears on the player and TV. 3. Connections Case 4 : Connecting to the power cable. ▪ If you...
User Manual (user Manual) (ver.1.0) (English)
Page 33
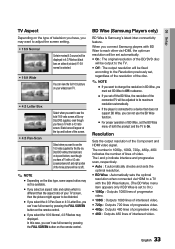
...when you want to see the 16:9 video supplied by pressing the FULL SCREEN button on the remote control. In this case, you select the 16:9 Normal, 4:3 Pillarbox may displayed. When you connect Samsung players with BD Wise to each other via HDMI to a TV with a 4:3 ratio screen. English 33 ... see the total 16:9 ratio screen a Blu-ray Disc/DVD supplies, even though you have a TV with the BD Wise feature. (The BD Wise menu item appears only if BD Wise is Samsung's latest inter-connectivity feature. Black bars will be displayed in 1080p, 1080i, 720p, 480p, 480i indicates the number...
...when you want to see the 16:9 video supplied by pressing the FULL SCREEN button on the remote control. In this case, you select the 16:9 Normal, 4:3 Pillarbox may displayed. When you connect Samsung players with BD Wise to each other via HDMI to a TV with a 4:3 ratio screen. English 33 ... see the total 16:9 ratio screen a Blu-ray Disc/DVD supplies, even though you have a TV with the BD Wise feature. (The BD Wise menu item appears only if BD Wise is Samsung's latest inter-connectivity feature. Black bars will be displayed in 1080p, 1080i, 720p, 480p, 480i indicates the number...

User Manual (user Manual) (ver.1.0) (English)
Page 38
...formatted in this player to use USB devices that supports the BD-LIVE service. Setup System Initial Settings By using a Samsung TV remote control and start disc playback simply by pressing the PLAY ( ) button on the TV's remote control. For more information, please see some black on ... allows you to select either the player's Internal Memory or External Memory (connected USB Device). BD Data Management Enables you to manage the downloaded contents from BD-LIVE is recommended to a Samsung TV with the Anynet+ feature. To operate this function, connect this user manual. (See ...
...formatted in this player to use USB devices that supports the BD-LIVE service. Setup System Initial Settings By using a Samsung TV remote control and start disc playback simply by pressing the PLAY ( ) button on the TV's remote control. For more information, please see some black on ... allows you to select either the player's Internal Memory or External Memory (connected USB Device). BD Data Management Enables you to manage the downloaded contents from BD-LIVE is recommended to a Samsung TV with the Anynet+ feature. To operate this function, connect this user manual. (See ...

User Manual (user Manual) (ver.1.0) (English)
Page 40
... Subnet Mask : 255 255 255 0 Language Gateway :0 0 0 0 DNS : Manual Security General DNS Server :0 0 0 0 Support > Move " Select ' Return 4. Press the ▼ button to go to your remote to DNS. 8. Setting Up a Wired Connection - Setting Up a Wired Connection - On the Internet Protocol Setup screen, press the ENTER button. 2. Use the number buttons on...
... Subnet Mask : 255 255 255 0 Language Gateway :0 0 0 0 DNS : Manual Security General DNS Server :0 0 0 0 Support > Move " Select ' Return 4. Press the ▼ button to go to your remote to DNS. 8. Setting Up a Wired Connection - Setting Up a Wired Connection - On the Internet Protocol Setup screen, press the ENTER button. 2. Use the number buttons on...

User Manual (user Manual) (ver.1.0) (English)
Page 41
... menu, press the ▲▼ buttons to select a network, and then press the ENTER button. 6. Press the PBC (WPS) button on your remote. 4. After the network connection is set up , press the Return button to select the Internet Protocol Setup, and then press the ENTER button. 3....to select Auto or Manual, and then press the ENTER button. Press the Return button on the remote control. 3. The Internet Protocol Setup screen appears. 2. On the Security screen, enter your remote. 10. If you would select Security (for available wireless networks. For most home networks, you ...
... menu, press the ▲▼ buttons to select a network, and then press the ENTER button. 6. Press the PBC (WPS) button on your remote. 4. After the network connection is set up , press the Return button to select the Internet Protocol Setup, and then press the ENTER button. 3....to select Auto or Manual, and then press the ENTER button. Press the Return button on the remote control. 3. The Internet Protocol Setup screen appears. 2. On the Security screen, enter your remote. 10. If you would select Security (for available wireless networks. For most home networks, you ...

User Manual (user Manual) (ver.1.0) (English)
Page 42
... button. Press the ▼ button to go to enter numbers. 5. To get the Network setting values from button to button on your remote, or move successively to the next field. Setting Up the Wireless Network Connection - Settings Display Audio System Network Language Security General Support NeStwecourkritSyeKtteinygs... Done button, and then press the ENTER button. On the dialog that corresponds to the letter. To Enter the Network settings into your remote to enter numbers. • Use the arrow keys on the Security Key screen. • To enter letters, move to move from ...
... button. Press the ▼ button to go to enter numbers. 5. To get the Network setting values from button to button on your remote, or move successively to the next field. Setting Up the Wireless Network Connection - Settings Display Audio System Network Language Security General Support NeStwecourkritSyeKtteinygs... Done button, and then press the ENTER button. On the dialog that corresponds to the letter. To Enter the Network settings into your remote to enter numbers. • Use the arrow keys on the Security Key screen. • To enter letters, move to move from ...
User Manual (user Manual) (ver.1.0) (English)
Page 46
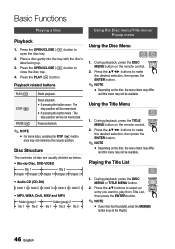
... file 1 file 2 file 3 Using the Disc menu/Title menu/ Popup menu Using the Disc Menu hZ 1. During playback, press the TITLE MENU button on the remote control. 2. Press the PLAY ( ) button. Pauses playback. ✎ NOTE ▪ For some discs, pressing the STOP ( ) button once may not be available...( close the disc tray. ) button to the Playlist. 46 English Using the Title Menu Z 1. During playback, press the DISC MENU button on the remote control. 2. Stops playback. • If pressing the button once : The stop position will be memorized. • If pressing the button twice : The...
... file 1 file 2 file 3 Using the Disc menu/Title menu/ Popup menu Using the Disc Menu hZ 1. During playback, press the TITLE MENU button on the remote control. 2. Press the PLAY ( ) button. Pauses playback. ✎ NOTE ▪ For some discs, pressing the STOP ( ) button once may not be available...( close the disc tray. ) button to the Playlist. 46 English Using the Title Menu Z 1. During playback, press the DISC MENU button on the remote control. 2. Stops playback. • If pressing the button once : The stop position will be memorized. • If pressing the button twice : The...
User Manual (user Manual) (ver.1.0) (English)
Page 47
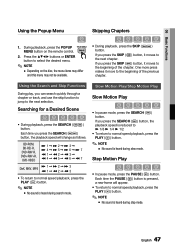
... to normal speed playback, press the PLAY ( ) button. ✎ NOTE ▪ No sound is heard during slow mode. BD-ROM, BD-RE/-R, DVD-RW/-R, DVD+RW/+R, DVD-VIDEO ) 1 ) 2 ) 3 ) 4 ...; ) 5 ) 6 ) 7 ( 1 ( 2 ( 3 ( 4 ( 5 ( 6 ( 7 DivX, MKV, MP4 ) 1 ) 2 ) 3 ( 1 ( 2 ( 3 • To return to select the desired menu. ✎ NOTE ▪ Depending on the remote...
... to normal speed playback, press the PLAY ( ) button. ✎ NOTE ▪ No sound is heard during slow mode. BD-ROM, BD-RE/-R, DVD-RW/-R, DVD+RW/+R, DVD-VIDEO ) 1 ) 2 ) 3 ) 4 ...; ) 5 ) 6 ) 7 ( 1 ( 2 ( 3 ( 4 ( 5 ( 6 ( 7 DivX, MKV, MP4 ) 1 ) 2 ) 3 ( 1 ( 2 ( 3 • To return to select the desired menu. ✎ NOTE ▪ Depending on the remote...
User Manual (user Manual) (ver.1.0) (English)
Page 48
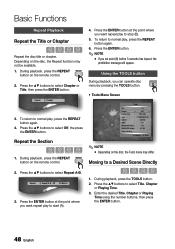
... Chapter 3. Press the ENTER button at the point where you want repeat play , press the REPEAT button again. 6. Depending on the remote control. 2. During playback, press the REPEAT button on the disc, the Repeat function may differ. Press the ▲▼ buttons to... : 1/6 ENG Angle : 1/1 BONUSVIEW Video : Off BONUSVIEW Audio : 0/1 Off Picture Setting < Change " Enter ✎ NOTE ▪ Depending on the remote control. 2. To return to select Off, the press the ENTER button. Press the ▲▼ buttons to normal play to select Chapter or Title, then...
... Chapter 3. Press the ENTER button at the point where you want repeat play , press the REPEAT button again. 6. Depending on the remote control. 2. During playback, press the REPEAT button on the disc, the Repeat function may differ. Press the ▲▼ buttons to... : 1/6 ENG Angle : 1/1 BONUSVIEW Video : Off BONUSVIEW Audio : 0/1 Off Picture Setting < Change " Enter ✎ NOTE ▪ Depending on the remote control. 2. To return to select Off, the press the ENTER button. Press the ▲▼ buttons to normal play to select Chapter or Title, then...
User Manual (user Manual) (ver.1.0) (English)
Page 49
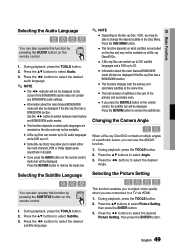
... in the Disc Menu. 06 Basic Functions Selecting the Audio Language hzZx You can also operate this function by pressing the AUDIO button on the remote control. 1. During playback, press the TOOLS button. 2. Press the ▲▼ buttons to select Audio. 3. Press the ◄► buttons to select Subtitle... When a Blu-ray Disc/DVD contains multiple angles of the primary and secondary ones. ▪ If you press the AUDIO button on the remote control, Audio bar will also be displayed if the Blu-ray Disc has a BONUSVIEW section. ▪ This function changes both the primary and...
... in the Disc Menu. 06 Basic Functions Selecting the Audio Language hzZx You can also operate this function by pressing the AUDIO button on the remote control. 1. During playback, press the TOOLS button. 2. Press the ▲▼ buttons to select Audio. 3. Press the ◄► buttons to select Subtitle... When a Blu-ray Disc/DVD contains multiple angles of the primary and secondary ones. ▪ If you press the AUDIO button on the remote control, Audio bar will also be displayed if the Blu-ray Disc has a BONUSVIEW section. ▪ This function changes both the primary and...
User Manual (user Manual) (ver.1.0) (English)
Page 50
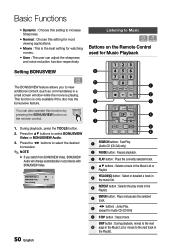
... sharpness and noise reduction function respectively. Press the ▲▼ buttons to select BONUSVIEW Video or BONUSVIEW Audio. 3. Listening to Music ow Buttons on the remote control. 1. Tools BONUSVIEW Video < BONUSVIEW Audio : Picture Setting Off > 0/1 Off < Change " Enter 50 English @ ! SKIP button : During playback, moves to the ...• Dynamic : Choose this setting to increase Sharpness. • Normal : Choose this function by pressing the BONUSVIEW button on the POWER Remote PPOOTTWWVVEERR Control used for Audio CD (CD-DA)) 9 STOP button : Stops a track.
... sharpness and noise reduction function respectively. Press the ▲▼ buttons to select BONUSVIEW Video or BONUSVIEW Audio. 3. Listening to Music ow Buttons on the remote control. 1. Tools BONUSVIEW Video < BONUSVIEW Audio : Picture Setting Off > 0/1 Off < Change " Enter 50 English @ ! SKIP button : During playback, moves to the ...• Dynamic : Choose this setting to increase Sharpness. • Normal : Choose this function by pressing the BONUSVIEW button on the POWER Remote PPOOTTWWVVEERR Control used for Audio CD (CD-DA)) 9 STOP button : Stops a track.


