

User Manual (user Manual) (ver.1.0) (English)
Page 1
DVD-V2000 Instruction Manual POWER OPEN/CLOSE CHANNEL EJECT DVD SELECT VCR REC VIDEO L AUDIO R LINE IN 2 POWER OPEN/CLOSE SCREEN FIT 4 M O D E / REPEAT 2 SHUTTLE 5 3 TV/VCR 6 AUDIO 7 ZOOM 3D SOUND TV MUTE 100+ DVD 8 9 ANGLE CLEAR 0 INPUT SEL. VCR SELECT TV VIEW DIGEST + VOL F.ADV/SKIP - CH/TRK DISPLAY REC DISC MENU SETUP /ENTER RETURN TITLE SUBTITLE MARK SPEED TIMER SEARCH www.samsungasc.com
DVD-V2000 Instruction Manual POWER OPEN/CLOSE CHANNEL EJECT DVD SELECT VCR REC VIDEO L AUDIO R LINE IN 2 POWER OPEN/CLOSE SCREEN FIT 4 M O D E / REPEAT 2 SHUTTLE 5 3 TV/VCR 6 AUDIO 7 ZOOM 3D SOUND TV MUTE 100+ DVD 8 9 ANGLE CLEAR 0 INPUT SEL. VCR SELECT TV VIEW DIGEST + VOL F.ADV/SKIP - CH/TRK DISPLAY REC DISC MENU SETUP /ENTER RETURN TITLE SUBTITLE MARK SPEED TIMER SEARCH www.samsungasc.com

User Manual (user Manual) (ver.1.0) (English)
Page 3
System Setup 16 s On-Screen Menu Navigation 16 s Menu Language 17 s Manual Clock Set 18 s Tuner Band Setting 19 s Auto Channel Memory 20 s Channel Add/Delete 21 s RF Output Channel 22 s Front Panel Dimmer... Contents x Safety 3 s Important Safety Instructions 3 x Welcome 7 s Feature Summary 7 s Unpacking 7 s Disc Type and Characteristics 8 x 1 - Getting Started 13 s Basic Connections/Auto Setup 13 x 3 - DVD Setup 24 s Disc Menu Language 24 s Audio Language 24 s Subtitle Language 25 s Parental 26 s Digital Output 27 s DTS 28 s Dynamic Compression 29 s TV Aspect Ratio...
System Setup 16 s On-Screen Menu Navigation 16 s Menu Language 17 s Manual Clock Set 18 s Tuner Band Setting 19 s Auto Channel Memory 20 s Channel Add/Delete 21 s RF Output Channel 22 s Front Panel Dimmer... Contents x Safety 3 s Important Safety Instructions 3 x Welcome 7 s Feature Summary 7 s Unpacking 7 s Disc Type and Characteristics 8 x 1 - Getting Started 13 s Basic Connections/Auto Setup 13 x 3 - DVD Setup 24 s Disc Menu Language 24 s Audio Language 24 s Subtitle Language 25 s Parental 26 s Digital Output 27 s DTS 28 s Dynamic Compression 29 s TV Aspect Ratio...

User Manual (user Manual) (ver.1.0) (English)
Page 7
...Connection, set your television with Samsung televisions and compatible brands. It is compatible with RCA jacks. 3 Plug In DVD-VCR Connect the DVD-VCR power cord to TV Choose one that you to operate the DVD-VCR setup menus. 1 Connect Antenna/Cable to DVD-VCR Connect the RF antenna ... If several codes are covered in Step 2. If Auto Clock set the clock manually; CH/TRK DISPLAY DVD VCR SELECT TV DIGEST VIEW 4+ VOL F.ADV/SKIP - 4 CH/TRK DISPLAY REC DISC MENU 7 ZOOM 3D SOUND TV MUTE 100+ 5 DVD 8 9 ANGLE CLEAR 0 INPUT SEL. INPUT ➁ Used to select the ...
...Connection, set your television with Samsung televisions and compatible brands. It is compatible with RCA jacks. 3 Plug In DVD-VCR Connect the DVD-VCR power cord to TV Choose one that you to operate the DVD-VCR setup menus. 1 Connect Antenna/Cable to DVD-VCR Connect the RF antenna ... If several codes are covered in Step 2. If Auto Clock set the clock manually; CH/TRK DISPLAY DVD VCR SELECT TV DIGEST VIEW 4+ VOL F.ADV/SKIP - 4 CH/TRK DISPLAY REC DISC MENU 7 ZOOM 3D SOUND TV MUTE 100+ 5 DVD 8 9 ANGLE CLEAR 0 INPUT SEL. INPUT ➁ Used to select the ...
User Manual (user Manual) (ver.1.0) (English)
Page 10
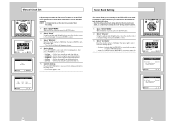
...SET/ADJUST TIME DATE YEAR 12:00AM 1/01 2002 TUE RETURN Tuner Band Setting This feature allows you to manually set the clock for accurate Timer Recording. 1 Open "SETUP MENU" With the DVD in stop mode, press the SETUP button. 2 Select "Clock" Using the up and down buttons. ...• Set Minute - Manual Clock Set REC DISC MENU SETUP /ENTER 1,3 RETURN TITLE SUBTITLE MARK SPEED TIMER SEARCH MAIN MENU DVD VCR Option Language Program Clock Channel Exit Clock Set/Adjust RETURN ENTER CLOCK SET/ADJUST Auto &#...
...SET/ADJUST TIME DATE YEAR 12:00AM 1/01 2002 TUE RETURN Tuner Band Setting This feature allows you to manually set the clock for accurate Timer Recording. 1 Open "SETUP MENU" With the DVD in stop mode, press the SETUP button. 2 Select "Clock" Using the up and down buttons. ...• Set Minute - Manual Clock Set REC DISC MENU SETUP /ENTER 1,3 RETURN TITLE SUBTITLE MARK SPEED TIMER SEARCH MAIN MENU DVD VCR Option Language Program Clock Channel Exit Clock Set/Adjust RETURN ENTER CLOCK SET/ADJUST Auto &#...
User Manual (user Manual) (ver.1.0) (English)
Page 23
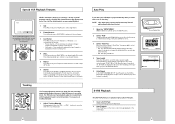
Press and release to cue/review at 5 times normal speed. • Jet Search - F.ADV/SKIP - Press the Play button again to resume normal playback. 1 Still From Play mode, press Play/Pause to still a single frame. 2 Frame Advance From still mode, press SKIP/F.ADV to advance to the next frame. 3 Cue/Review From Play mode, press F.Forward (¤¤ ) or Rewind (ˆˆ ) to advance the tape forward or backward at two speeds: • Picture Search - Shuttle Press Skip repeatedly up to 4 times to cue ahead 2 minutes. 5 Repeat From Play mode, press Repeat to Jet Search. ...
Press and release to cue/review at 5 times normal speed. • Jet Search - F.ADV/SKIP - Press the Play button again to resume normal playback. 1 Still From Play mode, press Play/Pause to still a single frame. 2 Frame Advance From still mode, press SKIP/F.ADV to advance to the next frame. 3 Cue/Review From Play mode, press F.Forward (¤¤ ) or Rewind (ˆˆ ) to advance the tape forward or backward at two speeds: • Picture Search - Shuttle Press Skip repeatedly up to 4 times to cue ahead 2 minutes. 5 Repeat From Play mode, press Repeat to Jet Search. ...

User Manual (user Manual) (ver.1.0) (English)
Page 27
You should hear the audio through the line inputs. NOTE: A monitor television is Complete NOTE: With this connection, the TV/VCR button has no effect. DVD & VCR To Monitor TV Audio/Video Inputs SCREEN FIT 4 M O D E / REPEAT 2 SHUTTLE 5 7 8 ZOOM 3D SOUND TV MUTE 100+ 0 3 TV/VCR 6 AUDIO 3 9 ...Connect RCA cables from the Audio/Video Line Out jacks on -screen display. Refer to your monitor television owner's manual for your particular device. 3 Play a Tape Insert a DVD or Hi-Fi stereo videotape in your system and adjust the volume on your stereo receiver. If you still ...
You should hear the audio through the line inputs. NOTE: A monitor television is Complete NOTE: With this connection, the TV/VCR button has no effect. DVD & VCR To Monitor TV Audio/Video Inputs SCREEN FIT 4 M O D E / REPEAT 2 SHUTTLE 5 7 8 ZOOM 3D SOUND TV MUTE 100+ 0 3 TV/VCR 6 AUDIO 3 9 ...Connect RCA cables from the Audio/Video Line Out jacks on -screen display. Refer to your monitor television owner's manual for your particular device. 3 Play a Tape Insert a DVD or Hi-Fi stereo videotape in your system and adjust the volume on your stereo receiver. If you still ...


