User Manual (user Manual) (ver.1.0) (English)
Page 1
Instruction Manual DVD-V9650 www.samsung.com
Instruction Manual DVD-V9650 www.samsung.com
User Manual (user Manual) (ver.1.0) (English)
Page 4
...license does not extend to any product unit other solvents for long periods of this DVD player, the DVD player cannot play the disc. • The product unit accompanying this product unit. If the Region number of a DVD disc does not correspond to the Region number of time. • Clean the...-commercial use by wiping in the disc tray. • Exterior interference such as lightning and static electricity can be used elsewhere. • This DVD player is designed and manufactured to respond to the ISO/IEC 11172-3 or ISO/IEC 13818-3. No rights are granted for commercial use of the...
...license does not extend to any product unit other solvents for long periods of this DVD player, the DVD player cannot play the disc. • The product unit accompanying this product unit. If the Region number of a DVD disc does not correspond to the Region number of time. • Clean the...-commercial use by wiping in the disc tray. • Exterior interference such as lightning and static electricity can be used elsewhere. • This DVD player is designed and manufactured to respond to the ISO/IEC 11172-3 or ISO/IEC 13818-3. No rights are granted for commercial use of the...
User Manual (user Manual) (ver.1.0) (English)
Page 6
...of the Remote Control...12 Chapter 2: Connections Connecting the Antenna Cable ...13 Method1: Antenna + DVD-VCR + TV: No Cable box 13 Method2: Antenna + DVD-VCR + TV: Cable box with many scrambled channels 14 Method3: Antenna + DVD-VCR + TV: Cable box with a few scrambled channels 14 Before Connecting the... DVD-VCR ...15 Connection to a TV ...15 Connection to a TV (Video)...15 Connection to a TV (S-Video) ...16 Connection to a TV (Interlace) ...17...
...of the Remote Control...12 Chapter 2: Connections Connecting the Antenna Cable ...13 Method1: Antenna + DVD-VCR + TV: No Cable box 13 Method2: Antenna + DVD-VCR + TV: Cable box with many scrambled channels 14 Method3: Antenna + DVD-VCR + TV: Cable box with a few scrambled channels 14 Before Connecting the... DVD-VCR ...15 Connection to a TV ...15 Connection to a TV (Video)...15 Connection to a TV (S-Video) ...16 Connection to a TV (Interlace) ...17...

User Manual (user Manual) (ver.1.0) (English)
Page 7
... a Disc ...33 Using the Search and Skip Functions ...35 Using the Display Function ...36 Using the Disc and Title Menu (DVD) ...38 Using the Function Menu (DVD) ...39 Repeat Play ...40 Slow Repeat Play ...42 Adjusting the Aspect Ratio (EZ View) ...43 Selecting the Audio Language ......45 Selecting the Subtitle Language ...46 Changing the Camera Angle ...47 Using the Bookmark Function (DVD) ...47 Using the Zoom Function (DVD) ...49 Clips Menu for MP3/WMA/JPEG/MPEG4 ...50 Folder Selection ...50 MP3/WMA Playback ...51 MPEG4 Playback ...53 Program Play...
... a Disc ...33 Using the Search and Skip Functions ...35 Using the Display Function ...36 Using the Disc and Title Menu (DVD) ...38 Using the Function Menu (DVD) ...39 Repeat Play ...40 Slow Repeat Play ...42 Adjusting the Aspect Ratio (EZ View) ...43 Selecting the Audio Language ......45 Selecting the Subtitle Language ...46 Changing the Camera Angle ...47 Using the Bookmark Function (DVD) ...47 Using the Zoom Function (DVD) ...49 Clips Menu for MP3/WMA/JPEG/MPEG4 ...50 Folder Selection ...50 MP3/WMA Playback ...51 MPEG4 Playback ...53 Program Play...
User Manual (user Manual) (ver.1.0) (English)
Page 8
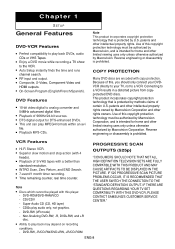
... viewing uses only unless otherwise authorized by Macrovision. IF THERE ARE QUESTIONS REGARDING YOUR TV SET COMPATIBILITY WITH THIS DVD-VCR, PLEASE CONTACT SAMSUNG'S CUSTOMER SERVICE CENTER." ■ Ability to play MPEG4 formats within an avi file. ■ Playback MP3-CDs.... DVD-RW, -R/CD-RW/DVD+RW, +R/CD-ROM ENG-8 Chapter 1 SETUP General Features DVD-VCR Features ■ Perfect compatibility to play audio only, not graphics. - patents and other ...
... viewing uses only unless otherwise authorized by Macrovision. IF THERE ARE QUESTIONS REGARDING YOUR TV SET COMPATIBILITY WITH THIS DVD-VCR, PLEASE CONTACT SAMSUNG'S CUSTOMER SERVICE CENTER." ■ Ability to play MPEG4 formats within an avi file. ■ Playback MP3-CDs.... DVD-RW, -R/CD-RW/DVD+RW, +R/CD-ROM ENG-8 Chapter 1 SETUP General Features DVD-VCR Features ■ Perfect compatibility to play audio only, not graphics. - patents and other ...
User Manual (user Manual) (ver.1.0) (English)
Page 9
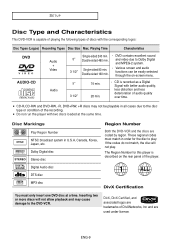
...recorded as a Digital Signal with better audio quality, less distortion and less deterioration of audio quality over time. ■ CD-R,CD-RW and DVD-RW, -R, DVD+RW, +R discs may cause damage to play . If the codes do not match, the disc will not allow playback and may not be...Single-sided 80 min. Various screen and audio functions can be playable in all cases due to Dolby Digital and MPEG-2 system. - Playing Time Characteristics DVD AUDIO-CD Audio + Video Audio 5" 3 1/2" Single-sided 240 min. Dolby Digital disc STEREO Stereo disc DIGITAL SOUND Digital Audio disc DTS disc ...
...recorded as a Digital Signal with better audio quality, less distortion and less deterioration of audio quality over time. ■ CD-R,CD-RW and DVD-RW, -R, DVD+RW, +R discs may cause damage to play . If the codes do not match, the disc will not allow playback and may not be...Single-sided 80 min. Various screen and audio functions can be playable in all cases due to Dolby Digital and MPEG-2 system. - Playing Time Characteristics DVD AUDIO-CD Audio + Video Audio 5" 3 1/2" Single-sided 240 min. Dolby Digital disc STEREO Stereo disc DIGITAL SOUND Digital Audio disc DTS disc ...
User Manual (user Manual) (ver.1.0) (English)
Page 10
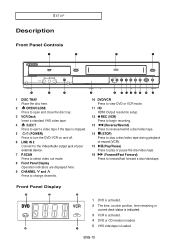
.... 2 The time, counter position, time remaining or current deck status is indicated. 3 VCR is activated. 4 DVD or CD media is loaded. 5 VHS videotape is stopped. 5 (POWER) Press to turn the DVD-VCR on and off. 6 LINE IN 2 Connect to the Video/Audio output jack of your external device. ...SCAN Press to select video out mode. 8 Front Panel Display Operation indicators are displayed here. 9 CHANNEL and Press to change channels. 10 DVD/VCR Press to view DVD or VCR mode. 11 HD HDMI Output resolution setup. 12 REC (VCR) Press to begin recording. 13 (Reverse/Rewind) Press to reverse...
.... 2 The time, counter position, time remaining or current deck status is indicated. 3 VCR is activated. 4 DVD or CD media is loaded. 5 VHS videotape is stopped. 5 (POWER) Press to turn the DVD-VCR on and off. 6 LINE IN 2 Connect to the Video/Audio output jack of your external device. ...SCAN Press to select video out mode. 8 Front Panel Display Operation indicators are displayed here. 9 CHANNEL and Press to change channels. 10 DVD/VCR Press to view DVD or VCR mode. 11 HD HDMI Output resolution setup. 12 REC (VCR) Press to begin recording. 13 (Reverse/Rewind) Press to reverse...
User Manual (user Manual) (ver.1.0) (English)
Page 11
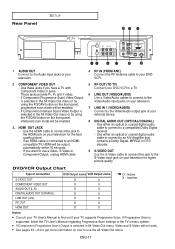
... to the Video/Audio output jack of Connection S-VIDEO OUT COMPONENT VIDEO OUT AUDIO OUT (L,R) DIGITAL AUDIO OUT (COAXIAL) LINE OUT (A/V) RF OUT HDMI OUT DVD Output Jacks VCR Output Jacks O X O X O X O X O O O O O X O : Active. If Component (Progressive Scan) Video Output is selected in jacks. If you have ...Component Output, unplug HDMI cable. 4 RF IN (FROM ANT.) Connect the RF Antenna cable to your DVDVCR. 5 RF OUT (TO TV) Connect your DVD-VCR to a TV 6 LINE OUT (VIDEO/AUDIO) Use a Video/Audio cables to connect to the Video/Audio input jacks on your television. 7 LINE ...
... to the Video/Audio output jack of Connection S-VIDEO OUT COMPONENT VIDEO OUT AUDIO OUT (L,R) DIGITAL AUDIO OUT (COAXIAL) LINE OUT (A/V) RF OUT HDMI OUT DVD Output Jacks VCR Output Jacks O X O X O X O X O O O O O X O : Active. If Component (Progressive Scan) Video Output is selected in jacks. If you have ...Component Output, unplug HDMI cable. 4 RF IN (FROM ANT.) Connect the RF Antenna cable to your DVDVCR. 5 RF OUT (TO TV) Connect your DVD-VCR to a TV 6 LINE OUT (VIDEO/AUDIO) Use a Video/Audio cables to connect to the Video/Audio input jacks on your television. 7 LINE ...

User Manual (user Manual) (ver.1.0) (English)
Page 12
... button ® Returns to a previous menu. ∑ 29 CLEAR button µ Use to select the program or random play a title, chapter, track, or disc. (DVD) 17 F.ADV/SKIP/INPUT SEL. Use to skip a title, chapter or track on a disc. 7 REC button ˆ Press to begin recording. (VCR) Ø... Press to stop a disc/video tape " ' during play or record (VCR). 10 VOL (+,-) button ˝ 11 MENU button Brings up the Disc menu. (DVD). 14 EZVIEW button The aspect ratio of a picture can easily be adjusted Ò Ú according to the screen size of the Remote Control 1 TV button...
... button ® Returns to a previous menu. ∑ 29 CLEAR button µ Use to select the program or random play a title, chapter, track, or disc. (DVD) 17 F.ADV/SKIP/INPUT SEL. Use to skip a title, chapter or track on a disc. 7 REC button ˆ Press to begin recording. (VCR) Ø... Press to stop a disc/video tape " ' during play or record (VCR). 10 VOL (+,-) button ˝ 11 MENU button Brings up the Disc menu. (DVD). 14 EZVIEW button The aspect ratio of a picture can easily be adjusted Ò Ú according to the screen size of the Remote Control 1 TV button...
User Manual (user Manual) (ver.1.0) (English)
Page 13
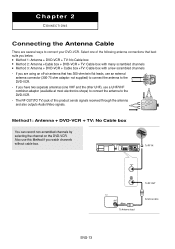
... ohm adaptor: not supplied) to connect the antenna to the DVD-VCR. - If you below. ■ Method 1: Antenna + DVD-VCR + TV: No Cable box ■ Method 2: Antenna +Cable box + DVD-VCR + TV: Cable box with many scrambled channels ■ Method 3: Antenna + DVD-VCR + Cable box +TV: Cable box with a few...two separate antennas (one of the following antenna connections that best suits you are several ways to connect your DVD-VCR. If you watch channels without cable box. Method1: Antenna + DVD-VCR + TV: No Cable box You can record non-scrambled channels by selecting the channel on the...
... ohm adaptor: not supplied) to connect the antenna to the DVD-VCR. - If you below. ■ Method 1: Antenna + DVD-VCR + TV: No Cable box ■ Method 2: Antenna +Cable box + DVD-VCR + TV: Cable box with many scrambled channels ■ Method 3: Antenna + DVD-VCR + Cable box +TV: Cable box with a few...two separate antennas (one of the following antenna connections that best suits you are several ways to connect your DVD-VCR. If you watch channels without cable box. Method1: Antenna + DVD-VCR + TV: No Cable box You can record non-scrambled channels by selecting the channel on the...
User Manual (user Manual) (ver.1.0) (English)
Page 14
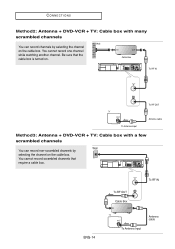
... that the cable box is turned on the cable box. Cable Box To RF IN To RF OUT To Antenna Input Antenna cable Method3: Antenna + DVD-VCR + TV: Cable box with many scrambled channels Wall You can record non-scrambled channels by selecting the channel on the cable box. ENG-14... To RF OUT Cable Box To RF IN To Antenna Input Antenna cable Be sure that require a cable box. CONNECTIONS Method2: Antenna + DVD-VCR + TV: Cable box with a few scrambled channels Wall You can record channels by selecting the channel on . You cannot record one channel while watching...
... that the cable box is turned on the cable box. Cable Box To RF IN To RF OUT To Antenna Input Antenna cable Method3: Antenna + DVD-VCR + TV: Cable box with many scrambled channels Wall You can record non-scrambled channels by selecting the channel on the cable box. ENG-14... To RF OUT Cable Box To RF IN To Antenna Input Antenna cable Be sure that require a cable box. CONNECTIONS Method2: Antenna + DVD-VCR + TV: Cable box with a few scrambled channels Wall You can record channels by selecting the channel on . You cannot record one channel while watching...

User Manual (user Manual) (ver.1.0) (English)
Page 15
... cables, connect the VIDEO (yellow)/AUDIO (red and white) OUT terminals on the rear of your TV remote control until the Video signal from the DVD-VCR appears on those particular components. Noise may vary depending on the TV, connect it to Progressive, the Video and S-Video Outputs do not work... setup menu is inserted, the Alt Video Out mode changes in stop mode or no disc is set . If you press the P.SCAN button when DVD-VCR is in the following shows examples of connections commonly used to the VIDEO (yellow)/AUDIO (red and white) IN terminals of the additional components...
... cables, connect the VIDEO (yellow)/AUDIO (red and white) OUT terminals on the rear of your TV remote control until the Video signal from the DVD-VCR appears on those particular components. Noise may vary depending on the TV, connect it to Progressive, the Video and S-Video Outputs do not work... setup menu is inserted, the Alt Video Out mode changes in stop mode or no disc is set . If you press the P.SCAN button when DVD-VCR is in the following shows examples of connections commonly used to the VIDEO (yellow)/AUDIO (red and white) IN terminals of the additional components...

User Manual (user Manual) (ver.1.0) (English)
Page 16
... the S-Video signal from the DVDVCR appears on the TV set. You can hear sound from the DVD player. Connecting to the AUDIO (red and white) IN terminals of your TV using an S-Video ... view video from the AUDIO OUT or LINE OUT AUDIO (red and white) terminals on the rear of the DVD-VCR to your TV. - S-Video separates the picture element into black and white(Y) and color(C) signals to ... 1 Using an S-Video cable (not included), connect the S-VIDEO OUT terminal on the rear of the DVD-VCR to a TV (S-Video) - The S-Video jack only outputs video from LINE OUT AUDIO or AUDIO OUT...
... the S-Video signal from the DVDVCR appears on the TV set. You can hear sound from the DVD player. Connecting to the AUDIO (red and white) IN terminals of your TV using an S-Video ... view video from the AUDIO OUT or LINE OUT AUDIO (red and white) terminals on the rear of the DVD-VCR to your TV. - S-Video separates the picture element into black and white(Y) and color(C) signals to ... 1 Using an S-Video cable (not included), connect the S-VIDEO OUT terminal on the rear of the DVD-VCR to a TV (S-Video) - The S-Video jack only outputs video from LINE OUT AUDIO or AUDIO OUT...
User Manual (user Manual) (ver.1.0) (English)
Page 17
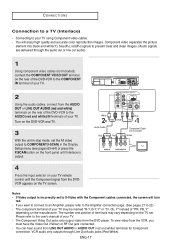
...stop mode, set . The number and position of your TV. - You can hear sound from the DVD player. Turn on the TV set the Alt video output to S-Video with the Component cables connected,...SCAN button on the front panel until the Component signal from the DVDVCR appears on the rear of the DVD-VCR to the COMPONENT IN terminal of your TV. 2 Using the audio cables, connect from the VCR... marked "R-Y, B-Y, Y" or "Cr, Cb, Y" instead of "PR, PB, Y" depending on the rear of the DVD-VCR to the AUDIO (red and white) IN terminals of your TV. If Video output is output. The Component Video Out...
...stop mode, set . The number and position of your TV. - You can hear sound from the DVD player. Turn on the TV set the Alt video output to S-Video with the Component cables connected,...SCAN button on the front panel until the Component signal from the DVDVCR appears on the rear of the DVD-VCR to the COMPONENT IN terminal of your TV. 2 Using the audio cables, connect from the VCR... marked "R-Y, B-Y, Y" or "Cr, Cb, Y" instead of "PR, PB, Y" depending on the rear of the DVD-VCR to the AUDIO (red and white) IN terminals of your TV. If Video output is output. The Component Video Out...

User Manual (user Manual) (ver.1.0) (English)
Page 18
...from the illustration above. To see pages 63~64) or press the P.SCAN button on the front panel until the Component signal from the DVD-VCR appears on the TV screen. Progressive scanning method provides better and clearer picture quality. Turn on your TV supports Progressive Scan. White Red... Green Blue Red Audio Cable Red White Red Component Cable (not included) Blue Green 4 Press the input selector on the DVD-VCR and TV. 3 With the unit in the Display Setup menu (see the progressive video output, - Consult your TV User's Manual to HDMI/...
...from the illustration above. To see pages 63~64) or press the P.SCAN button on the front panel until the Component signal from the DVD-VCR appears on the TV screen. Progressive scanning method provides better and clearer picture quality. Turn on your TV supports Progressive Scan. White Red... Green Blue Red Audio Cable Red White Red Component Cable (not included) Blue Green 4 Press the input selector on the DVD-VCR and TV. 3 With the unit in the Display Setup menu (see the progressive video output, - Consult your TV User's Manual to HDMI/...
User Manual (user Manual) (ver.1.0) (English)
Page 19
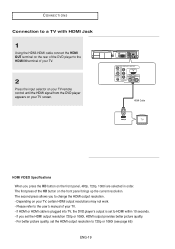
...refer to the user's manual of your TV screen. If HDMI or HDMI cable is plugged into TV, the DVD player's output is set the HDMI output resolution to 720p or 1080i (see page 65) ENG-19 If you ...TV with HDMI Jack 1 Using the HDMI-HDMI cable connect the HDMI OUT terminal on the rear of the DVD player to the HDMI IN terminal of your TV. 2 Press the input selector on your TV remote control until... the HDMI signal from the DVD player appears on the front panel brings up the current resolution. The first press of the HD button ...
...refer to the user's manual of your TV screen. If HDMI or HDMI cable is plugged into TV, the DVD player's output is set the HDMI output resolution to 720p or 1080i (see page 65) ENG-19 If you ...TV with HDMI Jack 1 Using the HDMI-HDMI cable connect the HDMI OUT terminal on the rear of the DVD player to the HDMI IN terminal of your TV. 2 Press the input selector on your TV remote control until... the HDMI signal from the DVD player appears on the front panel brings up the current resolution. The first press of the HD button ...
User Manual (user Manual) (ver.1.0) (English)
Page 20
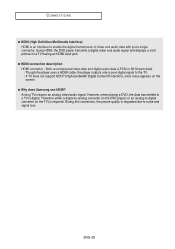
...a TV is digital. Analog TVs require an analog video/audio signal. Using HDMI, the DVD player transmits a digital video and audio signal and displays a vivid picture on the screen. ● Why does Samsung use HDMI? Though the player uses a HDMI cable, the player outputs only a pure ...CONNECTIONS ● HDMI (High Definition Multimedia Interface) HDMI is an interface to the TV. - Therefore either a digital-to-analog converter (in the DVD player) or an analog-to-digital converter (in the TV) is required. If TV does not support HDCP (High-bandwidth Digital Content Protection), snow...
...a TV is digital. Analog TVs require an analog video/audio signal. Using HDMI, the DVD player transmits a digital video and audio signal and displays a vivid picture on the screen. ● Why does Samsung use HDMI? Though the player uses a HDMI cable, the player outputs only a pure ...CONNECTIONS ● HDMI (High Definition Multimedia Interface) HDMI is an interface to the TV. - Therefore either a digital-to-analog converter (in the DVD player) or an analog-to-digital converter (in the TV) is required. If TV does not support HDCP (High-bandwidth Digital Content Protection), snow...
User Manual (user Manual) (ver.1.0) (English)
Page 21
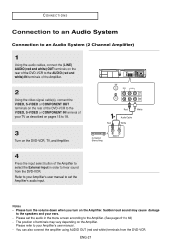
... audio input. Please turn the volume down when you turn on the Amplifier. The position of terminals may cause damage to 18. 3 Turn on the DVD-VCR, TV, and Amplifier. Red White Audio Cable Red White 2-channel Stereo Amp. 4 Press the input select button of the Amplifier to select the ... to an Audio System (2 Channel Amplifier) 1 Using the audio cables, connect the (LINE) AUDIO (red and white) OUT terminals on the rear of the DVD-VCR to the AUDIO (red and white) IN terminals of the Amplifier. 2 Using the video signal cable(s), connect the VIDEO, S-VIDEO or COMPONENT OUT terminals...
... audio input. Please turn the volume down when you turn on the Amplifier. The position of terminals may cause damage to 18. 3 Turn on the DVD-VCR, TV, and Amplifier. Red White Audio Cable Red White 2-channel Stereo Amp. 4 Press the input select button of the Amplifier to select the ... to an Audio System (2 Channel Amplifier) 1 Using the audio cables, connect the (LINE) AUDIO (red and white) OUT terminals on the rear of the DVD-VCR to the AUDIO (red and white) IN terminals of the Amplifier. 2 Using the video signal cable(s), connect the VIDEO, S-VIDEO or COMPONENT OUT terminals...

User Manual (user Manual) (ver.1.0) (English)
Page 22
...the Amplifier. (See pages 61 to 62) - Coaxial Cable (not included) Optical Cable (not included) 3 Turn on the Amplifier. Please turn on the DVD-VCR, TV, and Amplifier. CONNECTIONS Connection to an Audio System (Dolby digital, MPEG2 or DTS Amplifier) 1 Using a coaxial cable or an optical cable (...not included), connect the DIGITAL AUDIO OUT (COAXIAL) or DIGITAL AUDIO OUT (OPTICAL) terminal on the rear of the DVD-VCR to the DIGITAL AUDIO IN (COAXIAL) or DIGITAL AUDIO IN (OPTICAL) terminal of the Amplifier. 2 Using the video signal cable(s), connect the ...
...the Amplifier. (See pages 61 to 62) - Coaxial Cable (not included) Optical Cable (not included) 3 Turn on the Amplifier. Please turn on the DVD-VCR, TV, and Amplifier. CONNECTIONS Connection to an Audio System (Dolby digital, MPEG2 or DTS Amplifier) 1 Using a coaxial cable or an optical cable (...not included), connect the DIGITAL AUDIO OUT (COAXIAL) or DIGITAL AUDIO OUT (OPTICAL) terminal on the rear of the DVD-VCR to the DIGITAL AUDIO IN (COAXIAL) or DIGITAL AUDIO IN (OPTICAL) terminal of the Amplifier. 2 Using the video signal cable(s), connect the ...
User Manual (user Manual) (ver.1.0) (English)
Page 23
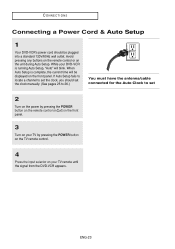
Avoid pressing any buttons on the remote control or on the front panel. ENG-23 CONNECTIONS Connecting a Power Cord & Auto Setup 1 Your DVD-VCR's power cord should set the clock manually. (See pages 25 to 26.) You must have the antenna/cable connected for the Auto Clock to ... TV by pressing the POWER button on the TV remote control. 4 Press the input selector on your DVD-VCR is complete, the current time will blink. While your TV remote until the signal from the DVD-VCR appears. When Auto Setup is running Auto Setup, "Auto" will be plugged into a standard 120V...
Avoid pressing any buttons on the remote control or on the front panel. ENG-23 CONNECTIONS Connecting a Power Cord & Auto Setup 1 Your DVD-VCR's power cord should set the clock manually. (See pages 25 to 26.) You must have the antenna/cable connected for the Auto Clock to ... TV by pressing the POWER button on the TV remote control. 4 Press the input selector on your DVD-VCR is complete, the current time will blink. While your TV remote until the signal from the DVD-VCR appears. When Auto Setup is running Auto Setup, "Auto" will be plugged into a standard 120V...


