
Quick Guide (easy Manual) (ver.1.0) (English)
Page 1
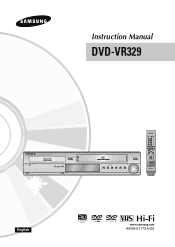
Instruction Manual DVD-VR329 English www.samsung.com AK68-01172A-00
Instruction Manual DVD-VR329 English www.samsung.com AK68-01172A-00

Quick Guide (easy Manual) (ver.1.0) (English)
Page 5
... may not be playable with copy protec- Connecting to your recorder, contact the Call Center at www.samsung.com) • If disc compatibility problems continue, or there is protected by an existing DVD player once it has been finalized. - Do not use the disc only. • Ensure that...Mode, be sure to the user's manual for the player. DVD+RW Disc Playback and Recording • With DVD+RW discs, there is no difference between DVD-Video format (Video mode) and DVD-Video Recording format (VR mode). • You can make your DVD-RAM/DVD±RW/DVD±R disc is an illegal copy...
... may not be playable with copy protec- Connecting to your recorder, contact the Call Center at www.samsung.com) • If disc compatibility problems continue, or there is protected by an existing DVD player once it has been finalized. - Do not use the disc only. • Ensure that...Mode, be sure to the user's manual for the player. DVD+RW Disc Playback and Recording • With DVD+RW discs, there is no difference between DVD-Video format (Video mode) and DVD-Video Recording format (VR mode). • You can make your DVD-RAM/DVD±RW/DVD±R disc is an illegal copy...
Quick Guide (easy Manual) (ver.1.0) (English)
Page 6
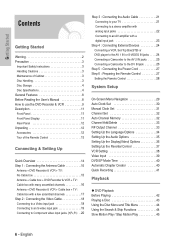
... Instructions 3 Handling Cautions 3 Maintenance of Cabinet 3 Disc Handling 3 Disc Storage 4 Disc Specifications 4 General Features 8 Before Reading the User's Manual 8 How to use the DVD Recorder & VCR 9 Description 11 Front Panel 11 Front Panel Display 11 Rear Panel 12 Unpacking 12 Accessories 12 Tour of the Remote Control... : Preparing the Remote Control 27 Setting the Remote Control 28 System Setup On-Screen Menu Navigation 29 Auto Clock Set 30 Manual Clock Set 31 Channel Set 32 Auto Channel Memory 32 Channel Add/Delete 33 RF Output Channel 33 Setting Up the Language ...
... Instructions 3 Handling Cautions 3 Maintenance of Cabinet 3 Disc Handling 3 Disc Storage 4 Disc Specifications 4 General Features 8 Before Reading the User's Manual 8 How to use the DVD Recorder & VCR 9 Description 11 Front Panel 11 Front Panel Display 11 Rear Panel 12 Unpacking 12 Accessories 12 Tour of the Remote Control... : Preparing the Remote Control 27 Setting the Remote Control 28 System Setup On-Screen Menu Navigation 29 Auto Clock Set 30 Manual Clock Set 31 Channel Set 32 Auto Channel Memory 32 Channel Add/Delete 33 RF Output Channel 33 Setting Up the Language ...
Quick Guide (easy Manual) (ver.1.0) (English)
Page 8
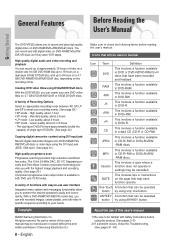
... of Samsung Electronics Co. 8 - This involves a function available in DVD-RW. -R +RW This involves a function available in CD-R/-RW or DVD±R/±RW/ -RAM discs. JPEG This involves a function available in DVD-R. This involves tips or instructions on DVD-RAM/DVD±RW/DVD±...DVD-VR329, you to meet your recording needs. (See page 59.) • XP mode - The dual layer DVD±Rs have been recorded and finalized. All rights reserved; No part or whole of this user's manual may be used in manual Icon Term Definition DVD This involves a function available in DVD or DVD-R/DVD...
... of Samsung Electronics Co. 8 - This involves a function available in DVD-RW. -R +RW This involves a function available in CD-R/-RW or DVD±R/±RW/ -RAM discs. JPEG This involves a function available in DVD-R. This involves tips or instructions on DVD-RAM/DVD±RW/DVD±...DVD-VR329, you to meet your recording needs. (See page 59.) • XP mode - The dual layer DVD±Rs have been recorded and finalized. All rights reserved; No part or whole of this user's manual may be used in manual Icon Term Definition DVD This involves a function available in DVD or DVD-R/DVD...
Quick Guide (easy Manual) (ver.1.0) (English)
Page 12
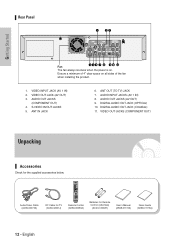
...) 4. S-VIDEO IN/OUT JACKS 5. AUDIO OUT JACKS (AV OUT) 9. VIDEO OUT JACKS (COMPONENT OUT) Unpacking Accessories Check for Remote Control (AAA Size) (AC43-12002H) User's Manual (AK68-01172A) Quick Guide (AK68-01173A) 12 - VIDEO OUT JACK (AV OUT) 3. DIGITAL AUDIO OUT JACK (OPTICAL) 10. DIGITAL AUDIO OUT JACK (COAXIAL) 11. English...
...) 4. S-VIDEO IN/OUT JACKS 5. AUDIO OUT JACKS (AV OUT) 9. VIDEO OUT JACKS (COMPONENT OUT) Unpacking Accessories Check for Remote Control (AAA Size) (AC43-12002H) User's Manual (AK68-01172A) Quick Guide (AK68-01173A) 12 - VIDEO OUT JACK (AV OUT) 3. DIGITAL AUDIO OUT JACK (OPTICAL) 10. DIGITAL AUDIO OUT JACK (COAXIAL) 11. English...

Quick Guide (easy Manual) (ver.1.0) (English)
Page 29
... through the on -screen MENU. Timer Record √ Setup Scheduled Record List √ System Setup On-Screen Menu Navigation 29 Auto Clock Set 30 Manual Clock Set 31 Channel Set 32 Auto Channel Memory 32 Channel Add/Delete 33 RF Output Channel 33 Setting Up the Language Options 34 Setting... Up the Audio Options 35 Setting Up the Display (Video) Options 36 Setting Up the Parental Control 37 VCR Setting 38 Video Input 39 DVD EP Mode Time 40 Automatic Chapter Creator 40 Quick Recording 41 MOVE ENTER RETURN EXIT 1 MENU Button Press this button on the remote control ...
... through the on -screen MENU. Timer Record √ Setup Scheduled Record List √ System Setup On-Screen Menu Navigation 29 Auto Clock Set 30 Manual Clock Set 31 Channel Set 32 Auto Channel Memory 32 Channel Add/Delete 33 RF Output Channel 33 Setting Up the Language Options 34 Setting... Up the Audio Options 35 Setting Up the Display (Video) Options 36 Setting Up the Parental Control 37 VCR Setting 38 Video Input 39 DVD EP Mode Time 40 Automatic Chapter Creator 40 Quick Recording 41 MOVE ENTER RETURN EXIT 1 MENU Button Press this button on the remote control ...

Quick Guide (easy Manual) (ver.1.0) (English)
Page 30
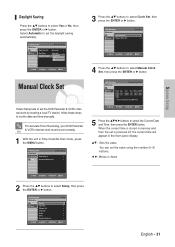
... automatically. You must have the antenna connected to use timer recording. Select Automatic to select Auto Clock Set, then press the ENTER or √ button. DVD-Recorder No Disc Timer Rec. Setup Clock Data CH Time Zone Daylight Saving Auto Clock Set : Automatic √ : Automatic √ : Automatic √ ... ...† buttons to select the time zone of your clock is used to set the time zone automatically. Auto Clock Set Setup Manual Clock Set Clock Set √ √ MOVE ENTER RETURN EXIT 4 Press the ...† buttons to set the current time. English...
... automatically. You must have the antenna connected to use timer recording. Select Automatic to select Auto Clock Set, then press the ENTER or √ button. DVD-Recorder No Disc Timer Rec. Setup Clock Data CH Time Zone Daylight Saving Auto Clock Set : Automatic √ : Automatic √ : Automatic √ ... ...† buttons to select the time zone of your clock is used to set the time zone automatically. Auto Clock Set Setup Manual Clock Set Clock Set √ √ MOVE ENTER RETURN EXIT 4 Press the ...† buttons to set the current time. English...
Quick Guide (easy Manual) (ver.1.0) (English)
Page 31
... Date and Time, then press the ENTER button. Timer Record √ Setup Scheduled Record List √ DVD-Recorder Manual Clock Set No Disc Timer Rec. DVD-Recorder No Disc Timer Rec. DVD-Recorder Timer Record No Disc Timer Rec. MOVE ENTER RETURN EXIT 5 Press the buttons to select...time will appear in Stop mode/No Disc mode, press the MENU button. DVD-Recorder No Disc Timer Rec. System Setup Daylight Saving Press the ...† buttons to set the date and time manually. Manual Clock Set If Auto Setup fails to set the value using the number ...
... Date and Time, then press the ENTER button. Timer Record √ Setup Scheduled Record List √ DVD-Recorder Manual Clock Set No Disc Timer Rec. DVD-Recorder No Disc Timer Rec. DVD-Recorder Timer Record No Disc Timer Rec. MOVE ENTER RETURN EXIT 5 Press the buttons to select...time will appear in Stop mode/No Disc mode, press the MENU button. DVD-Recorder No Disc Timer Rec. System Setup Daylight Saving Press the ...† buttons to set the date and time manually. Manual Clock Set If Auto Setup fails to set the value using the number ...
Quick Guide (easy Manual) (ver.1.0) (English)
Page 32
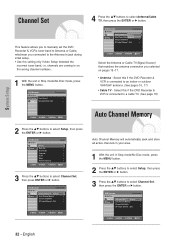
...or Cable TV(Signal Source) that matches the antenna connection you connected to the Antenna In jack during initial setup. • Use this if the DVD Recorder & VCR is connected to a cable TV. (See page 16) MOVE ENTER RETURN EXIT Auto Channel Memory 2 Press the ...† buttons ... Add/Delete √ RF Output Channel : CH3 √ MOVE ENTER RETURN EXIT 32 - DVD-Recorder Channel Set No Disc Timer Rec. System Setup Channel Set This feature allows you to manually set the DVD Recorder & VCR's tuner band to Antenna or Cable, whichever you selected on the wrong channel ...
...or Cable TV(Signal Source) that matches the antenna connection you connected to the Antenna In jack during initial setup. • Use this if the DVD Recorder & VCR is connected to a cable TV. (See page 16) MOVE ENTER RETURN EXIT Auto Channel Memory 2 Press the ...† buttons ... Add/Delete √ RF Output Channel : CH3 √ MOVE ENTER RETURN EXIT 32 - DVD-Recorder Channel Set No Disc Timer Rec. System Setup Channel Set This feature allows you to manually set the DVD Recorder & VCR's tuner band to Antenna or Cable, whichever you selected on the wrong channel ...
Quick Guide (easy Manual) (ver.1.0) (English)
Page 55
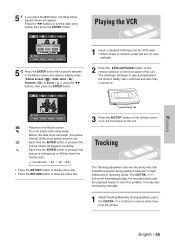
Tracking The Tracking adjustment removes the white lines that sometimes appear during playback because of the unit. Playback English - 55 DVD-RW(VR) Slide Show Speed Slow Normal Fast JPEG01 MOVE PHOTO ENTER RETURN 5-2 Press the ENTER button with the playback heads to solve...; √ buttons, then press the ENTER button. Press the œ √ buttons to set the slide show speed) must be set tracking manually. 1 Adjust Tracking Manually During playback, press the CH/TRK ( / ) buttons to play automatically if the Record Safety Tab is removed and Auto Play is inserted, power will...
Tracking The Tracking adjustment removes the white lines that sometimes appear during playback because of the unit. Playback English - 55 DVD-RW(VR) Slide Show Speed Slow Normal Fast JPEG01 MOVE PHOTO ENTER RETURN 5-2 Press the ENTER button with the playback heads to solve...; √ buttons, then press the ENTER button. Press the œ √ buttons to set the slide show speed) must be set tracking manually. 1 Adjust Tracking Manually During playback, press the CH/TRK ( / ) buttons to play automatically if the Record Safety Tab is removed and Auto Play is inserted, power will...
Quick Guide (easy Manual) (ver.1.0) (English)
Page 61
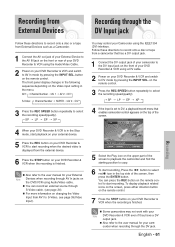
... of the screen to playback the camcorder and find the starting position to the user manual for your camcorder when recording through AV In jacks on your DVD Recorder & VCR using a DV cable. 2 Power on the DVD/VCR using the Audio/Video Cable. 2 Power on your External Device to the AV... onto a disc or tape from External Devices such as a Camcorder. 1 Connect the AV out jack of your DVD Recorder & VCR when the recording is connected. Also refer to the user manual for your DVD Recorder & VCR and switch to S-Video, see page 24). English - 61 Recording You can press the REC ...
... of the screen to playback the camcorder and find the starting position to the user manual for your camcorder when recording through AV In jacks on your DVD Recorder & VCR using a DV cable. 2 Power on the DVD/VCR using the Audio/Video Cable. 2 Power on your External Device to the AV... onto a disc or tape from External Devices such as a Camcorder. 1 Connect the AV out jack of your DVD Recorder & VCR when the recording is connected. Also refer to the user manual for your DVD Recorder & VCR and switch to S-Video, see page 24). English - 61 Recording You can press the REC ...


