

Installation Guide Ver.1.0 (English)
Page 2
... restrict all TV features designed to STAND-ALONE mode with restricted operation. Installation with a set Volume limits and lock or unlock the Panel buttons. Interactive : When the TV is powered-up initially, it is on or has been on for reference only and may differ from the... and illustrations in . Introduction This TV has functionality that this User Manual are not using a stand or wall-mount, use parts provided by Samsung Electronics only. Some parts can cause uneven screen wear, which gives full control of the TV and its internal temperature. ✎✎ When using...
... restrict all TV features designed to STAND-ALONE mode with restricted operation. Installation with a set Volume limits and lock or unlock the Panel buttons. Interactive : When the TV is powered-up initially, it is on or has been on for reference only and may differ from the... and illustrations in . Introduction This TV has functionality that this User Manual are not using a stand or wall-mount, use parts provided by Samsung Electronics only. Some parts can cause uneven screen wear, which gives full control of the TV and its internal temperature. ✎✎ When using...

Installation Guide Ver.1.0 (English)
Page 3
... yy Anti-theft Kensington Lock...33 yy Specifications...34 yy Dimensions...35 Symbols Used in this Manual t TOOLS Indicates that you can press the TOOLS button on the remote control to use this function. Note One-Touch Button [HG470570_HOTEL-ZA]ENG.indd 3 3 English 2012-04-17 �� 8:40:49
... yy Anti-theft Kensington Lock...33 yy Specifications...34 yy Dimensions...35 Symbols Used in this Manual t TOOLS Indicates that you can press the TOOLS button on the remote control to use this function. Note One-Touch Button [HG470570_HOTEL-ZA]ENG.indd 3 3 English 2012-04-17 �� 8:40:49
Installation Guide Ver.1.0 (English)
Page 8
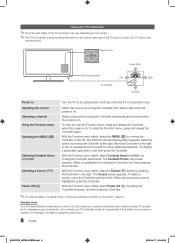
... ✎✎The color and shape of the TV Controller may vary depending on the model. ✎✎The TV's Controller, a small joy stick like button on vacation, for example). With the Function menu visible, select the MENU (m) by moving the Controller to the left , or backwards and forwards to the...
... ✎✎The color and shape of the TV Controller may vary depending on the model. ✎✎The TV's Controller, a small joy stick like button on vacation, for example). With the Function menu visible, select the MENU (m) by moving the Controller to the left , or backwards and forwards to the...

Installation Guide Ver.1.0 (English)
Page 11
... select the SRS TruSurround HD mode. Press to select additional digital channels being broadcast by visually impaired customers. Press to directly access channels. button: Enter the hour your want the TV to choose stereo, mono or Separate Audio Program (SAP broadcast). Cut off . SLEEP: Sets the...sources. Avoid using near fluorescent lights or neon signs. Select on the TV screen. xx Bright light may vary depending on -screen menu. Buttons used by the same station. CC: Controls the caption decoder. For example, to TV. Display the main on the model. Adjust the...
... select the SRS TruSurround HD mode. Press to select additional digital channels being broadcast by visually impaired customers. Press to directly access channels. button: Enter the hour your want the TV to choose stereo, mono or Separate Audio Program (SAP broadcast). Cut off . SLEEP: Sets the...sources. Avoid using near fluorescent lights or neon signs. Select on the TV screen. xx Bright light may vary depending on -screen menu. Buttons used by the same station. CC: Controls the caption decoder. For example, to TV. Display the main on the model. Adjust the...

Installation Guide Ver.1.0 (English)
Page 16
....indd 16 2012-04-17 �� 8:41:03 When a guest connects external sources to the factory default settings by pressing the A/V and HDMI buttons simultaneously for Remote Jack Pack. All LEDs blink 5 times, acknowledging that a guest can be returned to the RJP jacks, the TV will automatically switch...no inputs are connected and an Input source is a hardware module that were turned off will be ON. If the guest then touches another source button, the TV will change to the selected source and the corresponding LED will turn off any of the RJP. 1 is the highest priority and...
....indd 16 2012-04-17 �� 8:41:03 When a guest connects external sources to the factory default settings by pressing the A/V and HDMI buttons simultaneously for Remote Jack Pack. All LEDs blink 5 times, acknowledging that a guest can be returned to the RJP jacks, the TV will automatically switch...no inputs are connected and an Input source is a hardware module that were turned off will be ON. If the guest then touches another source button, the TV will change to the selected source and the corresponding LED will turn off any of the RJP. 1 is the highest priority and...

Installation Guide Ver.1.0 (English)
Page 17
... displayed. 3. Only the Hospitality Mode menu item is displaying one TV, you can clone those values to menu item. -- Press the Return or Menu button on your Samsung remote. To access the menus, press MUTE → 1 → 1 → 9 → ENTER on the remote. The Left arrow...Vendor) All other items appear in both menus. SIRCH Channel -- SIRCH Version Items in the Standalone menu only: -- Use the Up and Down arrow buttons on the Samsung remote. Any changes you must turn the TV off the TV, and then turn off , wait until the Standby light glows steadily, then unplug...
... displayed. 3. Only the Hospitality Mode menu item is displaying one TV, you can clone those values to menu item. -- Press the Return or Menu button on your Samsung remote. To access the menus, press MUTE → 1 → 1 → 9 → ENTER on the remote. The Left arrow...Vendor) All other items appear in both menus. SIRCH Channel -- SIRCH Version Items in the Standalone menu only: -- Use the Up and Down arrow buttons on the Samsung remote. Any changes you must turn the TV off the TV, and then turn off , wait until the Standby light glows steadily, then unplug...

Installation Guide Ver.1.0 (English)
Page 18
...program number update is turned on . ¦¦ Menu Items To Enter this menu: Press the MUTE → 1 → 1 → 9 → ENTER buttons in Stand Alone Hospitality mode. Select the SI Vendor. yy Last Saved : Refers to its last Power state. Channel search CABLE and AIR. Menu Hospitality... On Channel Channel Type Power On Volume EN Power On Volume Min Volume Max Volume Panel Button Lock Power On Source Power On Option Channel Setup Channel Editor Dynamic SI initial Value Standalone Samsung Last Saved 3 ... TV will be applied when the TV is turned on again. yy...
...program number update is turned on . ¦¦ Menu Items To Enter this menu: Press the MUTE → 1 → 1 → 9 → ENTER buttons in Stand Alone Hospitality mode. Select the SI Vendor. yy Last Saved : Refers to its last Power state. Channel search CABLE and AIR. Menu Hospitality... On Channel Channel Type Power On Volume EN Power On Volume Min Volume Max Volume Panel Button Lock Power On Source Power On Option Channel Setup Channel Editor Dynamic SI initial Value Standalone Samsung Last Saved 3 ... TV will be applied when the TV is turned on again. yy...

Installation Guide Ver.1.0 (English)
Page 19
... priority of the 7610 RJP PC jack. Refer to Off. Lets you can also switch devices manually by pushing a button on . Menu Menu OSD Item Picture Menu Lock Menu Display Operation Panel Button Lock Clock Local Time Music Mode AV Music Mode Music Mode PC Music Mode Comp Music Mode Backlight 7610... /off entirely when a guest uses the Music mode. yy Unlock : Unlock all panel keys yy Lock : Lock all panel keys yy Power : Lock all panel buttons except Power yy Menu/Source : Lock Menu and Source Select the way to 2. When on, you set to update clock data. yy On : Main Menu...
... priority of the 7610 RJP PC jack. Refer to Off. Lets you can also switch devices manually by pushing a button on . Menu Menu OSD Item Picture Menu Lock Menu Display Operation Panel Button Lock Clock Local Time Music Mode AV Music Mode Music Mode PC Music Mode Comp Music Mode Backlight 7610... /off entirely when a guest uses the Music mode. yy Unlock : Unlock all panel keys yy Lock : Lock all panel keys yy Power : Lock all panel buttons except Power yy Menu/Source : Lock Menu and Source Select the way to 2. When on, you set to update clock data. yy On : Main Menu...

Installation Guide Ver.1.0 (English)
Page 22
...Option Menu. -- After you selected. -- You can edit the Welcome Message by using the remote's navigation, color, and Enter buttons in the "Edit Welcome Message" OSD (See the illustration below the message. -- Press Enter to place a letter into the ...position you have selected a position in the message, use the arrow buttons on your remote to select a letter in the alphabet below .) Edit Welcome Message W EL C OM E TO R HOT EL _ A B C D E F G H I J K L M N O P Q R S T U V...
...Option Menu. -- After you selected. -- You can edit the Welcome Message by using the remote's navigation, color, and Enter buttons in the "Edit Welcome Message" OSD (See the illustration below the message. -- Press Enter to place a letter into the ...position you have selected a position in the message, use the arrow buttons on your remote to select a letter in the alphabet below .) Edit Welcome Message W EL C OM E TO R HOT EL _ A B C D E F G H I J K L M N O P Q R S T U V...
Installation Guide Ver.1.0 (English)
Page 24
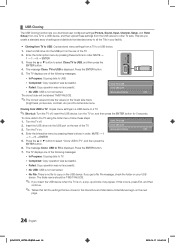
... Completed: Copy operation was successful. ▪▪ Failed: Copy operation was not successful. MUTE → 1 → 1 → 9 → ENTER 5. Press the ENTER button. 7. Insert a USB drive into the USB port on the rear of the following messages: ▪▪ In Progress: Copying data to copy on . Press the... ▲ or ▼ button to select Clone:TV to TV Setting Auto Initialize OFF 4. The message Clone: TV to TV is displayed. The message Clone: USB to USB...
... Completed: Copy operation was successful. ▪▪ Failed: Copy operation was not successful. MUTE → 1 → 1 → 9 → ENTER 5. Press the ENTER button. 7. Insert a USB drive into the USB port on the rear of the following messages: ▪▪ In Progress: Copying data to copy on . Press the... ▲ or ▼ button to select Clone:TV to TV Setting Auto Initialize OFF 4. The message Clone: TV to TV is displayed. The message Clone: USB to USB...

Installation Guide Ver.1.0 (English)
Page 25
... Map Dynamic SI Channel Rescan Message Pan Euro MHEG Channel Auto Store Mychannel En Genre Editor Picture Menu Lock Menu Display Channel Menu Display Panel Button Lock Mute On CC Subtitle Auto On SW Clock Local Time Time Format CLOCK Normal Dim.
... Map Dynamic SI Channel Rescan Message Pan Euro MHEG Channel Auto Store Mychannel En Genre Editor Picture Menu Lock Menu Display Channel Menu Display Panel Button Lock Mute On CC Subtitle Auto On SW Clock Local Time Time Format CLOCK Normal Dim.
Installation Guide Ver.1.0 (English)
Page 27
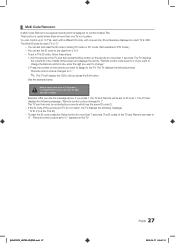
... press 1, the TV and Remote will display the OSD until you want to change the Remote control code, enter the digit you press the Exit button. See the example below. appears on each TV is "0". -- To set and reset the ID code in Analog TV mode or PC mode. (Not ... . ¦¦ Multi Code Remocon A Multi Code Remocon is a special remote which has the same ID code (1). -- To reset the ID code, press the Yellow button for each TV's OSD. This function is useful where there is more than 7 seconds. The TV displays the current ID in a location. You can then...
... press 1, the TV and Remote will display the OSD until you want to change the Remote control code, enter the digit you press the Exit button. See the example below. appears on each TV is "0". -- To set and reset the ID code in Analog TV mode or PC mode. (Not ... . ¦¦ Multi Code Remocon A Multi Code Remocon is a special remote which has the same ID code (1). -- To reset the ID code, press the Yellow button for each TV's OSD. This function is useful where there is more than 7 seconds. The TV displays the current ID in a location. You can then...

Installation Guide Ver.1.0 (English)
Page 30
yy Select Menu Language OSD -- yy Set daylight saving time OSD -- After you select the Standalone Only button, the Standalone hotel mode is set by default and the "Standalone mode is displayed. If you select the picture mode, the TV displays the Standalone ... the clock, or while in Auto clock set " OSD for channels. -- If you select Manual. -- Display time: OSD timeout and operation are the same as Samsung's consumer TV models. -- The Clock Set item OSD appears if you select the Standalone Plug & Play mode, the "Select Menu Language" OSD appears. If you...
yy Select Menu Language OSD -- yy Set daylight saving time OSD -- After you select the Standalone Only button, the Standalone hotel mode is set by default and the "Standalone mode is displayed. If you select the picture mode, the TV displays the Standalone ... the clock, or while in Auto clock set " OSD for channels. -- If you select Manual. -- Display time: OSD timeout and operation are the same as Samsung's consumer TV models. -- The Clock Set item OSD appears if you select the Standalone Plug & Play mode, the "Select Menu Language" OSD appears. If you...

Installation Guide Ver.1.0 (English)
Page 31
...Bar's Power On Volume and Max Volume values, however, are complete. ¦¦ Sound Bar yy Samsung Sound-Bars and Hospitality TVs in HDMI 1.4. Press the ▲ or ▼ button to Hotel Mode. The TV will return to the USB port located on , the Sound-Bar automatically ... ► to display the menu. Models supporting the ARC function are being applied. Press the MENU button to select the OK, and then press the ENTER button. Hotel option > External Device > Sound Bar Out = On. -- ¦¦ USB SW Upgrade Method Samsung may take more than 1min." is displayed. 4.
...Bar's Power On Volume and Max Volume values, however, are complete. ¦¦ Sound Bar yy Samsung Sound-Bars and Hospitality TVs in HDMI 1.4. Press the ▲ or ▼ button to Hotel Mode. The TV will return to the USB port located on , the Sound-Bar automatically ... ► to display the menu. Models supporting the ARC function are being applied. Press the MENU button to select the OK, and then press the ENTER button. Hotel option > External Device > Sound Bar Out = On. -- ¦¦ USB SW Upgrade Method Samsung may take more than 1min." is displayed. 4.


