
User Manual (user Manual) (ver.2.0) (English)
Page 5
...Theater 8 Icons that will be used in manual 9 Disc Types and Characteristics 13 Accessories 14 Description 14 Front Panel 15 Rear Panel 16 Remote control 18 Connecting the Speakers 23 Connecting External Devices/your TV via HDMI 25 Connecting the Video Out to your TV 26 Connecting Audio from External...Network 28 Connecting the FM Antenna 29 Before Starting (Initial settings) 30 Setting the Menu 31 Display 31 TV Aspect Ratio 31 BD Wise (Samsung Products only) 31 Resolution 33 HDMI Format 33 Movie Frame (24 Fs) 33 Progressive Mode 33 Still Mode 33 HDMI Deep Color 34 ...
...Theater 8 Icons that will be used in manual 9 Disc Types and Characteristics 13 Accessories 14 Description 14 Front Panel 15 Rear Panel 16 Remote control 18 Connecting the Speakers 23 Connecting External Devices/your TV via HDMI 25 Connecting the Video Out to your TV 26 Connecting Audio from External...Network 28 Connecting the FM Antenna 29 Before Starting (Initial settings) 30 Setting the Menu 31 Display 31 TV Aspect Ratio 31 BD Wise (Samsung Products only) 31 Resolution 33 HDMI Format 33 Movie Frame (24 Fs) 33 Progressive Mode 33 Still Mode 33 HDMI Deep Color 34 ...

User Manual (user Manual) (ver.2.0) (English)
Page 13
... FULL SCREEN 0 9 REPEAT MUTE VOL TUNING SFE MODE /CH DISC MENU TOOLS MENU TITLE MENU POPUP INFO RETURN A B INTERNET@ EXIT TUNER MEMORY C MO/ST D DSP Remote Control (AH59-02298A)/ Batteries (AAA size) (4301-000116) ASC Microphone (AH30-00099A) 13 English 01 Getting Started Notes on USB connection Supported devices: USB storage media...
... FULL SCREEN 0 9 REPEAT MUTE VOL TUNING SFE MODE /CH DISC MENU TOOLS MENU TITLE MENU POPUP INFO RETURN A B INTERNET@ EXIT TUNER MEMORY C MO/ST D DSP Remote Control (AH59-02298A)/ Batteries (AAA size) (4301-000116) ASC Microphone (AH30-00099A) 13 English 01 Getting Started Notes on USB connection Supported devices: USB storage media...
User Manual (user Manual) (ver.2.0) (English)
Page 14
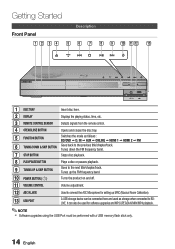
... next title/chapter/track. Tunes up the FM frequency band. 10 POWER BUTTON ( ) Turns the product on and off. 11 VOLUME CONTROL Volume adjustment. 12 ASC IN JACK Used to connect the ASC Microphone for setting up MRC (Musical Room Calibration). 13 USB PORT A... Panel Description 12 3 4 5 67 8 9 10 11 12 13 1 DISC TRAY Insert disc here. 2 DISPLAY Displays the playing status, time, etc. 3 REMOTE CONTROL SENSOR Detects signals from the remote control. 4 OPEN/CLOSE BUTTON Opens and closes the disc tray. 5 FUNCTION BUTTON Switches the mode as storage when connected to BDLIVE.
... next title/chapter/track. Tunes up the FM frequency band. 10 POWER BUTTON ( ) Turns the product on and off. 11 VOLUME CONTROL Volume adjustment. 12 ASC IN JACK Used to connect the ASC Microphone for setting up MRC (Musical Room Calibration). 13 USB PORT A... Panel Description 12 3 4 5 67 8 9 10 11 12 13 1 DISC TRAY Insert disc here. 2 DISPLAY Displays the playing status, time, etc. 3 REMOTE CONTROL SENSOR Detects signals from the remote control. 4 OPEN/CLOSE BUTTON Opens and closes the disc tray. 5 FUNCTION BUTTON Switches the mode as storage when connected to BDLIVE.

User Manual (user Manual) (ver.2.0) (English)
Page 16
... POPUP INFO RETURN A B INTERNET@ EXIT TUNER MEMORY C MO/ST D DSP Use to set the SFE (Sound Field Effect) mode best suited for menus on the remote control, check this to see the full screen on -screen menu items and change to the previous menu. Getting Started... Remote control Tour of music you are used both for the type of the Remote Control Turn the product on and off. Select the desired Dolby Pro Logic II audio mode. To open and close the...
... POPUP INFO RETURN A B INTERNET@ EXIT TUNER MEMORY C MO/ST D DSP Use to set the SFE (Sound Field Effect) mode best suited for menus on the remote control, check this to see the full screen on -screen menu items and change to the previous menu. Getting Started... Remote control Tour of music you are used both for the type of the Remote Control Turn the product on and off. Select the desired Dolby Pro Logic II audio mode. To open and close the...

User Manual (user Manual) (ver.2.0) (English)
Page 17
..., VOLUME, CHANNEL, and Numeric buttons (0~9). ✎ NOTE The remote control may not work with the remote control 1. Setting the Remote Control You can be possible, depending on your brand of TV's. When operating a TV with Samsung TVs by default. Turn on the TV. 3. Installing batteries in the Remote Control * Battery size: AAA ✎ NOTE Make sure to...
..., VOLUME, CHANNEL, and Numeric buttons (0~9). ✎ NOTE The remote control may not work with the remote control 1. Setting the Remote Control You can be possible, depending on your brand of TV's. When operating a TV with Samsung TVs by default. Turn on the TV. 3. Installing batteries in the Remote Control * Battery size: AAA ✎ NOTE Make sure to...

User Manual (user Manual) (ver.2.0) (English)
Page 22
.... For optimal listening performance, make sure that the area around the wireless receiver module location is turned off , press "0""1""3""5" on the remote control, and then turn on your TV set . Place the wireless receiver module at all, because the radio wave cannot penetrate metal. If the...
.... For optimal listening performance, make sure that the area around the wireless receiver module location is turned off , press "0""1""3""5" on the remote control, and then turn on your TV set . Place the wireless receiver module at all, because the radio wave cannot penetrate metal. If the...

User Manual (user Manual) (ver.2.0) (English)
Page 23
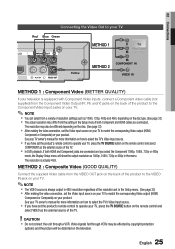
...After making the video connection, set the Video input source on your TV to match the corresponding Video output (HDMI, Component or Composite) on the remote control and select HDMI as the external source of the TV. 23 English See your TV owner's manual for connecting to devices such as a TV, projector..., DVD player, Blu-ray player, set the product's remote control to operate your TV, press the TV SOURCE button on your product. Becuase HDMI is all digital, you have set top box, and more. 02...
...After making the video connection, set the Video input source on your TV to match the corresponding Video output (HDMI, Component or Composite) on the remote control and select HDMI as the external source of the TV. 23 English See your TV owner's manual for connecting to devices such as a TV, projector..., DVD player, Blu-ray player, set the product's remote control to operate your TV, press the TV SOURCE button on your product. Becuase HDMI is all digital, you have set top box, and more. 02...
User Manual (user Manual) (ver.2.0) (English)
Page 25
... product. See your TV owner's manual for more information on how to select the TV's Video Input source. If you have set the product's remote control to operate your TV. ✎ NOTE You can select from a variety of resolution settings such as 1080i, 720p, 480p and 480i, depending on the..., Pb and Y) jacks on the back of the product to the Component Video Input Jacks on your TV, press the TV SOURCE button on the remote control and select COMPONENT as the external source of the TV. In DVD playback, if both Component and HDMI cables are connected and you have...
... product. See your TV owner's manual for more information on how to select the TV's Video Input source. If you have set the product's remote control to operate your TV. ✎ NOTE You can select from a variety of resolution settings such as 1080i, 720p, 480p and 480i, depending on the..., Pb and Y) jacks on the back of the product to the Component Video Input Jacks on your TV, press the TV SOURCE button on the remote control and select COMPONENT as the external source of the TV. In DVD playback, if both Component and HDMI cables are connected and you have...

User Manual (user Manual) (ver.2.0) (English)
Page 31
... appear distorted. If you select the 4:3 Pan-Scan or 4:3 Letter Box, you must set BD Wise to Off in 4:3 Pillarbox (black bars on the remote control. BD Wise is output to the TV. ✎ NOTE If you want to On. When you can configure various display options such... will be available. If you select an aspect ratio and option which is connected to a device that does not support BD Wise, you connect Samsung products with BD-Wise to each other via HDMI to a TV with a 4:3 ratio screen. TV Aspect Ratio Depending on the type of television you have...
... appear distorted. If you select the 4:3 Pan-Scan or 4:3 Letter Box, you must set BD Wise to Off in 4:3 Pillarbox (black bars on the remote control. BD Wise is output to the TV. ✎ NOTE If you want to On. When you can configure various display options such... will be available. If you select an aspect ratio and option which is connected to a device that does not support BD Wise, you connect Samsung products with BD-Wise to each other via HDMI to a TV with a 4:3 ratio screen. TV Aspect Ratio Depending on the type of television you have...
User Manual (user Manual) (ver.2.0) (English)
Page 37
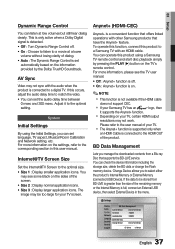
...Internal Memory is full, connect an External USB device, then select External Device in this user manual. System Initial Settings By using a Samsung TV remote control and start disc playback simply by the Dolby TrueHD Soundtrack. The image may not sync with the audio when the product is connected ...Video may be stored from a Blu-ray Disc that have the Anynet+ feature. For more information, please see some black on the TV's remote control. BD Data Management Lets you to match the video. • You can check the device information including the storage size, delete the BD ...
...Internal Memory is full, connect an External USB device, then select External Device in this user manual. System Initial Settings By using a Samsung TV remote control and start disc playback simply by the Dolby TrueHD Soundtrack. The image may not sync with the audio when the product is connected ...Video may be stored from a Blu-ray Disc that have the Anynet+ feature. For more information, please see some black on the TV's remote control. BD Data Management Lets you to match the video. • You can check the device information including the storage size, delete the BD ...

User Manual (user Manual) (ver.2.0) (English)
Page 40
...) The easiest way to select the Internet Protocol Setup, and then press the ENTER button. 3. Press the RED (A) button on your remote. 10. Press the ▼ button to go to your wireless router has a PBC (WPS) button, follow these steps: 1. Press... 0 DNS : Manual Security DNS Server :0 0 0 0 General Support > Move " Select ' Return 4. Press the RETURN button on your remote. 4. The Network function searches for your network. Use the number buttons on the remote control. 3. If you use the ► button to move up security for your wireless network.
...) The easiest way to select the Internet Protocol Setup, and then press the ENTER button. 3. Press the RED (A) button on your remote. 10. Press the ▼ button to go to your wireless router has a PBC (WPS) button, follow these steps: 1. Press... 0 DNS : Manual Security DNS Server :0 0 0 0 General Support > Move " Select ' Return 4. Press the RETURN button on your remote. 4. The Network function searches for your network. Use the number buttons on the remote control. 3. If you use the ► button to move up security for your wireless network.
User Manual (user Manual) (ver.2.0) (English)
Page 45
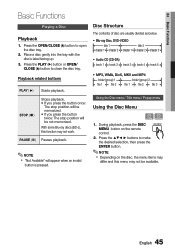
...; "Not Available" will be not memorized. Press the buttons to make the desired selection, then press the ENTER button. ✎ NOTE Depending on the remote control. 2. STOP ( ) Stops playback. • If you press the button once: The stop position will be available. 45 English During playback, press the DISC DISC...
...; "Not Available" will be not memorized. Press the buttons to make the desired selection, then press the ENTER button. ✎ NOTE Depending on the remote control. 2. STOP ( ) Stops playback. • If you press the button once: The stop position will be available. 45 English During playback, press the DISC DISC...
User Manual (user Manual) (ver.2.0) (English)
Page 46
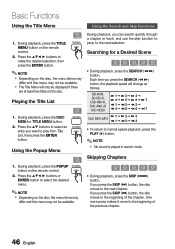
During playback, press the TITLE MENU button on the remote control. 2. During playback, press the DISC MENU or TITLE MENU button. 2. Press the buttons or ENTER button to the beginning of the chapter. Each time you ...press the SEARCH () button, the playback speed will only be available. During playback, press the POPUP button on the remote control. 2. TITLE MENU POPUP ✎ NOTE Depending on the disc. Playing the Title List 1. z DISC MENU TITLE MENU POPUP Using the Popup Menu h 1. During playback...
During playback, press the TITLE MENU button on the remote control. 2. During playback, press the DISC MENU or TITLE MENU button. 2. Press the buttons or ENTER button to the beginning of the chapter. Each time you ...press the SEARCH () button, the playback speed will only be available. During playback, press the POPUP button on the remote control. 2. TITLE MENU POPUP ✎ NOTE Depending on the disc. Playing the Title List 1. z DISC MENU TITLE MENU POPUP Using the Popup Menu h 1. During playback...
User Manual (user Manual) (ver.2.0) (English)
Page 47
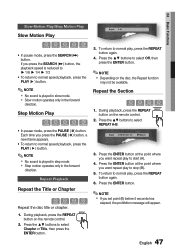
... direction. Press the ▲▼ buttons to select Off, then press the ENTER button. ✎ NOTE Depending on the remote control. 2. During playback, press the REPEAT REPEAT button on the disc, the Repeat function may not be available. Press the ENTER button at.... ✎ NOTE If you want repeat play , press the REPEAT button again. 4. During playback, press the REPEAT button on the remote control. 2. To return to select REPEAT A-B. Repeat the Section hzZy 1. Repeat Playback Repeat the Title or Chapter hzZy Repeat the disc title or chapter....
... direction. Press the ▲▼ buttons to select Off, then press the ENTER button. ✎ NOTE Depending on the remote control. 2. During playback, press the REPEAT REPEAT button on the disc, the Repeat function may not be available. Press the ENTER button at.... ✎ NOTE If you want repeat play , press the REPEAT button again. 4. During playback, press the REPEAT button on the remote control. 2. To return to select REPEAT A-B. Repeat the Section hzZy 1. Repeat Playback Repeat the Title or Chapter hzZy Repeat the disc title or chapter....
User Manual (user Manual) (ver.2.0) (English)
Page 50
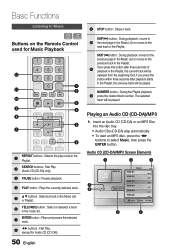
... a track in the Music List or Playlist. 6 YELLOW(C) button : Select or deselect a track in the Playlist. ! Basic Functions Listening to Music ow Buttons on the Remote Control used for Audio CD (CD-DA)) 50 English 9 STOP button : Stops a track. SKIP($) button : During playback, moves to 0 the next page in the Music List...
... a track in the Music List or Playlist. 6 YELLOW(C) button : Select or deselect a track in the Playlist. ! Basic Functions Listening to Music ow Buttons on the Remote Control used for Audio CD (CD-DA)) 50 English 9 STOP button : Stops a track. SKIP($) button : During playback, moves to 0 the next page in the Music List...
User Manual (user Manual) (ver.2.0) (English)
Page 52
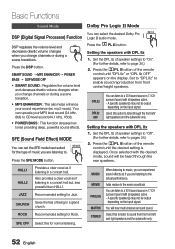
...SFE MODE for normal listening. Setting the speakers with the desired mode, sound will hear multi channel surround sound. Set the DPL IIz of the remote control until the desired setting is displayed. Press the PL II button of speaker settings to "On". (For further details, refer to enable sound ... output depending on the input signal. You will be output depending on the display. Press the PL II button. Set the DPL IIz of the remote control until "DPL IIz" or "DPL IIz OFF" appears on the input signal. JAZZ Recommended setting for Rock. Adds realism to pages 34.) 2. Select...
...SFE MODE for normal listening. Setting the speakers with the desired mode, sound will hear multi channel surround sound. Set the DPL IIz of the remote control until the desired setting is displayed. Press the PL II button of speaker settings to "On". (For further details, refer to enable sound ... output depending on the input signal. You will be output depending on the display. Press the PL II button. Set the DPL IIz of the remote control until "DPL IIz" or "DPL IIz OFF" appears on the input signal. JAZZ Recommended setting for Rock. Adds realism to pages 34.) 2. Select...

User Manual (user Manual) (ver.2.0) (English)
Page 54
... the front panel of Internet Services. ✎ NOTE You must remove the USB storage device safely by pressing the FULL SCREEN button on the remote control. If you insert a disc when playing a USB storage device, the device mode is selected. • Automatic Tuning 2 : Press and hold... to increase or decrease the frequency incrementally. If you pressed the BLUE (D) button, go to the USB memory. Using the buttons on the Remote Control 1. Press the ◄► buttons to select the desired Videos, Music or Photos, then press the ENTER button. 7. Press the ▲...
... the front panel of Internet Services. ✎ NOTE You must remove the USB storage device safely by pressing the FULL SCREEN button on the remote control. If you insert a disc when playing a USB storage device, the device mode is selected. • Automatic Tuning 2 : Press and hold... to increase or decrease the frequency incrementally. If you pressed the BLUE (D) button, go to the USB memory. Using the buttons on the Remote Control 1. Press the ◄► buttons to select the desired Videos, Music or Photos, then press the ENTER button. 7. Press the ▲...

User Manual (user Manual) (ver.2.0) (English)
Page 55
... such as the PLAY, PAUSE, STOP and REPEAT buttons. Press the ▲▼ buttons to select preset number. • You can use the remote control or the product to VFD display only. iPod iPod Example : Presetting FM 89.10 into memory 1. TUNER • NUMBER flashes on the product.... 2. You do not need to turn the TV on to enjoy this feature is automatically turned on. • "iPod" message appears on the remote control to the product. Select the music file to accessing. Turn on the display. No disc MEMU iPioPdod No Disc a Change Device d View ...
... such as the PLAY, PAUSE, STOP and REPEAT buttons. Press the ▲▼ buttons to select preset number. • You can use the remote control or the product to VFD display only. iPod iPod Example : Presetting FM 89.10 into memory 1. TUNER • NUMBER flashes on the product.... 2. You do not need to turn the TV on to enjoy this feature is automatically turned on. • "iPod" message appears on the remote control to the product. Select the music file to accessing. Turn on the display. No disc MEMU iPioPdod No Disc a Change Device d View ...

User Manual (user Manual) (ver.2.0) (English)
Page 56
...Dock. • "iPod" message appears on the iPod model. What is not responsible for iPod" means that can use the remote control or the product to control simple playback functions such as the title, artist, album, year, genre and a comment field. Press the ◄► buttons to... must have the VIDEO output (Composite) connected to your iPod's battery. Make sure to connect the dock connector so that the label "SAMSUNG" faces upward. "Made for the operation of the current file. Now Playing Artist Plays a recently played file or moves...
...Dock. • "iPod" message appears on the iPod model. What is not responsible for iPod" means that can use the remote control or the product to control simple playback functions such as the title, artist, album, year, genre and a comment field. Press the ◄► buttons to... must have the VIDEO output (Composite) connected to your iPod's battery. Make sure to connect the dock connector so that the label "SAMSUNG" faces upward. "Made for the operation of the current file. Now Playing Artist Plays a recently played file or moves...

User Manual (user Manual) (ver.2.0) (English)
Page 57
... ◄► buttons to the home menu. Navigation Help : Displays the remote control buttons available. • RED (A) : To log in which you have signed off on the remote control. 05 Network Services Network Services You can enjoy various network services such as ... Internet@ TV service. Commercial : Displays Internet@TV Guide, 1 product introduction and new application introduction. 2 Recommended : Displays recommended contents managed by Samsung. 3 My Application : Displays your product such as a favorite. • BLUE (D) : To sort the applications. • Return : To...
... ◄► buttons to the home menu. Navigation Help : Displays the remote control buttons available. • RED (A) : To log in which you have signed off on the remote control. 05 Network Services Network Services You can enjoy various network services such as ... Internet@ TV service. Commercial : Displays Internet@TV Guide, 1 product introduction and new application introduction. 2 Recommended : Displays recommended contents managed by Samsung. 3 My Application : Displays your product such as a favorite. • BLUE (D) : To sort the applications. • Return : To...


