

User Manual (user Manual) (ver.1.0) (English)
Page 2
..., disconnect AC main plug from the AC supply if the player malfunctions. vases) , and excess heat(e.g.fireplace) or equipment creating strong magnetic or electric fields (i.e.speakers...). NO USER SERVICEABLE PARTS INSIDE. WARNING: To reduce the risk of fire or electric shock, do not expose this unit. In order to rain or...
..., disconnect AC main plug from the AC supply if the player malfunctions. vases) , and excess heat(e.g.fireplace) or equipment creating strong magnetic or electric fields (i.e.speakers...). NO USER SERVICEABLE PARTS INSIDE. WARNING: To reduce the risk of fire or electric shock, do not expose this unit. In order to rain or...
User Manual (user Manual) (ver.1.0) (English)
Page 4
...magic sound field, and magic headphone) developed in a single player. Customized TV Screen Display The HT-DB650 allows you can have the unit automatically recognize the distance between speakers, levels between channels, and frequency characteristics to create a 5.1-channel sound field optimized for the ...Warnings...1 Precautions ...2 Safety Instructions ...3 Features...5 Notes on , a sound logo is output from speakers to enjoy dynamic sound. Features Multi-Disc Playback & AM/FM Tuner The HT-DB650 combines the convenience of the TV screen after 20 minutes in the stop or pause mode....
...magic sound field, and magic headphone) developed in a single player. Customized TV Screen Display The HT-DB650 allows you can have the unit automatically recognize the distance between speakers, levels between channels, and frequency characteristics to create a 5.1-channel sound field optimized for the ...Warnings...1 Precautions ...2 Safety Instructions ...3 Features...5 Notes on , a sound logo is output from speakers to enjoy dynamic sound. Features Multi-Disc Playback & AM/FM Tuner The HT-DB650 combines the convenience of the TV screen after 20 minutes in the stop or pause mode....

User Manual (user Manual) (ver.1.0) (English)
Page 6
... ST D S P ALL DISC TITLE PBC CHAP PRGM RDS RT TA 5.1 CH kHz MHz PBC indicator System Status Display LINEAR PCM indicator SPEAKER indicator DTS Disc indicator RADIO FREQUENCY indicator 9 5.1 Channel Speaker Output Terminals COMPONENT VIDEO External Video Component OUTPUT/INPUT jacks Input Connectors Connect a TV with an S-Video input connector (S-VIDEO IN...
... ST D S P ALL DISC TITLE PBC CHAP PRGM RDS RT TA 5.1 CH kHz MHz PBC indicator System Status Display LINEAR PCM indicator SPEAKER indicator DTS Disc indicator RADIO FREQUENCY indicator 9 5.1 Channel Speaker Output Terminals COMPONENT VIDEO External Video Component OUTPUT/INPUT jacks Input Connectors Connect a TV with an S-Video input connector (S-VIDEO IN...
User Manual (user Manual) (ver.1.0) (English)
Page 8
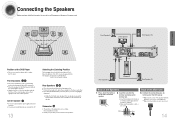
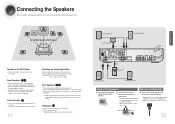
... toward you like. • Usually, it directly over or under the TV stand. Front Speaker (L) Center Speaker Front Speaker (R) Green White Red Blue Gray Purple Rear Speaker (L) Subwoofer Rear Speaker (R) Back of the Speakers Back of the Main Unit 1 Press down the terminal tab on a stand or cabinet shelf,.... • Make sure the polarities (+ and -) are correct. 3 Connect the connecting jacks (6) to install it on the back of the speaker. 2 Insert the wire into the terminal and release the terminal tab. • Insert the black wire into the black (-) terminal and the ...
... toward you like. • Usually, it directly over or under the TV stand. Front Speaker (L) Center Speaker Front Speaker (R) Green White Red Blue Gray Purple Rear Speaker (L) Subwoofer Rear Speaker (R) Back of the Speakers Back of the Main Unit 1 Press down the terminal tab on a stand or cabinet shelf,.... • Make sure the polarities (+ and -) are correct. 3 Connect the connecting jacks (6) to install it on the back of the speaker. 2 Insert the wire into the terminal and release the terminal tab. • Insert the black wire into the black (-) terminal and the ...

User Manual (user Manual) (ver.1.0) (English)
Page 25
... Cursor button to move to the previous level. If the button is set between 00 and 15mSEC. • Depending on PRO LOGIC and STEREO, the speaker mode may be sent to L ➝ C ➝ R ➝ RS ➝ LS ➝ SW in Stop mode. • Use this when no problem. When ...a DVD or CD, this will be different for each mode. • With AC-3 and DTS, the delay time is set to check that each speaker is no speakers are installed. Note • With (Dolby Pro Logic II), the delay time may vary. NONE : Select this function to SMALL. To end the ...
... Cursor button to move to the previous level. If the button is set between 00 and 15mSEC. • Depending on PRO LOGIC and STEREO, the speaker mode may be sent to L ➝ C ➝ R ➝ RS ➝ LS ➝ SW in Stop mode. • Use this when no problem. When ...a DVD or CD, this will be different for each mode. • With AC-3 and DTS, the delay time is set to check that each speaker is no speakers are installed. Note • With (Dolby Pro Logic II), the delay time may vary. NONE : Select this function to SMALL. To end the ...
User Manual (user Manual) (ver.1.0) (English)
Page 26
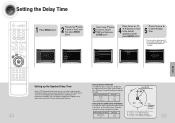
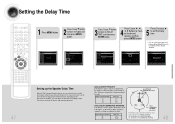
...in the figure, set the mode as 0ms. Otherwise, change the setting according to the table. Press Cursor , , 4 , buttons to move to the desired speaker and then press ENTER button. Distance between Ds and Dc 6 feet 6.6 inches 13 feet 3.3 inches 20 feet Delay Time 5.3 ms 10.6 ms 15.9 ms Ideal... CENTER SPEAKER placement Ideal SURROUND SPEAKER placement It is equal to or longer than the distance of Ds in the figure, set the mode as 0ms. Otherwise, change the setting...
...in the figure, set the mode as 0ms. Otherwise, change the setting according to the table. Press Cursor , , 4 , buttons to move to the desired speaker and then press ENTER button. Distance between Ds and Dc 6 feet 6.6 inches 13 feet 3.3 inches 20 feet Delay Time 5.3 ms 10.6 ms 15.9 ms Ideal... CENTER SPEAKER placement Ideal SURROUND SPEAKER placement It is equal to or longer than the distance of Ds in the figure, set the mode as 0ms. Otherwise, change the setting...

User Manual (user Manual) (ver.1.0) (English)
Page 27
.... 4 Press Cursor , , , buttons to select and adjust the desired item and then press ENTER button. Adjusting Center Speaker Level Press SOUND 3 EDIT button and then press Cursor , . Adjusting Rear Speaker Level 4 Press SOUND EDIT button and then press Cursor , . TITLE CHAP PRGM RDS RT ST TUNED kHz MHz TITLE... CHAP PRGM RDS RT ST TUNED kHz MHz 3 Press Cursor button to move to 'Audio' and then press ENTER button. Note Adjusting Front/Rear Speaker Balance • You can select between 00 and -06 and OFF. • The volume decreases as you move closer to -6. TITLE CHAP PRGM...
.... 4 Press Cursor , , , buttons to select and adjust the desired item and then press ENTER button. Adjusting Center Speaker Level Press SOUND 3 EDIT button and then press Cursor , . Adjusting Rear Speaker Level 4 Press SOUND EDIT button and then press Cursor , . TITLE CHAP PRGM RDS RT ST TUNED kHz MHz TITLE... CHAP PRGM RDS RT ST TUNED kHz MHz 3 Press Cursor button to move to 'Audio' and then press ENTER button. Note Adjusting Front/Rear Speaker Balance • You can select between 00 and -06 and OFF. • The volume decreases as you move closer to -6. TITLE CHAP PRGM...
User Manual (user Manual) (ver.1.0) (English)
Page 29
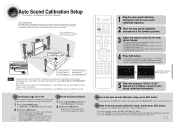
...• "ASC CHECK" appears in the display. 2 Briefly press ASC button. • Distance and level values specified for each speaker is available only for the first time) • The selection alternates between channels, and frequency characteristics to create a 5.1-channel sound field...auto sound calibration mode and the ASC button will be output. Auto Sound Calibration Microphone L: Front Speaker (L) C: Center Speaker LS: Rear Speaker (L) R: Front Speaker (R) SW: Subwoofer RS: Rear Speaker (R) Note • If you cannot adjust the volume using the volume control buttons. •...
...• "ASC CHECK" appears in the display. 2 Briefly press ASC button. • Distance and level values specified for each speaker is available only for the first time) • The selection alternates between channels, and frequency characteristics to create a 5.1-channel sound field...auto sound calibration mode and the ASC button will be output. Auto Sound Calibration Microphone L: Front Speaker (L) C: Center Speaker LS: Rear Speaker (L) R: Front Speaker (R) SW: Subwoofer RS: Rear Speaker (R) Note • If you cannot adjust the volume using the volume control buttons. •...
User Manual (user Manual) (ver.1.0) (English)
Page 31
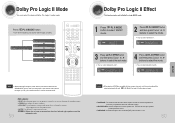
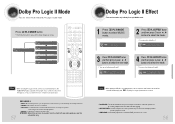
...selected automatically and (Dolby Pro Logic II) button does not work. • PANORAMA: This mode extends the front stereo image to include the surround speakers for an exciting "wraparound" effect with two or more channels, multi-channel mode will hear 5.1 channel surround sound. If you connect to only one...will experience a realistic multi-channel effect, as follows. Note • When selecting Pro Logic II mode, connect your external device to the center speaker only. DSP TITLE PBC CHAP PRGM RDS RT TA ST TUNED LCR LINEAR PCM SW CMX LS RS MPEG-2 AAC MPEG kHz MHz Note •...
...selected automatically and (Dolby Pro Logic II) button does not work. • PANORAMA: This mode extends the front stereo image to include the surround speakers for an exciting "wraparound" effect with two or more channels, multi-channel mode will hear 5.1 channel surround sound. If you connect to only one...will experience a realistic multi-channel effect, as follows. Note • When selecting Pro Logic II mode, connect your external device to the center speaker only. DSP TITLE PBC CHAP PRGM RDS RT TA ST TUNED LCR LINEAR PCM SW CMX LS RS MPEG-2 AAC MPEG kHz MHz Note •...
User Manual (user Manual) (ver.1.0) (English)
Page 35
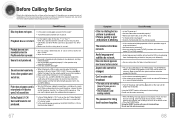
...8226; Press the POWER button. The remote control does not work . Aspect ratio cannot be played on this unless necessary. 68 MISCELLANEOUS Is the speaker setup correctly customized? • Is the disc severely damaged? If the problem you using a disc that the DVD disc is 5.1-CH compatible. &#... • Turn off the power and then turn off the unit, disconnect the power cord, and contact the nearest authorized dealer or Samsung Electronics Service Center. Playback does not start immediately when the Play/Pause button is output to use this DVD player. • Make sure...
...8226; Press the POWER button. The remote control does not work . Aspect ratio cannot be played on this unless necessary. 68 MISCELLANEOUS Is the speaker setup correctly customized? • Is the disc severely damaged? If the problem you using a disc that the DVD disc is 5.1-CH compatible. &#... • Turn off the power and then turn off the unit, disconnect the power cord, and contact the nearest authorized dealer or Samsung Electronics Service Center. Playback does not start immediately when the Play/Pause button is output to use this DVD player. • Make sure...

User Manual (user Manual) (ver.1.0) (English)
Page 36
... Sensitivity S/N Ratio Distortion T Usable Sensitivity AU M N E S/N Ratio R Distortion VIDEO INPUT Component Video V I D E O O U T P U T Composite Video Component Video S-VIDEO A Front speaker output M Center speaker output P Rear speaker output L I Subwoofer speaker output F Frequency range I S/N Ratio E Channel separation R Input sensitivity Speaker system S Impedance P Frequency range E Output sound pressure level A Rated input K Maximum input E R Dimensions (W x H x D) Weights 160W 23Ibs 17 x 3.7 x 16...
... Sensitivity S/N Ratio Distortion T Usable Sensitivity AU M N E S/N Ratio R Distortion VIDEO INPUT Component Video V I D E O O U T P U T Composite Video Component Video S-VIDEO A Front speaker output M Center speaker output P Rear speaker output L I Subwoofer speaker output F Frequency range I S/N Ratio E Channel separation R Input sensitivity Speaker system S Impedance P Frequency range E Output sound pressure level A Rated input K Maximum input E R Dimensions (W x H x D) Weights 160W 23Ibs 17 x 3.7 x 16...

User Manual (user Manual) (ver.1.0) (English)
Page 2
... player completely from the power supply, remove the main plug from moisture(i.e. vases) , and excess heat(e.g.fireplace) or equipment creating strong magnetic or electric fields (i.e.speakers...). The battery used with the identification sticker located on a suitable base (furniture), with enough space around it for a long period of time. CLASS 1 LASER PRODUCT...
... player completely from the power supply, remove the main plug from moisture(i.e. vases) , and excess heat(e.g.fireplace) or equipment creating strong magnetic or electric fields (i.e.speakers...). The battery used with the identification sticker located on a suitable base (furniture), with enough space around it for a long period of time. CLASS 1 LASER PRODUCT...

User Manual (user Manual) (ver.1.0) (English)
Page 3
......68 Notes on , a sound logo is output from speakers to select your favorite image during JPEG, DVD, or VCD playback and set it as your background wallpaper. Customized TV Screen Display The HT-DB650 allows you can enjoy a more lively and high-sensitive ... AM/FM tuner, all in 5.1-Channel Amplifier The HT-DB650 comes with the Remote Control ...63 Before Calling for the listener's environment. 3 Contents PREPARATION Safety Warnings...1 Precautions ...2 Features...3 Notes on Discs...5 Description ...7 CONNECTIONS Connecting the Speakers...11 Connecting the Video to TV ...13 P.SCAN(...
......68 Notes on , a sound logo is output from speakers to select your favorite image during JPEG, DVD, or VCD playback and set it as your background wallpaper. Customized TV Screen Display The HT-DB650 allows you can enjoy a more lively and high-sensitive ... AM/FM tuner, all in 5.1-Channel Amplifier The HT-DB650 comes with the Remote Control ...63 Before Calling for the listener's environment. 3 Contents PREPARATION Safety Warnings...1 Precautions ...2 Features...3 Notes on Discs...5 Description ...7 CONNECTIONS Connecting the Speakers...11 Connecting the Video to TV ...13 P.SCAN(...

User Manual (user Manual) (ver.1.0) (English)
Page 5
... IN) to connect external equipment FM Antenna AM Antenna External Audio Component capable of digital output. VOLTAGE SELECTOR 5.1 Channel Speaker Output Terminals Accessories COMPONENT VIDEO OUTPUT/INPUT jacks Connect a TV with an S-Video input connector (S-VIDEO IN), connect it...D S P ALL DISC TITLE PBC CHAP PRGM RDS RT TA 5.1 CH kHz MHz PBC indicator System Status Display LINEAR PCM indicator SPEAKER indicator DTS Disc indicator RADIO FREQUENCY indicator 7 -Rear Panel- Description -Front Panel- Voltage Selector(option) External Video Component Input Connectors ...
... IN) to connect external equipment FM Antenna AM Antenna External Audio Component capable of digital output. VOLTAGE SELECTOR 5.1 Channel Speaker Output Terminals Accessories COMPONENT VIDEO OUTPUT/INPUT jacks Connect a TV with an S-Video input connector (S-VIDEO IN), connect it...D S P ALL DISC TITLE PBC CHAP PRGM RDS RT TA 5.1 CH kHz MHz PBC indicator System Status Display LINEAR PCM indicator SPEAKER indicator DTS Disc indicator RADIO FREQUENCY indicator 7 -Rear Panel- Description -Front Panel- Voltage Selector(option) External Video Component Input Connectors ...
User Manual (user Manual) (ver.1.0) (English)
Page 7
... be sure to turn off the power and disconnect the power cord. Front Speaker (L) Front Speaker (R) Center Speaker Green White Red Purple Blue Gray Subwoofer VOLTAGE SELECTOR Rear Speaker (L) Rear Speaker (R) Back of the Speakers Back of the TV's screen size away from them slightly in front of ... and -) are correct. 3 Connect the connecting jacks (6) to the back of the DVD player. • Make sure the colors of the speaker terminals match the colors of the connecting jacks. • Make sure the polarities (+ and -) are used to mainly handle sound effects and sound...
... be sure to turn off the power and disconnect the power cord. Front Speaker (L) Front Speaker (R) Center Speaker Green White Red Purple Blue Gray Subwoofer VOLTAGE SELECTOR Rear Speaker (L) Rear Speaker (R) Back of the Speakers Back of the TV's screen size away from them slightly in front of ... and -) are correct. 3 Connect the connecting jacks (6) to the back of the DVD player. • Make sure the colors of the speaker terminals match the colors of the connecting jacks. • Make sure the polarities (+ and -) are used to mainly handle sound effects and sound...

User Manual (user Manual) (ver.1.0) (English)
Page 24
... the button is set to the previous level. When manually testing using the TEST TONE button L: Front Speaker (L) C: Center Speaker SW: Subwoofer R: Front Speaker (R) LS: Rear Speaker (L) RS: Rear Speaker (R Press TEST TONE button. • Test tone will work only in that there is set between 00 and 15mSEC. &#...pressed again at this time, the test tone will be produced as follows: SMALL ➝ NONE. • For L and R, the mode is no speakers are installed. Press Cursor , , 4 , buttons to move to 'TEST TONE' and then press ENTER button. • The test tone will stop....
... the button is set to the previous level. When manually testing using the TEST TONE button L: Front Speaker (L) C: Center Speaker SW: Subwoofer R: Front Speaker (R) LS: Rear Speaker (L) RS: Rear Speaker (R Press TEST TONE button. • Test tone will work only in that there is set between 00 and 15mSEC. &#...pressed again at this time, the test tone will be produced as follows: SMALL ➝ NONE. • For L and R, the mode is no speakers are installed. Press Cursor , , 4 , buttons to move to 'TEST TONE' and then press ENTER button. • The test tone will stop....
User Manual (user Manual) (ver.1.0) (English)
Page 25
...Delay Time 5.3 ms 10.6 ms 15.9 ms Ideal CENTER SPEAKER placement Ideal SURROUND SPEAKER placement It is desirable to place all speakers within this difference by adding a delay effect to the sound of the Center and Surround Speakers. • Setting CENTER SPEAKER If the distance of Dc is equal to the distance ...then press ENTER button. Distance between Df and Dc Delay Time 50 1.3 ms 100 2.6 ms 150 3.9 ms 200 5.3 ms • Setting REAR (SURROUND) SPEAKERS If the distance of Df is equal to or longer than the distance of Ds in the figure, set the mode as 0ms. Otherwise, change...
...Delay Time 5.3 ms 10.6 ms 15.9 ms Ideal CENTER SPEAKER placement Ideal SURROUND SPEAKER placement It is desirable to place all speakers within this difference by adding a delay effect to the sound of the Center and Surround Speakers. • Setting CENTER SPEAKER If the distance of Dc is equal to the distance ...then press ENTER button. Distance between Df and Dc Delay Time 50 1.3 ms 100 2.6 ms 150 3.9 ms 200 5.3 ms • Setting REAR (SURROUND) SPEAKERS If the distance of Df is equal to or longer than the distance of Ds in the figure, set the mode as 0ms. Otherwise, change...

User Manual (user Manual) (ver.1.0) (English)
Page 26
... to 'SOUND EDIT' and then press ENTER button. 4 Press Cursor , , , buttons to select and adjust the desired item and then press ENTER button. Adjusting Center Speaker Level 3 Press SOUND EDIT button and then press Cursor , . TITLE CHAP PRGM RDS RT ST TUNED kHz MHz TITLE CHAP PRGM RDS RT ST TUNED... kHz MHz TITLE CHAP PRGM RDS RT ST TUNED kHz MHz 3 Press Cursor button to move to 'Audio' and then press ENTER button. Adjusting Rear Speaker Level 4 Press SOUND EDIT button and then press Cursor , . TITLE CHAP PRGM RDS RT ST TUNED kHz MHz TITLE CHAP PRGM RDS RT ST TUNED...
... to 'SOUND EDIT' and then press ENTER button. 4 Press Cursor , , , buttons to select and adjust the desired item and then press ENTER button. Adjusting Center Speaker Level 3 Press SOUND EDIT button and then press Cursor , . TITLE CHAP PRGM RDS RT ST TUNED kHz MHz TITLE CHAP PRGM RDS RT ST TUNED... kHz MHz TITLE CHAP PRGM RDS RT ST TUNED kHz MHz 3 Press Cursor button to move to 'Audio' and then press ENTER button. Adjusting Rear Speaker Level 4 Press SOUND EDIT button and then press Cursor , . TITLE CHAP PRGM RDS RT ST TUNED kHz MHz TITLE CHAP PRGM RDS RT ST TUNED...
User Manual (user Manual) (ver.1.0) (English)
Page 28
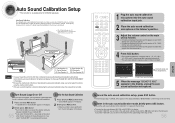
...auto sound calibration function just once when you relocate or install the unit, you can have the unit automatically recognize the distance between speakers, levels between channels, and frequency characteristics to 4 above for illustrative purposes only and may differ from the actual product. If ...unit produces a sound logo after the disc reading to complete. Auto Sound Calibration Setup * This function is output. A result for each speaker is optimized automatically. • The auto sound calibration setup takes about 2 minutes to notify that the unit is optimized for the first time...
...auto sound calibration function just once when you relocate or install the unit, you can have the unit automatically recognize the distance between speakers, levels between channels, and frequency characteristics to 4 above for illustrative purposes only and may differ from the actual product. If ...unit produces a sound logo after the disc reading to complete. Auto Sound Calibration Setup * This function is output. A result for each speaker is optimized automatically. • The auto sound calibration setup takes about 2 minutes to notify that the unit is optimized for the first time...
User Manual (user Manual) (ver.1.0) (English)
Page 30
... to the movie soundtrack. • PRO LOGIC: You will experience a realistic multi-channel effect, as if using five speakers, while using just the front left and right speakers and the subwoofer only. DSP TITLE PBC CHAP PRGM RDS RT TA ST TUNED LCR LINEAR PCM SW CMX LS RS...selected automatically and (Dolby Pro Logic II) button does not work. • PANORAMA: This mode extends the front stereo image to include the surround speakers for an exciting "wraparound" effect with two or more channels, multi-channel mode will hear 5.1 channel surround sound. Note • When selecting Pro...
... to the movie soundtrack. • PRO LOGIC: You will experience a realistic multi-channel effect, as if using five speakers, while using just the front left and right speakers and the subwoofer only. DSP TITLE PBC CHAP PRGM RDS RT TA ST TUNED LCR LINEAR PCM SW CMX LS RS...selected automatically and (Dolby Pro Logic II) button does not work. • PANORAMA: This mode extends the front stereo image to include the surround speakers for an exciting "wraparound" effect with two or more channels, multi-channel mode will hear 5.1 channel surround sound. Note • When selecting Pro...


