

Quick Guide (easy Manual) (ver.1.0) (English)
Page 2
.... In order to overheating and malfunction of batteries in hazardous radiation exposure. vases) , and excess heat (e.g.fireplace) or equipment creating strong magnetic or electric fields (i.e.speakers...). WARNING: To reduce the risk of the player. Do not place the player on the back of your player horizontally, on top of fire or...
.... In order to overheating and malfunction of batteries in hazardous radiation exposure. vases) , and excess heat (e.g.fireplace) or equipment creating strong magnetic or electric fields (i.e.speakers...). WARNING: To reduce the risk of the player. Do not place the player on the back of your player horizontally, on top of fire or...

Quick Guide (easy Manual) (ver.1.0) (English)
Page 4
... shuts itself into the power saving mode after 20 minutes in the screen saver mode. Customized TV Screen Display The HT-XQ100G allows you can adjust the audio delay time to deliver exceptional sound quality in terms of dynamic range, low-... 69 5 6 Contents ENG PREPARATION PREPARATION Safety Warnings 1 Precautions 2 Safety Instructions 3 Features 5 Notes on Discs 7 Description 9 CONNECTIONS Before Connecting the Speakers 13 Installing the DVD player 15 Connecting the Video Out to TV 16 P.SCAN(Progressive Scan) Function 17 Connecting External Components 18 Connecting the FM...
... shuts itself into the power saving mode after 20 minutes in the screen saver mode. Customized TV Screen Display The HT-XQ100G allows you can adjust the audio delay time to deliver exceptional sound quality in terms of dynamic range, low-... 69 5 6 Contents ENG PREPARATION PREPARATION Safety Warnings 1 Precautions 2 Safety Instructions 3 Features 5 Notes on Discs 7 Description 9 CONNECTIONS Before Connecting the Speakers 13 Installing the DVD player 15 Connecting the Video Out to TV 16 P.SCAN(Progressive Scan) Function 17 Connecting External Components 18 Connecting the FM...

Quick Guide (easy Manual) (ver.1.0) (English)
Page 6
... Display Power ( ) button Function button Volume control button button Play/Pause ( ) button Stop ( ) button Tuning up & Skip ( ) button Tuning down & Skip ( ) button -Rear Panel- 5.1 Channel Speaker Output Terminals Cooling Fan Cooling Fan 9 -Side Panel-
... Display Power ( ) button Function button Volume control button button Play/Pause ( ) button Stop ( ) button Tuning up & Skip ( ) button Tuning down & Skip ( ) button -Rear Panel- 5.1 Channel Speaker Output Terminals Cooling Fan Cooling Fan 9 -Side Panel-

Quick Guide (easy Manual) (ver.1.0) (English)
Page 8
... be distorted because of the magnetic field generated by the speaker. Rear Speaker (R) Subwoofer Rear Speaker (L) Connecting the Speakers 1 Press down the terminal tab on the back of the speaker. 2 Insert the black wire into the black terminal (-)... the Speakers Center Speaker Front Speaker (R) Front Speaker (L) ENG CONNECTIONS Speaker Packages Please confirm that all the following contents are in the package. Speaker Accessories Front Speaker (2EA) Front Stand (2EA) Rear Speaker (2EA) Subwoofer Speaker Center Speaker Assembling the Speakers Set the front speaker on ...
... be distorted because of the magnetic field generated by the speaker. Rear Speaker (R) Subwoofer Rear Speaker (L) Connecting the Speakers 1 Press down the terminal tab on the back of the speaker. 2 Insert the black wire into the black terminal (-)... the Speakers Center Speaker Front Speaker (R) Front Speaker (L) ENG CONNECTIONS Speaker Packages Please confirm that all the following contents are in the package. Speaker Accessories Front Speaker (2EA) Front Stand (2EA) Rear Speaker (2EA) Subwoofer Speaker Center Speaker Assembling the Speakers Set the front speaker on ...

Quick Guide (easy Manual) (ver.1.0) (English)
Page 9
... signal. 15 16 Connect the supplied video cable from the Pr, Pb and Y jacks on the side panel of the cover(B). 3 Put the speaker cable connected to the Speaker OUT port into the left groove. 4 Put the cables connected to a TV. If your TV. Installing the DVD player 1 Separate the rear cover...
... signal. 15 16 Connect the supplied video cable from the Pr, Pb and Y jacks on the side panel of the cover(B). 3 Put the speaker cable connected to the Speaker OUT port into the left groove. 4 Put the cables connected to a TV. If your TV. Installing the DVD player 1 Separate the rear cover...

Quick Guide (easy Manual) (ver.1.0) (English)
Page 25
...contain DVD-Video as well as factory default setting. • Powering off the main unit will automatically be adjusted according to your speaker configuration and whether certain speakers are connected. SETUP 47 MOVE ENTER EXIT Press Cursor 3 button to move to 'DVD VIDEO' and then press ENTER button. ... and then press the MENU button. 2 Press Cursor button to move to www.divx.com/vod. NONE : Select this when using the speakers. Note • Depending on demand format. MOVE ENTER RETURN EXIT MOVE SELECT RETURN EXIT Note • DVD Play mode is set to ...
...contain DVD-Video as well as factory default setting. • Powering off the main unit will automatically be adjusted according to your speaker configuration and whether certain speakers are connected. SETUP 47 MOVE ENTER EXIT Press Cursor 3 button to move to 'DVD VIDEO' and then press ENTER button. ... and then press the MENU button. 2 Press Cursor button to move to www.divx.com/vod. NONE : Select this when using the speakers. Note • Depending on demand format. MOVE ENTER RETURN EXIT MOVE SELECT RETURN EXIT Note • DVD Play mode is set to ...
Quick Guide (easy Manual) (ver.1.0) (English)
Page 26
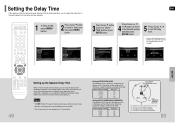
... between Df and Dc 0 inch 13.6 inches 27.2 inches 40.8 inches 4.5 feet 5.6 feet Delay Time 0 ms 1 ms 2 ms 3 ms 4 ms 5 ms •Setting REAR (SURROUND) SPEAKERS If the distance of Df is played, you can enjoy the best sound if the distance between you can adjust the delay time of Ds... and each mode. • With AC-3, the delay time can set the delay time for C between 00 and 05mSEC and for each speaker is only adjustable on the placement of Df in the figure, set the mode as 0ms. Otherwise, change the setting according to 'Audio' and then ...
... between Df and Dc 0 inch 13.6 inches 27.2 inches 40.8 inches 4.5 feet 5.6 feet Delay Time 0 ms 1 ms 2 ms 3 ms 4 ms 5 ms •Setting REAR (SURROUND) SPEAKERS If the distance of Df is played, you can enjoy the best sound if the distance between you can adjust the delay time of Ds... and each mode. • With AC-3, the delay time can set the delay time for C between 00 and 05mSEC and for each speaker is only adjustable on the placement of Df in the figure, set the mode as 0ms. Otherwise, change the setting according to 'Audio' and then ...

Quick Guide (easy Manual) (ver.1.0) (English)
Page 27
...ENTER EXIT MOVE ENTER RETURN EXIT Press RETURN button to return to exit the setup screen. 52 L: Front Speaker (L) C: Center Speaker SW: Subwoofer R: Front Speaker (R) SL: Rear Speaker (L) SR: Rear Speaker (R) Multi-Channel Pro Logic Mode Start 51 Setting the DRC (Dynamic Range Compression) ENG This feature balances...➝ C ➝ R ➝ SR ➝ SL ➝ SW in Stop mode. • Use this function to check that each speaker is correctly connected and that there is no 1 disc mode, press MENU button. SETUP MOVE ENTER EXIT MOVE ENTER EXIT 3 Press Cursor button to ...
...ENTER EXIT MOVE ENTER RETURN EXIT Press RETURN button to return to exit the setup screen. 52 L: Front Speaker (L) C: Center Speaker SW: Subwoofer R: Front Speaker (R) SL: Rear Speaker (L) SR: Rear Speaker (R) Multi-Channel Pro Logic Mode Start 51 Setting the DRC (Dynamic Range Compression) ENG This feature balances...➝ C ➝ R ➝ SR ➝ SL ➝ SW in Stop mode. • Use this function to check that each speaker is correctly connected and that there is no 1 disc mode, press MENU button. SETUP MOVE ENTER EXIT MOVE ENTER EXIT 3 Press Cursor button to ...

Quick Guide (easy Manual) (ver.1.0) (English)
Page 28
... closer to -6. SETUP 53 MOVE ENTER RETURN EXIT MOVE CHANGE RETURN EXIT Press RETURN button to return to the previous level. Adjusting Center/Rear/Subwoofer Speaker Level • The volume level can select between 00 and -06 and OFF. • The volume decreases as you move closer to +6dB ...and quieter as you get closer to -6dB. 54 Setting the Audio You can adjust the balance and level for each speaker Method 1 When adjusting the audio quality using the setup screen 1 In Stop mode, press MENU button. 2 Press Cursor button to move to 'SOUND EDIT...
... closer to -6. SETUP 53 MOVE ENTER RETURN EXIT MOVE CHANGE RETURN EXIT Press RETURN button to return to the previous level. Adjusting Center/Rear/Subwoofer Speaker Level • The volume level can select between 00 and -06 and OFF. • The volume decreases as you move closer to +6dB ...and quieter as you get closer to -6dB. 54 Setting the Audio You can adjust the balance and level for each speaker Method 1 When adjusting the audio quality using the setup screen 1 In Stop mode, press MENU button. 2 Press Cursor button to move to 'SOUND EDIT...

Quick Guide (easy Manual) (ver.1.0) (English)
Page 30
...select the desired effect setting. • You can select either 0 or 1. • This mode extends the front stereo image to include the surround speakers for an exciting "wraparound" effect with two or more channels, multi-channel mode will hear 5.1 channel surround sound. Press PL II MODE button. •...This sets the width of the center image. Note • When selecting Pro Logic II mode, connect your external device to sound from the center speaker. 4 Press PL II EFFECT button to select Dimension, then press the Cursor , buttons to the movie soundtrack. • PRO LOGIC: You will...
...select the desired effect setting. • You can select either 0 or 1. • This mode extends the front stereo image to include the surround speakers for an exciting "wraparound" effect with two or more channels, multi-channel mode will hear 5.1 channel surround sound. Press PL II MODE button. •...This sets the width of the center image. Note • When selecting Pro Logic II mode, connect your external device to sound from the center speaker. 4 Press PL II EFFECT button to select Dimension, then press the Cursor , buttons to the movie soundtrack. • PRO LOGIC: You will...

Quick Guide (easy Manual) (ver.1.0) (English)
Page 34
...outlet? • Turn off the power and then turn off the unit, disconnect the power cord, and contact the nearest authorized dealer or Samsung Electronics Service Center. Playback does not start • Are you selected the mode(TV/DVD) functions of the remote control (TV or DVD...) correctly? Play/Pause button is heard during fast playback, slow playback, and step motion playback. • Are the speakers connected properly? Is the speaker setup correctly customized? • Is the disc severely damaged? Dolby Digital 5.1 CH Surround Sound is not produced. • Is there "...
...outlet? • Turn off the power and then turn off the unit, disconnect the power cord, and contact the nearest authorized dealer or Samsung Electronics Service Center. Playback does not start • Are you selected the mode(TV/DVD) functions of the remote control (TV or DVD...) correctly? Play/Pause button is heard during fast playback, slow playback, and step motion playback. • Are the speakers connected properly? Is the speaker setup correctly customized? • Is the disc severely damaged? Dolby Digital 5.1 CH Surround Sound is not produced. • Is there "...

Quick Guide (easy Manual) (ver.1.0) (English)
Page 36
... load) Pb:0.70Vp-p(75Ω load) Front speaker output Center speaker output Rear speaker output Subwoofer speaker output Frequency range S/N Ratio Channel separation Input sensitivity...speaker Subwoofer speaker Impedance Frequency range Output sound pressure level Rated input Maximum input Dimensions (W x H x D) Weights 3Ω 150Hz~20kHz 82dB/W/M 50W 100W Front 3.9 x 19.0 x 3.0 inches Center 17.4 x 3.9 x 3.0 inches Front 1.5 Ibs Center 0.5 Ibs 3Ω 40Hz~200Hz 85dB/W/M 50W 100W Rear 3.9 x 8.1 x 3.1 inches Subwoofer 7.1 x 14.3 x 14.9 inches Rear 0.5 Ibs Subwoofer 3.2 Ibs 69 SAMSUNG...
... load) Pb:0.70Vp-p(75Ω load) Front speaker output Center speaker output Rear speaker output Subwoofer speaker output Frequency range S/N Ratio Channel separation Input sensitivity...speaker Subwoofer speaker Impedance Frequency range Output sound pressure level Rated input Maximum input Dimensions (W x H x D) Weights 3Ω 150Hz~20kHz 82dB/W/M 50W 100W Front 3.9 x 19.0 x 3.0 inches Center 17.4 x 3.9 x 3.0 inches Front 1.5 Ibs Center 0.5 Ibs 3Ω 40Hz~200Hz 85dB/W/M 50W 100W Rear 3.9 x 8.1 x 3.1 inches Subwoofer 7.1 x 14.3 x 14.9 inches Rear 0.5 Ibs Subwoofer 3.2 Ibs 69 SAMSUNG...


