User Manual
Page 5
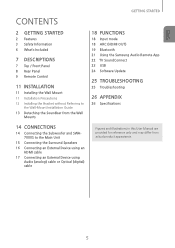
... Panel 9 Remote Control 11 INSTALLATION 11 Installing the Wall Mount 11 Installation Precautions 12 Installing the Bracket without Referring to the Wall-Mount Installation Guide 13 Detaching the Soundbar from the Wall Mounts 18 FUNCTIONS 18 Input mode 18 ARC (HDMI OUT) 19 Bluetooth 21 Using the Samsung Audio Remote App 22 TV SoundConnect 23 USB 24...
... Panel 9 Remote Control 11 INSTALLATION 11 Installing the Wall Mount 11 Installation Precautions 12 Installing the Bracket without Referring to the Wall-Mount Installation Guide 13 Detaching the Soundbar from the Wall Mounts 18 FUNCTIONS 18 Input mode 18 ARC (HDMI OUT) 19 Bluetooth 21 Using the Samsung Audio Remote App 22 TV SoundConnect 23 USB 24...
User Manual
Page 6
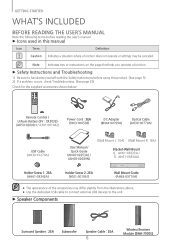
...) Optical Cable (AH39-00779A) USB Cable (AH39-01270A) User Manual / Quick Guide (AH68-02853A) / (AH68-02689N) (Wall Mount L: 1EA) (Wall Mount R: 1EA) Bracket-Wall Mount (L : AH61-03833A / R : AH61-03834A) Holder-Screw 1: 2EA (AH61-03342A) Holder-Screw 2: 2EA (6001-001961) Wall Mount Guide (AH63-03710A) ●● The appearance of the accessories may be canceled. Note Indicates tips or...
...) Optical Cable (AH39-00779A) USB Cable (AH39-01270A) User Manual / Quick Guide (AH68-02853A) / (AH68-02689N) (Wall Mount L: 1EA) (Wall Mount R: 1EA) Bracket-Wall Mount (L : AH61-03833A / R : AH61-03834A) Holder-Screw 1: 2EA (AH61-03342A) Holder-Screw 2: 2EA (6001-001961) Wall Mount Guide (AH63-03710A) ●● The appearance of the accessories may be canceled. Note Indicates tips or...
User Manual
Page 11
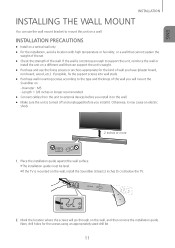
... unplugged before you install it on the wall. ●● Make sure the unit is mounted on a wall. Next, drill holes for the kind of wall you install it. If possible, fix the support screws into wall studs. ●● Purchase wall mounting screws according to the type and thickness ...of the wall you will go through on a vertical wall only. ●●...
... unplugged before you install it on the wall. ●● Make sure the unit is mounted on a wall. Next, drill holes for the kind of wall you install it. If possible, fix the support screws into wall studs. ●● Purchase wall mounting screws according to the type and thickness ...of the wall you will go through on a vertical wall only. ●●...

User Manual
Page 12
...GUIDE 2 inches or more 2 inches or more 6.3 inches 6.9 inches Minimum 12.9 ~ 13.2 inches 12 Make sure to the bottom of the wall mounts. Secure the two holder screws to the marked locations. • The left and one on the back of the Soundbar into the grooves of the... grooves. INSTALLATION 3. Fasten the wall mounts and screws to the screw holes on the back of the Soundbar's main body, one on the left and right mounts are different shapes. Set the holder screws on the right. 5. Wall Mounting the Sound Bar 4. For safe installation, make sure to ...
...GUIDE 2 inches or more 2 inches or more 6.3 inches 6.9 inches Minimum 12.9 ~ 13.2 inches 12 Make sure to the bottom of the wall mounts. Secure the two holder screws to the marked locations. • The left and one on the back of the Soundbar into the grooves of the... grooves. INSTALLATION 3. Fasten the wall mounts and screws to the screw holes on the back of the Soundbar's main body, one on the left and right mounts are different shapes. Set the holder screws on the right. 5. Wall Mounting the Sound Bar 4. For safe installation, make sure to ...
User Manual
Page 13
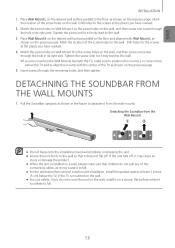
... the screw holes on the previous page. DETACHNING THE SOUNDBAR FROM THE WALL MOUNTS 1. Place Wall Mount L on the wall. Tighten the screw until it is unlikely to align the mounts with Wall Mount L as shown on the wall, and then screw one screw through the remaining holes, and then tighten... the unit falls off . Match the screw holes on Wall Mount L to the floor and aligned with the center of a wall mount installation, install the speaker system at the places you have marked. 4. Place Wall Mount R on the desired wall surface parallel to the screw holes on the previous page....
... the screw holes on the previous page. DETACHNING THE SOUNDBAR FROM THE WALL MOUNTS 1. Place Wall Mount L on the wall. Tighten the screw until it is unlikely to align the mounts with Wall Mount L as shown on the wall, and then screw one screw through the remaining holes, and then tighten... the unit falls off . Match the screw holes on Wall Mount L to the floor and aligned with the center of a wall mount installation, install the speaker system at the places you have marked. 4. Place Wall Mount R on the desired wall surface parallel to the screw holes on the previous page....


