
User Manual
Page 4
... outlet. The wide blade or the third prong are not covered. Use only with the cart, stand, tripod, bracket, or table specified by the manufacturer. 12. Refer all servicing to avoid injury from the wall outlet. This unit is used, use caution when moving the cart/apparatus combination to qualified service...
... outlet. The wide blade or the third prong are not covered. Use only with the cart, stand, tripod, bracket, or table specified by the manufacturer. 12. Refer all servicing to avoid injury from the wall outlet. This unit is used, use caution when moving the cart/apparatus combination to qualified service...
User Manual
Page 7
07 Connecting an External Device Connecting using an Optical Cable 08 Connecting a USB Storage Device 09 Connecting a Mobile Device Connecting via Bluetooth Using Tap Sound 10 Installing the Wall Mount Installation Precautions Wallmount Components 11 Installing the Soundbar in front of TV 12 Software Update Reset 13 Troubleshooting 14 License 15 Open Source License Notice 16 Important Notes About Service 17 Specifications and Guide Specifications 29 29 30 32 32 37 38 38 38 40 41 42 43 44 45 45 46 46 ENG - 7
07 Connecting an External Device Connecting using an Optical Cable 08 Connecting a USB Storage Device 09 Connecting a Mobile Device Connecting via Bluetooth Using Tap Sound 10 Installing the Wall Mount Installation Precautions Wallmount Components 11 Installing the Soundbar in front of TV 12 Software Update Reset 13 Troubleshooting 14 License 15 Open Source License Notice 16 Important Notes About Service 17 Specifications and Guide Specifications 29 29 30 32 32 37 38 38 38 40 41 42 43 44 45 45 46 46 ENG - 7
User Manual
Page 12
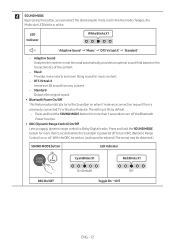
... bPuAItRton LED Indicator SOUND MODE 5 Sec DRC On/Off Cyan Blinks X1 Red Blinks X1 On (Default) Off Toggle On Off VOL WOOFER ENG - 12 Press and hold the SOUND MODE button for more than 5 seconds to turn DRC (Dynamic Range Control) on , loud sound is On by default. -- DTS...
... bPuAItRton LED Indicator SOUND MODE 5 Sec DRC On/Off Cyan Blinks X1 Red Blinks X1 On (Default) Off Toggle On Off VOL WOOFER ENG - 12 Press and hold the SOUND MODE button for more than 5 seconds to turn DRC (Dynamic Range Control) on , loud sound is On by default. -- DTS...
User Manual
Page 15
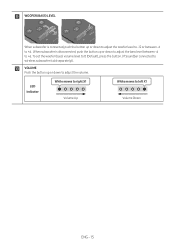
... the button up or down to adjust the volume. When subwoofer is connected, push the button up or down to adjust the woofer level to -12 or between -6 to left X1 Volume Down ENG - 15
... the button up or down to adjust the volume. When subwoofer is connected, push the button up or down to adjust the woofer level to -12 or between -6 to left X1 Volume Down ENG - 15
User Manual
Page 16
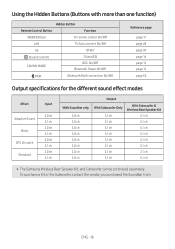
... EQ DRC On/Off Bluetooth Power On/Off PAIR Bluetooth Multi connection On/Off Reference page page 17 page 28 page 20 page 14 page 12 page 12 page 35 Output specifications for the different sound effect modes Effect Input Adaptive Sound Music DTS Virtual:X Standard 2.0 ch 5.1 ch 2.0 ch 5.1 ch 2.0 ch 5.1 ch... With Subwoofer & Wireless Rear Speaker Kit 3.1 ch 5.1 ch 3.1 ch 5.1 ch 3.1 ch 5.1 ch 3.1 ch 5.1 ch 3.1 ch 5.1 ch 3.1 ch 5.1 ch 2.1 ch 2.1 ch 3.1 ch 5.1 ch •• The Samsung Wireless Rear Speaker Kit, and Subwoofer can be purchased separately.
... EQ DRC On/Off Bluetooth Power On/Off PAIR Bluetooth Multi connection On/Off Reference page page 17 page 28 page 20 page 14 page 12 page 12 page 35 Output specifications for the different sound effect modes Effect Input Adaptive Sound Music DTS Virtual:X Standard 2.0 ch 5.1 ch 2.0 ch 5.1 ch 2.0 ch 5.1 ch... With Subwoofer & Wireless Rear Speaker Kit 3.1 ch 5.1 ch 3.1 ch 5.1 ch 3.1 ch 5.1 ch 3.1 ch 5.1 ch 3.1 ch 5.1 ch 3.1 ch 5.1 ch 2.1 ch 2.1 ch 3.1 ch 5.1 ch •• The Samsung Wireless Rear Speaker Kit, and Subwoofer can be purchased separately.

User Manual
Page 41
12 SOFTWARE UPDATE 5. When the update is complete." This may cause the firmware update to unzip the folder. 4. Connect the cable to the USB port on ...) (ARC) DC 19V SERVICE DC 19V (not supplied) DIGITAL AUDIO IN HDMI (OPTICAL) (ARC) White moves from left to right and right to https://www.samsung.com/us/ support/ downloads/ on a Micro USB adapter cable.
12 SOFTWARE UPDATE 5. When the update is complete." This may cause the firmware update to unzip the folder. 4. Connect the cable to the USB port on ...) (ARC) DC 19V SERVICE DC 19V (not supplied) DIGITAL AUDIO IN HDMI (OPTICAL) (ARC) White moves from left to right and right to https://www.samsung.com/us/ support/ downloads/ on a Micro USB adapter cable.