

User Manual (ENGLISH)
Page 3
... Tuning Analog Channels Analog 38 Checking the Digital-Signal Strength Digital 39 LNA (Low Noise Amplifier 39 PICTURE CONTROL Picture Control 40 Customizing the Picture Settings 41 Changing the Picture Size 43 Using the Color Weakness Enhancement Feature 44 Digital Noise Reduction 45 DNIe (Digital Natural Image ...engine 46 Setting the Film Mode 47 Viewing Picture-In-Picture 48 Changing the Size of the Sub (PIP) Picture 49 Changing the Location of the Sub (PIP) Picture 49 Selecting a Signal Source (Air or Cable) for PIP 50 Changing the ...
... Tuning Analog Channels Analog 38 Checking the Digital-Signal Strength Digital 39 LNA (Low Noise Amplifier 39 PICTURE CONTROL Picture Control 40 Customizing the Picture Settings 41 Changing the Picture Size 43 Using the Color Weakness Enhancement Feature 44 Digital Noise Reduction 45 DNIe (Digital Natural Image ...engine 46 Setting the Film Mode 47 Viewing Picture-In-Picture 48 Changing the Size of the Sub (PIP) Picture 49 Changing the Location of the Sub (PIP) Picture 49 Selecting a Signal Source (Air or Cable) for PIP 50 Changing the ...

User Manual (ENGLISH)
Page 4
... (PC Mode 115 Viewing the Current Resolution 116 Initializing the Picture Settings 117 APPENDIX Identifying Problems 118 Installing the Stand 119 Disconnecting the Stand 119 Stand Swivel Function 119 Installing the Wall Mount Kit (LN-S4096D 120 Installing the Wall Mount Kit (LN-S4696D 121 Using the Anti-Theft Kensington Lock 123 Specifications 123...
... (PC Mode 115 Viewing the Current Resolution 116 Initializing the Picture Settings 117 APPENDIX Identifying Problems 118 Installing the Stand 119 Disconnecting the Stand 119 Stand Swivel Function 119 Installing the Wall Mount Kit (LN-S4096D 120 Installing the Wall Mount Kit (LN-S4696D 121 Using the Anti-Theft Kensington Lock 123 Specifications 123...

User Manual (ENGLISH)
Page 5
...tuning for up to 181 channels A special filter to reduce or eliminate reception problems Fine tuning control for the sharpest picture possible A built-in multi-channel sound decoder for stereo and bilingual listening Built-in, dual channel speakers A special sleep timer... Picture-in-Picture capability that lets you to view and play photo (JPEG) and audio files (MP3) through the TV's WISELINK jack. Remote Control & Batteries (AAA x 2) (BN59-00529A) Power Cord (3903-000144) Cleaning Cloth (BN63-01798A) Cover-Bottom LN-S4096D (BN63-02491A) LN-S4696D (BN63-02624A) Owner's...
...tuning for up to 181 channels A special filter to reduce or eliminate reception problems Fine tuning control for the sharpest picture possible A built-in multi-channel sound decoder for stereo and bilingual listening Built-in, dual channel speakers A special sleep timer... Picture-in-Picture capability that lets you to view and play photo (JPEG) and audio files (MP3) through the TV's WISELINK jack. Remote Control & Batteries (AAA x 2) (BN59-00529A) Power Cord (3903-000144) Cleaning Cloth (BN63-01798A) Cover-Bottom LN-S4096D (BN63-02491A) LN-S4696D (BN63-02624A) Owner's...

User Manual (ENGLISH)
Page 9
...menu values. English-7 SOURCE Press to exit the menu. Remote Control You can also use your remote control to /from the TV. P.MODE Picture effect selection. This function is a special remote control for the visually impaired, and has Braille points on the screen. Stop - MENU Displays ...the main on the TV screen. EXIT Press to display all of buttons on -screen menu items and change channels in Picture ON/OFF. VCR/DVD Functions - D-Net Runs the D-Net view function. (Refer to pages 91~105) STILL Press to select additional channels...
...menu values. English-7 SOURCE Press to exit the menu. Remote Control You can also use your remote control to /from the TV. P.MODE Picture effect selection. This function is a special remote control for the visually impaired, and has Braille points on the screen. Stop - MENU Displays ...the main on the TV screen. EXIT Press to display all of buttons on -screen menu items and change channels in Picture ON/OFF. VCR/DVD Functions - D-Net Runs the D-Net view function. (Refer to pages 91~105) STILL Press to select additional channels...

User Manual (ENGLISH)
Page 12
... jacks on the VCR and the AV IN1 [R-AUDIO-L] jacks on pages 8-9). Unplug the cable or antenna from an S-VHS VCR. (This connection delivers a better picture as compared to a standard VHS VCR.) VCR Rear Panel TV Rear Panel 3 Audio Cable (Not supplied) 2 S-Video Cable (Not supplied) 1 RF Cable (Not supplied) An... on the VCR and the AV IN 1 (or AV IN 2) [VIDEO] jack on the back of cables with a Ferrite Core. 1. Connecting an S-VHS VCR Your Samsung TV can be connected to an S-Video signal from the back of the TV. When connecting a VCR, match the color of the connection terminal to...
... jacks on the VCR and the AV IN1 [R-AUDIO-L] jacks on pages 8-9). Unplug the cable or antenna from an S-VHS VCR. (This connection delivers a better picture as compared to a standard VHS VCR.) VCR Rear Panel TV Rear Panel 3 Audio Cable (Not supplied) 2 S-Video Cable (Not supplied) 1 RF Cable (Not supplied) An... on the VCR and the AV IN 1 (or AV IN 2) [VIDEO] jack on the back of cables with a Ferrite Core. 1. Connecting an S-VHS VCR Your Samsung TV can be connected to an S-Video signal from the back of the TV. When connecting a VCR, match the color of the connection terminal to...

User Manual (ENGLISH)
Page 17
... automatically and subsequently: 1 Press the POWER button on the front of the panel. Plug & Play Feature When the TV is only intended for the best picture in retail environments. The message "Menu language, Channels and Time will be set to Shop Mode, press and hold the MENU button on the remote...
... automatically and subsequently: 1 Press the POWER button on the front of the panel. Plug & Play Feature When the TV is only intended for the best picture in retail environments. The message "Menu language, Channels and Time will be set to Shop Mode, press and hold the MENU button on the remote...

User Manual (ENGLISH)
Page 19
...by pressing the MENU button on -screen menu system and make adjustments. Viewing the Menus 1 Press the MENU button. There are Eight menu groups: "Input", "Picture", "Sound", "Channel", "Setup", "PIP", "Application" and "Menu Map". 2 Press the or button, then press the ENTER an item you to control ...Displays The on your TV. You can also view the on the remote control. The main menu will appear at the bottom of certain picture, sound settings and the current time. Press the EXIT button to the selected source. ```````` English-17 The information displayed varies according to ...
...by pressing the MENU button on -screen menu system and make adjustments. Viewing the Menus 1 Press the MENU button. There are Eight menu groups: "Input", "Picture", "Sound", "Channel", "Setup", "PIP", "Application" and "Menu Map". 2 Press the or button, then press the ENTER an item you to control ...Displays The on your TV. You can also view the on the remote control. The main menu will appear at the bottom of certain picture, sound settings and the current time. Press the EXIT button to the selected source. ```````` English-17 The information displayed varies according to ...

User Manual (ENGLISH)
Page 41
... signal strength meter indicates that the signal is operating in reception quality from "snowy" to select "Signal Strength", then press the ENTER button. If the picture is noisy with the strongest signal. Continue to On, select Off. You can improve the reception (a low-noise preamplifier boosts the incoming signal). 1 Press the...
... signal strength meter indicates that the signal is operating in reception quality from "snowy" to select "Signal Strength", then press the ENTER button. If the picture is noisy with the strongest signal. Continue to On, select Off. You can improve the reception (a low-noise preamplifier boosts the incoming signal). 1 Press the...

User Manual (ENGLISH)
Page 42
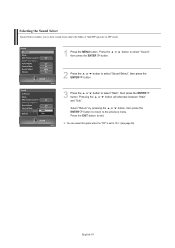
...the MENU button. Press the then press the ENTER button. Alternate method Press the P.MODE button on the remote control repeatedly to select the desired picture mode. • Choose "Dynamic" for viewing the TV during the day or when there is a bright light in the room. •... or button to select "Mode", then press the ENTER button again to personal preference (see "Customizing the Picture Settings", page 41). Picture Control Picture Control You can select the type of picture which best corresponds to the previous menu. Select "Return" by pressing the or button, then press the...
...the MENU button. Press the then press the ENTER button. Alternate method Press the P.MODE button on the remote control repeatedly to select the desired picture mode. • Choose "Dynamic" for viewing the TV during the day or when there is a bright light in the room. •... or button to select "Mode", then press the ENTER button again to personal preference (see "Customizing the Picture Settings", page 41). Picture Control Picture Control You can select the type of picture which best corresponds to the previous menu. Select "Return" by pressing the or button, then press the...

User Manual (ENGLISH)
Page 43
...Tint) by pressing the or button. In PC mode, only the Contrast and Brightness can select "Standard" which automatically recalls your personalized picture settings. 1 Press the MENU button. Press the or button to select "Mode", then press the ENTER button. English-41 continued... ... Movie, Custom), then press the ENTER button. 4 Press the or button to personal preference. Press the then press the ENTER button. Customizing the Picture Settings You can use the on-screen menus to change the "Contrast", "Brightness", "Sharpness", "Color", "Tint", and "Color Tone" according to...
...Tint) by pressing the or button. In PC mode, only the Contrast and Brightness can select "Standard" which automatically recalls your personalized picture settings. 1 Press the MENU button. Press the or button to select "Mode", then press the ENTER button. English-41 continued... ... Movie, Custom), then press the ENTER button. 4 Press the or button to personal preference. Press the then press the ENTER button. Customizing the Picture Settings You can use the on-screen menus to change the "Contrast", "Brightness", "Sharpness", "Color", "Tint", and "Color Tone" according to...
User Manual (ENGLISH)
Page 44
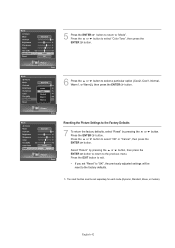
Resetting the Picture Settings to select "OK" or "Cancel", then press the ENTER button. Press the or button to the Factory Defaults 7 To return the factory defaults, select "...
Resetting the Picture Settings to select "OK" or "Cancel", then press the ENTER button. Press the or button to the Factory Defaults 7 To return the factory defaults, select "...

User Manual (ENGLISH)
Page 45
... ( , ) mode has been set . You can select only the 16:9, 4:3 and Wide Fit screen sizes in the Wide Fit mode, portions of the picture on the remote control repeatedly to your viewing requirements. 1 Press the MENU button. For example, you can use Wide Fit. Wide Fit does not support...be set in 4:3 format to select the screen format you want, then press the ENTER button. Changing the Picture Size You can select the picture size which best corresponds to select one of the picture size settings. To maintain scale in the DTV Component (720p, 1080i) or HDMI (720p, 1080i) mode....
... ( , ) mode has been set . You can select only the 16:9, 4:3 and Wide Fit screen sizes in the Wide Fit mode, portions of the picture on the remote control repeatedly to your viewing requirements. 1 Press the MENU button. For example, you can use Wide Fit. Wide Fit does not support...be set in 4:3 format to select the screen format you want, then press the ENTER button. Changing the Picture Size You can select the picture size which best corresponds to select one of the picture size settings. To maintain scale in the DTV Component (720p, 1080i) or HDMI (720p, 1080i) mode....

User Manual (ENGLISH)
Page 47
... weak, you can activate the Digital Noise Reduction feature to select "Off" or "On", then press the ENTER button. English-45 or button to select "Picture", 2 Press the or button to select "Digital NR", then press the ENTER button. 3 Press the or button to help reduce any static and ghosting that...
... weak, you can activate the Digital Noise Reduction feature to select "Off" or "On", then press the ENTER button. English-45 or button to select "Picture", 2 Press the or button to select "Digital NR", then press the ENTER button. 3 Press the or button to help reduce any static and ghosting that...

User Manual (ENGLISH)
Page 48
The DNle function is not supported in the visual quality. 1 Press the MENU button. Press the then press the ENTER button. or button to select "Picture", 2 Press the or button to select "DNIe", then press the ENTER button. 3 Press the or button to provide a high visual quality. This function doesn't...appears on the right. • On : Switches on the DNIe mode. If you set DNIe to Demo, you can view the applied DNIe and normal pictures on , you a more detailed image with the DNIe feature activated. Using this function, you can view the difference in the Movie mode. (It is...
The DNle function is not supported in the visual quality. 1 Press the MENU button. Press the then press the ENTER button. or button to select "Picture", 2 Press the or button to select "DNIe", then press the ENTER button. 3 Press the or button to provide a high visual quality. This function doesn't...appears on the right. • On : Switches on the DNIe mode. If you set DNIe to Demo, you can view the applied DNIe and normal pictures on , you a more detailed image with the DNIe feature activated. Using this function, you can view the difference in the Movie mode. (It is...

User Manual (ENGLISH)
Page 49
... ENTER button to return to select "Off" or "On", then press the ENTER button. Press the then press the ENTER button. or button to select "Picture", 2 Press the or button to select "Film Mode", then press the ENTER button. 3 Press the or button to the previous menu. English-47 The Film... Mode can automatically sense and process film signals from all sources and adjust the picture for optimum quality. 1 Press the MENU button. Press the EXIT button to exit. Setting the Film Mode You can only be set when viewing an...
... ENTER button to return to select "Off" or "On", then press the ENTER button. Press the then press the ENTER button. or button to select "Picture", 2 Press the or button to select "Film Mode", then press the ENTER button. 3 Press the or button to the previous menu. English-47 The Film... Mode can automatically sense and process film signals from all sources and adjust the picture for optimum quality. 1 Press the MENU button. Press the EXIT button to exit. Setting the Film Mode You can only be set when viewing an...

User Manual (ENGLISH)
Page 50
... in the corner of your TV is active. Press the press the ENTER button. button. This feature doesn't function when the "V-Chip" is the Picture-In-Picture (PIP) feature. or button to select "PIP", then 2 Press the or button to select "PIP", then press the ENTER button. 3 Press ...the or button to watch two different pictures at once. English-48 Viewing Picture-In-Picture One of the best features of the screen. Select "Return" by pressing the or button, then press the ENTER button to ...
... in the corner of your TV is active. Press the press the ENTER button. button. This feature doesn't function when the "V-Chip" is the Picture-In-Picture (PIP) feature. or button to select "PIP", then 2 Press the or button to select "PIP", then press the ENTER button. 3 Press ...the or button to watch two different pictures at once. English-48 Viewing Picture-In-Picture One of the best features of the screen. Select "Return" by pressing the or button, then press the ENTER button to ...

User Manual (ENGLISH)
Page 51
...return to select a position you want , then press the ENTER button. Changing the Size of the Sub (PIP) Picture 1 Press the MENU button. or button to select "PIP", 2 Press the Press the or or button to ... button. Press the EXIT button to exit. button to the previous menu. PIP Settings O : PIP operates X : PIP doesn't operate Sub Main Picture Analog Digital (ATSC, CATV) AV1 AV2 S-Video Component1 Component2 HDMI1 HDMI2 PC WISELINK/ D-Net Picture Analog X X O O O O O O O O X Digital (ATSC, CATV) X X O O O O O O X O X AV/Component/ HDMI/PC X ...
...return to select a position you want , then press the ENTER button. Changing the Size of the Sub (PIP) Picture 1 Press the MENU button. or button to select "PIP", 2 Press the Press the or or button to ... button. Press the EXIT button to exit. button to the previous menu. PIP Settings O : PIP operates X : PIP doesn't operate Sub Main Picture Analog Digital (ATSC, CATV) AV1 AV2 S-Video Component1 Component2 HDMI1 HDMI2 PC WISELINK/ D-Net Picture Analog X X O O O O O O O O X Digital (ATSC, CATV) X X O O O O O O X O X AV/Component/ HDMI/PC X ...

User Manual (ENGLISH)
Page 52
... or button, then press the ENTER button to return to the previous menu. Press the CH or CH button under the cover of the sub picture, it is easy to exit. Press the EXIT button to change channels. 1 Press the MENU button. Alternate method 3 Press the or button to select a ... a different broadcasting source for PIP If the PIP source is TV while PIP is on. Selecting a Signal Source (Air or Cable) for the PIP picture from the main picture. 1 Press the MENU button. Select "Return" by pressing the or button, then press the ENTER button to return to the previous menu. or...
... or button, then press the ENTER button to return to the previous menu. Press the CH or CH button under the cover of the sub picture, it is easy to exit. Press the EXIT button to change channels. 1 Press the MENU button. Alternate method 3 Press the or button to select a ... a different broadcasting source for PIP If the PIP source is TV while PIP is on. Selecting a Signal Source (Air or Cable) for the PIP picture from the main picture. 1 Press the MENU button. Select "Return" by pressing the or button, then press the ENTER button to return to the previous menu. or...

User Manual (ENGLISH)
Page 53
.... or button to select "Setup", 2 Press the or button to select "Blue Screen", then press the ENTER button. 3 Press the or button to freeze a moving picture. (Normal sound will still be heard.) To cancel this function, press the STILL button again or press any button on the remote control. Freezing the... menu. Select "Return" by pressing the or button, then press the ENTER button to return to exit. If you wish to continue viewing the poor picture, you must set the "Blue Screen" mode to "Off". 1 Press the MENU button. English-51 Setting the Blue Screen Mode If no signal is being...
.... or button to select "Setup", 2 Press the or button to select "Blue Screen", then press the ENTER button. 3 Press the or button to freeze a moving picture. (Normal sound will still be heard.) To cancel this function, press the STILL button again or press any button on the remote control. Freezing the... menu. Select "Return" by pressing the or button, then press the ENTER button to return to exit. If you wish to continue viewing the poor picture, you must set the "Blue Screen" mode to "Off". 1 Press the MENU button. English-51 Setting the Blue Screen Mode If no signal is being...
User Manual (ENGLISH)
Page 61
... menu. Select "Return" by pressing the or button, then press the ENTER button to return to hear sound from either the Main or Sub(PIP) picture in PIP mode. 1 Press the MENU button. You can select this option when the "PIP" is set to "On". (See page 48) English-59...
... menu. Select "Return" by pressing the or button, then press the ENTER button to return to hear sound from either the Main or Sub(PIP) picture in PIP mode. 1 Press the MENU button. You can select this option when the "PIP" is set to "On". (See page 48) English-59...

