

User Manual
Page 1
User Manual ME40A ME46A ME55A UE46A UE55A The color and the appearance may differ depending on the product, and the specifications are subject to change without prior notice to improve the performance. BN46-00103A-03
User Manual ME40A ME46A ME55A UE46A UE55A The color and the appearance may differ depending on the product, and the specifications are subject to change without prior notice to improve the performance. BN46-00103A-03
User Manual
Page 2
Use or reproduction of this manual. The SAMSUNG and SyncMaster logos are registered trademarks of the Video Electronics Standards Association. VESA, DPM and DDC are registered trademarks of Samsung Electronics. Ownership of all other trademarks is attributed to their due owner. An ... or home visit is carried out. 2 Before Using the Product b 2011 Samsung Electronics Samsung Electronics owns the copyright for this manual in parts or entirety without notice to read this user manual). The amount of Microsoft Corporation. Before Using the Product Copyright The...
Use or reproduction of this manual. The SAMSUNG and SyncMaster logos are registered trademarks of the Video Electronics Standards Association. VESA, DPM and DDC are registered trademarks of Samsung Electronics. Ownership of all other trademarks is attributed to their due owner. An ... or home visit is carried out. 2 Before Using the Product b 2011 Samsung Electronics Samsung Electronics owns the copyright for this manual in parts or entirety without notice to read this user manual). The amount of Microsoft Corporation. Before Using the Product Copyright The...

User Manual
Page 22
... be used to connect to the [RS232C OUT] port on the product. 22 1 Preparations Quick setup guide Warranty card (Not available in all locations) User manual MagicInfo Lite Edition Software CD POWER OFF SOURCE .QZ DEF 3 ABC MNO 2 6 JKL WXY 1 4 5 8 9 GHI TUV PRS SYMBOL ENTPERRE-CH 7 - 0 DEL -/-- Components Components may differ...
... be used to connect to the [RS232C OUT] port on the product. 22 1 Preparations Quick setup guide Warranty card (Not available in all locations) User manual MagicInfo Lite Edition Software CD POWER OFF SOURCE .QZ DEF 3 ABC MNO 2 6 JKL WXY 1 4 5 8 9 GHI TUV PRS SYMBOL ENTPERRE-CH 7 - 0 DEL -/-- Components Components may differ...

User Manual
Page 36
...; Do not fasten the screws too firmly. Screws that do not comply with the VESA standard screw specifications, the length of accidents. Samsung is not liable for product damage or personal injury when a non-VESA or non-specified wall mount is turned on. 1 Preparations Standard... dimensions for wall mount kits are shown in the table below. Samsung wall mount kits contain a detailed installation manual and all parts necessary for assembly are provided. Do not use screws that do not comply with the VESA standard...
...; Do not fasten the screws too firmly. Screws that do not comply with the VESA standard screw specifications, the length of accidents. Samsung is not liable for product damage or personal injury when a non-VESA or non-specified wall mount is turned on. 1 Preparations Standard... dimensions for wall mount kits are shown in the table below. Samsung wall mount kits contain a detailed installation manual and all parts necessary for assembly are provided. Do not use screws that do not comply with the VESA standard...

User Manual
Page 50
Audio 2.1.1 Pre-connection Checkpoints Before connecting a source device, read the user manual provided with other devices. Devices that can be connected to this product with it. The number and locations of ports on source devices may damage ...
Audio 2.1.1 Pre-connection Checkpoints Before connecting a source device, read the user manual provided with other devices. Devices that can be connected to this product with it. The number and locations of ports on source devices may damage ...
User Manual
Page 61
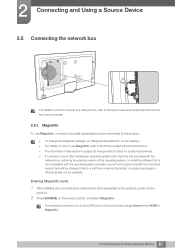
... Using a Source Device 2 Connecting and Using a Source Device 2.5 Connecting the network box For details on how to connect to a network box, refer to the user's manual provided with the network box upon purchase. 2.5.1 MagicInfo To use MagicInfo, refer to the DVD provided with the network box. The information in this...
... Using a Source Device 2 Connecting and Using a Source Device 2.5 Connecting the network box For details on how to connect to a network box, refer to the user's manual provided with the network box upon purchase. 2.5.1 MagicInfo To use MagicInfo, refer to the DVD provided with the network box. The information in this...

User Manual
Page 89
... the timer only one time. EveryDay: Activate the timer every day. Mon~Fri: Activate the timer from turning on Saturdays and Sundays. Manual: Customize days of holidays you to be enabled or disabled in the Timer settings menu. Add: You can specify holidays: Click the Add button...: View a list of the week. The checkboxes to select days of the week below Repeat are set to prevent devices that are enabled only if Manual is selected.
... the timer only one time. EveryDay: Activate the timer every day. Mon~Fri: Activate the timer from turning on Saturdays and Sundays. Manual: Customize days of holidays you to be enabled or disabled in the Timer settings menu. Add: You can specify holidays: Click the Add button...: View a list of the week. The checkboxes to select days of the week below Repeat are set to prevent devices that are enabled only if Manual is selected.

User Manual
Page 91
3 Using MDC The Safety Screen function can be used to adjust the backlight to Off. If Manual Lamp Control is adjusted, Auto Lamp Control will automatically switch to Off. Ambient Light: Ambient Light detects ambient light ...1 Security Panel Control Turn on the screen of a display device for the selected display. Lamp Control Lamp Control is adjusted, Manual Lamp Control will automatically switch to reduce power consumption. Manually adjust the backlight for an extended period of time. Remote Control Enable or disable the remote control. 91 3 Using MDC Automatically...
3 Using MDC The Safety Screen function can be used to adjust the backlight to Off. If Manual Lamp Control is adjusted, Auto Lamp Control will automatically switch to Off. Ambient Light: Ambient Light detects ambient light ...1 Security Panel Control Turn on the screen of a display device for the selected display. Lamp Control Lamp Control is adjusted, Manual Lamp Control will automatically switch to reduce power consumption. Manually adjust the backlight for an extended period of time. Remote Control Enable or disable the remote control. 91 3 Using MDC Automatically...

User Manual
Page 105
.... Some file format may not supported the "2D 3D." "Side by Side" format HDMI signal with the 3D input source. Manual: Manually adjust the perspective and depth settings. L/R Change (L/R Image / R/L Image): Swap the left and right pictures. 3D 2D (Off / On... Displays the images for the left eye only. Support resolution (16:9 only) 105 4 Screen Adjustment Displays two images next to Off and manually select a 3D Mode using the corresponding menu. 3D Optimize (or 3D Optimisation): The overall adjustment of 3D effect. This function ...
.... Some file format may not supported the "2D 3D." "Side by Side" format HDMI signal with the 3D input source. Manual: Manually adjust the perspective and depth settings. L/R Change (L/R Image / R/L Image): Swap the left and right pictures. 3D 2D (Off / On... Displays the images for the left eye only. Support resolution (16:9 only) 105 4 Screen Adjustment Displays two images next to Off and manually select a 3D Mode using the corresponding menu. 3D Optimize (or 3D Optimisation): The overall adjustment of 3D effect. This function ...
User Manual
Page 117
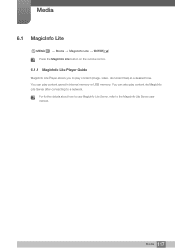
Media 6.1 MagicInfo Lite O MENU m Media MagicInfo Lite ENTER[ ] Press the MagicInfo Lite button on the remote control. 6.1.1 MagicInfo Lite Player Guide MagicInfo Lite Player allows you to play content saved in internal memory or USB memory. You can also play content via MagicInfo Lite Server after connecting to the MagicInfo Lite Server user manual. You can play content (image, video, document files) at a desired time. For further details about how to use MagicInfo Lite Server, refer to a network. Media 117
Media 6.1 MagicInfo Lite O MENU m Media MagicInfo Lite ENTER[ ] Press the MagicInfo Lite button on the remote control. 6.1.1 MagicInfo Lite Player Guide MagicInfo Lite Player allows you to play content saved in internal memory or USB memory. You can also play content via MagicInfo Lite Server after connecting to the MagicInfo Lite Server user manual. You can play content (image, video, document files) at a desired time. For further details about how to use MagicInfo Lite Server, refer to a network. Media 117

User Manual
Page 122
... press [ ]. 6.3.1 Viewing a Photo (or Slide Show) 1 Press the / / / button to select the desired file in the file list. 2 Press the [ ] button. To view files manually, one at a time, press the left or right arrow buttons. To start the slide show, press the [ Ü ] (Play) button when the file you...
... press [ ]. 6.3.1 Viewing a Photo (or Slide Show) 1 Press the / / / button to select the desired file in the file list. 2 Press the [ ] button. To view files manually, one at a time, press the left or right arrow buttons. To start the slide show, press the [ Ü ] (Play) button when the file you...

User Manual
Page 132
...also get the IP address, subnet mask, gateway, and DNS values, contact your Internet Service Provider (ISP). To set the connection manually, go to enter them manually. To get these steps. 7 Network access the Internet so you do not have a Windows computer, you can use various Internet... Use the Automatic Network Settings when connecting your product Cable Setup Screen when you must enter the IP address, subnet mask, gateway, and DNS values manually on your product to the Network Settings screen. 2 Select Wired, press [ ], and then press [ ] again. 3 The network test screen appears...
...also get the IP address, subnet mask, gateway, and DNS values, contact your Internet Service Provider (ISP). To set the connection manually, go to enter them manually. To get these steps. 7 Network access the Internet so you do not have a Windows computer, you can use various Internet... Use the Automatic Network Settings when connecting your product Cable Setup Screen when you must enter the IP address, subnet mask, gateway, and DNS values manually on your product to the Network Settings screen. 2 Select Wired, press [ ], and then press [ ] again. 3 The network test screen appears...
User Manual
Page 133
... are displayed. The IP Settings screen appears. 4 Select the field at the bottom of the screen. 2 In the pop-up your product cable network connection manually, follow these steps. 1 Right click the Network icon on the bottom right of the page, and then press [ ]. You can also press the up or... go to the IP Address entry field, and then press [ ]. 6 Enter the first portion of the IP Address. How to set up manually To set IP Mode to Manual. 5 Press the button on your remote to go to the next field. 7 Enter the next portion of the IP Address into the first...
... are displayed. The IP Settings screen appears. 4 Select the field at the bottom of the screen. 2 In the pop-up your product cable network connection manually, follow these steps. 1 Right click the Network icon on the bottom right of the page, and then press [ ]. You can also press the up or... go to the IP Address entry field, and then press [ ]. 6 Enter the first portion of the IP Address. How to set up manually To set IP Mode to Manual. 5 Press the button on your remote to go to the next field. 7 Enter the next portion of the IP Address into the first...

User Manual
Page 134
...supports the IEEE 802.11a/b/g and n communication protocols. If the channel set to WEP, TKIP or TKIP AES (WPS2Mixed) on before you connect the Samsung Wireless LAN adapter. Connection Methods: You can setup the wireless network connection in either a router or a modem). 7 Network 7.1.3 Connecting ...wireless IP sharer that is turned on your AP or wireless router, Samsung product will automatically configure the SSID and WPA key in five ways: Auto Setup (Using the Auto Network Search function) Manual Setup 7 Network 134 When you can use a DHCP or static...
...supports the IEEE 802.11a/b/g and n communication protocols. If the channel set to WEP, TKIP or TKIP AES (WPS2Mixed) on before you connect the Samsung Wireless LAN adapter. Connection Methods: You can setup the wireless network connection in either a router or a modem). 7 Network 7.1.3 Connecting ...wireless IP sharer that is turned on your AP or wireless router, Samsung product will automatically configure the SSID and WPA key in five ways: Auto Setup (Using the Auto Network Search function) Manual Setup 7 Network 134 When you can use a DHCP or static...

User Manual
Page 135
... on your remote to select number/ characters. 7 Network Ad Hoc WPS (PBC) One Foot Connection The product may not recognize the Samsung Wireless LAN adapter if you connect it displays a list of the available networks. 4 In the list of networks, press the or button to enter the...
... on your remote to select number/ characters. 7 Network Ad Hoc WPS (PBC) One Foot Connection The product may not recognize the Samsung Wireless LAN adapter if you connect it displays a list of the available networks. 4 In the list of networks, press the or button to enter the...

User Manual
Page 136
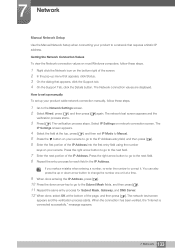
... key to establish the connection. 5 If the Enter security key screen appears, go to the next section, "How to set up manually". Manual Network Setup Use the Manual Network Setup when connecting your remote. You should be able to find the Pass Phrase on the bottom right of networks, ...most Windows computers, follow these steps: 1 Right click the Network icon on one of the set up screens you want to set up the connection manually, select IP Settings. Press [ ] to enter the characters. You can also enter numbers by pressing the number buttons on the network ...
... key to establish the connection. 5 If the Enter security key screen appears, go to the next section, "How to set up manually". Manual Network Setup Use the Manual Network Setup when connecting your remote. You should be able to find the Pass Phrase on the bottom right of networks, ...most Windows computers, follow these steps: 1 Right click the Network icon on one of the set up screens you want to set up the connection manually, select IP Settings. Press [ ] to enter the characters. You can also enter numbers by pressing the number buttons on the network ...

User Manual
Page 143
... using the Timer function. 8.2.1 Clock set the product to use On Timer. Setup: Select Off, Once, Everyday, Mon~Fri, Mon~Sat, Sat~Sun or Manual. Use the left and right arrow buttons to move from one entry field to select a period of the product. To exit Clock Set, select Close... 3) You must set the clock again. Changing the Setting for Clock Clock Set Set the Date and Time. Select Clock Set. If you select Manual, you can choose the days you have to enter numbers or press the up and down arrow buttons. 8 System 8.2 Time O MENU m System Time ENTER You...
... using the Timer function. 8.2.1 Clock set the product to use On Timer. Setup: Select Off, Once, Everyday, Mon~Fri, Mon~Sat, Sat~Sun or Manual. Use the left and right arrow buttons to move from one entry field to select a period of the product. To exit Clock Set, select Close... 3) You must set the clock again. Changing the Setting for Clock Clock Set Set the Date and Time. Select Clock Set. If you select Manual, you can choose the days you have to enter numbers or press the up and down arrow buttons. 8 System 8.2 Time O MENU m System Time ENTER You...
User Manual
Page 144
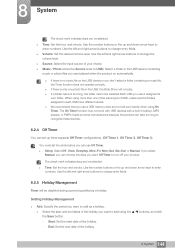
... recognize these devices. 8.2.4 Off Timer You can use Off Timer. Setup: Select Off, Once, Everyday, Mon~Fri, Mon~Sat, Sat~Sun or Manual. If you select Manual, you can choose the days you 've selected. Time: Set the hour and minute. Setting Holiday Management Add: Specify the period you...
... recognize these devices. 8.2.4 Off Timer You can use Off Timer. Setup: Select Off, Once, Everyday, Mon~Fri, Mon~Sat, Sat~Sun or Manual. If you select Manual, you can choose the days you 've selected. Time: Set the hour and minute. Setting Holiday Management Add: Specify the period you...
User Manual
Page 146
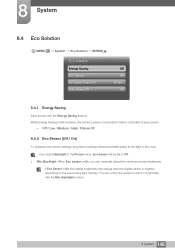
... sensor is On, you adjust Backlight in the Picture menu, Eco Sensor will automatically adapt to Off. Min. Backlight function. 8 System 146 You can manually adjust the minimum screen brightness. If Eco Sensor is active, the product power consumption will be controlled to save power. Off / Low / Medium / High...
... sensor is On, you adjust Backlight in the Picture menu, Eco Sensor will automatically adapt to Off. Min. Backlight function. 8 System 146 You can manually adjust the minimum screen brightness. If Eco Sensor is active, the product power consumption will be controlled to save power. Off / Low / Medium / High...
User Manual
Page 158
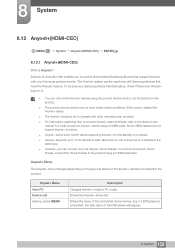
...system can connect only one Anynet+ Home Theater. Anynet+ Menu View PC Device List (device_name) MENU Description Changes Anynet+ mode to the device's user manual You must connect an Anynet+ device using an HDMI cable then. Anynet+ is in the standby or on the type and status of the connected...+(HDMI-CEC) ENTER 8.12.1 Anynet+(HDMI-CEC) What is connected, the disc menu of the same type. However, you can be sure your Samsung product remote. if a DVD player is Anynet+? Note that have the Anynet+ feature. To connect an Anynet+ Home Theate, connect the Home Theater to 3...
...system can connect only one Anynet+ Home Theater. Anynet+ Menu View PC Device List (device_name) MENU Description Changes Anynet+ mode to the device's user manual You must connect an Anynet+ device using an HDMI cable then. Anynet+ is in the standby or on the type and status of the connected...+(HDMI-CEC) ENTER 8.12.1 Anynet+(HDMI-CEC) What is connected, the disc menu of the same type. However, you can be sure your Samsung product remote. if a DVD player is Anynet+? Note that have the Anynet+ feature. To connect an Anynet+ Home Theate, connect the Home Theater to 3...