

Universal Print Driver Guide (user Manual) (ver.2.00) (English)
Page 4
... autorun or Add printer • Install via executing the installer file. The Samsung Universal Print Driver is automatically set to 2 GB Pentium IV 1 GHz (Pentium IV 2 GHz) 512 MB (2 GB) 10 GB Pentium IV 1 GHz (x86) or 1.4 GHz (x64) processors (... or faster) 512 MB (2 GB) 10 GB Introduction_ 4 For unsupported Samsung models, driver is a single driver that are as follows: OPERATING SYSTEM CPU REQUIREMENTS (RECOMMONDED) RAM FREE HDD SPACE Windows Vista Windows XP Windows 2000 Windows 7 Windows Server 2003 Windows Server 2008 Windows Server 2008 (R2) Pentium IV 3 GHz...
... autorun or Add printer • Install via executing the installer file. The Samsung Universal Print Driver is automatically set to 2 GB Pentium IV 1 GHz (Pentium IV 2 GHz) 512 MB (2 GB) 10 GB Pentium IV 1 GHz (x86) or 1.4 GHz (x64) processors (... or faster) 512 MB (2 GB) 10 GB Introduction_ 4 For unsupported Samsung models, driver is a single driver that are as follows: OPERATING SYSTEM CPU REQUIREMENTS (RECOMMONDED) RAM FREE HDD SPACE Windows Vista Windows XP Windows 2000 Windows 7 Windows Server 2003 Windows Server 2008 Windows Server 2008 (R2) Pentium IV 3 GHz...

Universal Print Driver Guide (user Manual) (ver.2.00) (English)
Page 10
... you print: The Samsung Universal Print Driver window appears every time you print. • Only the first time you print: The Samsung Universal Print Driver window appears only for the first time when Samsung Universal Print Driver is selected as the printer from an application. 3. Click OK. 1. Using the Samsung Universal Print Driver_ 10 Click the Settings...
... you print: The Samsung Universal Print Driver window appears every time you print. • Only the first time you print: The Samsung Universal Print Driver window appears only for the first time when Samsung Universal Print Driver is selected as the printer from an application. 3. Click OK. 1. Using the Samsung Universal Print Driver_ 10 Click the Settings...

Universal Print Driver Guide (user Manual) (ver.2.00) (Korean)
Page 11
2 Samsung 3 TCP/IP 1. Samsung Universal Print Driver 3 Samsung Universal Print Driver 4 Samsung Universal Print Driver 10쪽 참조). TCP/IP TCP/IP IP IP 1. Windows 2. Samsung Universal Print Driver 3 Samsung Universal Print Driver 4 5 IP IP 6 Samsung Universal Print Driver 사용_ 11 Windows 2.
2 Samsung 3 TCP/IP 1. Samsung Universal Print Driver 3 Samsung Universal Print Driver 4 Samsung Universal Print Driver 10쪽 참조). TCP/IP TCP/IP IP IP 1. Windows 2. Samsung Universal Print Driver 3 Samsung Universal Print Driver 4 5 IP IP 6 Samsung Universal Print Driver 사용_ 11 Windows 2.

Service Manual
Page 5
... when moving the machine. (9) Caution when thundering, and being flash of lightening. (10) Do avoid the place where is possible to remove dust. Do not install the ... time, the machine cannot work properly because inner temperature of the machine. Service Manual 1-2 Samsung Electronics Precautions 1.2 Caution for safety 1.2.1 Precaution related noxious material The toner in a printer ...fire or electric shock can be replaced immediately. Do not install the printer near to window where directly contacts to thinner(weak) cover of the toner cartridge. 1.2.2 Precaution related electric...
... when moving the machine. (9) Caution when thundering, and being flash of lightening. (10) Do avoid the place where is possible to remove dust. Do not install the ... time, the machine cannot work properly because inner temperature of the machine. Service Manual 1-2 Samsung Electronics Precautions 1.2 Caution for safety 1.2.1 Precaution related noxious material The toner in a printer ...fire or electric shock can be replaced immediately. Do not install the printer near to window where directly contacts to thinner(weak) cover of the toner cartridge. 1.2.2 Precaution related electric...
Service Manual
Page 15
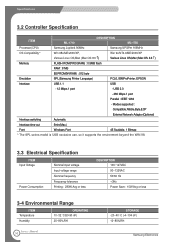
... Parallel : IEEE 1284 - Specifications 3.2 Controller Specification ITEM ML-1710 DESCRIPTION ML-1750 Processor(CPU) Samsung Jupiter4 90MHz Samsung SPGPm 166MHz OS Compatibility(1) Win 98x/ME/2000/XP,...SPL(Samsung Printer Language) PCL6, IBMProPrinter, EPSON Interface USB 1.1 USB - 12 Mbps 1 port - Modes supported : Compatible,Nibble,Byte,ECP External Network Adaptor(Optional) Interface switching Automatic Interface time-out 5min(Max.) Font Windows Font...Environmental Range ITEM Temperature Humidity OPERATING 10~32 oC(50-90 oF) 20~80%RH Service Manual 3-2 STORAGE -20~40...
... Parallel : IEEE 1284 - Specifications 3.2 Controller Specification ITEM ML-1710 DESCRIPTION ML-1750 Processor(CPU) Samsung Jupiter4 90MHz Samsung SPGPm 166MHz OS Compatibility(1) Win 98x/ME/2000/XP,...SPL(Samsung Printer Language) PCL6, IBMProPrinter, EPSON Interface USB 1.1 USB - 12 Mbps 1 port - Modes supported : Compatible,Nibble,Byte,ECP External Network Adaptor(Optional) Interface switching Automatic Interface time-out 5min(Max.) Font Windows Font...Environmental Range ITEM Temperature Humidity OPERATING 10~32 oC(50-90 oF) 20~80%RH Service Manual 3-2 STORAGE -20~40...

User Manual (user Manual) (ver.1.00) (English)
Page 4
...(Face up) ....... 3.6 Loading Paper 3.7 Using the Tray 3.7 Using the Manual Feeder 3.8 Printing on Envelopes 3.10 Printing on Labels 3.12 Printing on Transparencies 3.13 Printing on Card Stock or Custom-sized Materials 3.15 Printing on ...Setting Paper Properties 4.6 Using the Toner Save Mode 4.8 Printing Multiple Pages on One Sheet of Paper (N-Up Printing 4.10 Scaling Your Document 4.12 Fitting Your Document to a Selected Paper Size ...... 4.13 Printing Posters 4.14 Setting Graphic ... Monitor 4.26 Setting Up Locally Shared Printer 4.28 Windows 9x/Me 4.28 Windows NT/2000/XP 4.29 iii
...(Face up) ....... 3.6 Loading Paper 3.7 Using the Tray 3.7 Using the Manual Feeder 3.8 Printing on Envelopes 3.10 Printing on Labels 3.12 Printing on Transparencies 3.13 Printing on Card Stock or Custom-sized Materials 3.15 Printing on ...Setting Paper Properties 4.6 Using the Toner Save Mode 4.8 Printing Multiple Pages on One Sheet of Paper (N-Up Printing 4.10 Scaling Your Document 4.12 Fitting Your Document to a Selected Paper Size ...... 4.13 Printing Posters 4.14 Setting Graphic ... Monitor 4.26 Setting Up Locally Shared Printer 4.28 Windows 9x/Me 4.28 Windows NT/2000/XP 4.29 iii
User Manual (user Manual) (ver.1.00) (English)
Page 5
...12 Solving Print Quality Problems 6.12 Print Quality Checklist 6.12 Solving Print Quality Problems 6.13 Troubleshooting Error Messages 6.18 Common Windows Problems 6.19 Common Linux Problems 6.20 Common DOS problem 6.23 Chapter 7: APPENDIX Using Your Printer in Linux 7.2 Installing the... Printer Driver 7.2 Changing the Printer Connection Method 7.6 Using the Configuration Tool 7.8 Changing LLPR Properties 7.10 Printing from DOS Applications 7.12 About the Remote Control Panel 7.12 Installing the Remote Control Panel 7.12 Selecting Print Settings 7.14...
...12 Solving Print Quality Problems 6.12 Print Quality Checklist 6.12 Solving Print Quality Problems 6.13 Troubleshooting Error Messages 6.18 Common Windows Problems 6.19 Common Linux Problems 6.20 Common DOS problem 6.23 Chapter 7: APPENDIX Using Your Printer in Linux 7.2 Installing the... Printer Driver 7.2 Changing the Printer Connection Method 7.6 Using the Configuration Tool 7.8 Changing LLPR Properties 7.10 Printing from DOS Applications 7.12 About the Remote Control Panel 7.12 Installing the Remote Control Panel 7.12 Selecting Print Settings 7.14...
User Manual (user Manual) (ver.1.00) (English)
Page 29
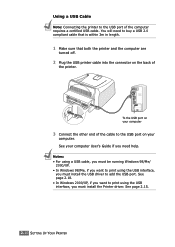
... off. 2 Plug the USB printer cable into the connector on your computer. Notes: • For using a USB cable, you must be running Windows 98/Me/ 2000/XP. • In Windows 98/Me, if you want to print using the USB interface, you must install the USB driver to the USB port of... the printer. See page 2.18. • In Windows 2000/XP, if you want to print using the USB interface, you must install the Printer driver. See page 2.15. 2.10 SETTING UP YOUR PRINTER You will need help. To the USB port on the back...
... off. 2 Plug the USB printer cable into the connector on your computer. Notes: • For using a USB cable, you must be running Windows 98/Me/ 2000/XP. • In Windows 98/Me, if you want to print using the USB interface, you must install the USB driver to the USB port of... the printer. See page 2.18. • In Windows 2000/XP, if you want to print using the USB interface, you must install the Printer driver. See page 2.15. 2.10 SETTING UP YOUR PRINTER You will need help. To the USB port on the back...

User Manual (user Manual) (ver.1.00) (English)
Page 37
...Driver in the CD-ROM drive and check Search for the best driver for the CD-ROM drive). Click Next. 3 Place the CD-ROM in Windows 98/Me 1 Connect the printer to your device and click Next. 4 Check CD-ROM drive and click Browse, and choose x:\USB (where ...x is completed, click Finish. 7 When the language selection window appears, select the appropriate language. For detailed information, see page 2.10. 2 The Add New Hardware Wizard window appears. Note: If you already installed the printer software, this screen doesn't appear. 2.18 SETTING UP...
...Driver in the CD-ROM drive and check Search for the best driver for the CD-ROM drive). Click Next. 3 Place the CD-ROM in Windows 98/Me 1 Connect the printer to your device and click Next. 4 Check CD-ROM drive and click Browse, and choose x:\USB (where ...x is completed, click Finish. 7 When the language selection window appears, select the appropriate language. For detailed information, see page 2.10. 2 The Add New Hardware Wizard window appears. Note: If you already installed the printer software, this screen doesn't appear. 2.18 SETTING UP...
User Manual (user Manual) (ver.1.00) (English)
Page 49
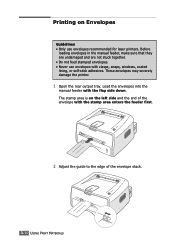
... the envelopes into the manual feeder with the flap side down. The stamp area is on Envelopes Guidelines • Only use envelopes with clasps, snaps, windows, coated lining, or self-stick adhesives. Printing on the left side and the end of the envelope with the stamp area enters the feeder first.... 2 Adjust the guide to the edge of the envelope stack. 3.10 USING PRINT MATERIALS Before loading envelopes in the manual feeder, make sure that they are undamaged and are not stuck together. • Do not feed...
... the envelopes into the manual feeder with the flap side down. The stamp area is on Envelopes Guidelines • Only use envelopes with clasps, snaps, windows, coated lining, or self-stick adhesives. Printing on the left side and the end of the envelope with the stamp area enters the feeder first.... 2 Adjust the guide to the edge of the envelope stack. 3.10 USING PRINT MATERIALS Before loading envelopes in the manual feeder, make sure that they are undamaged and are not stuck together. • Do not feed...

User Manual (user Manual) (ver.1.00) (English)
Page 87
8 Select Local Port, and click New Port. 9 Fill in the Enter a port name field, and enter the shared name. 10 Click OK, and click Close. 11 Click OK. (Windows NT) Click Apply, and click OK. (Windows 2000/XP) 4.30 PRINTING TASKS
8 Select Local Port, and click New Port. 9 Fill in the Enter a port name field, and enter the shared name. 10 Click OK, and click Close. 11 Click OK. (Windows NT) Click Apply, and click OK. (Windows 2000/XP) 4.30 PRINTING TASKS

User Manual (user Manual) (ver.1.00) (English)
Page 116
...programs responsible for implementing them from the defaults, to the Adobe Document Structing Conventions. Legacy BSD lpr systems have a hard limitation on a Windows machine), you selected a number of different options, the length of the options may not print correctly. Some pages come out all If ...the length of my documents. correctly. I am using have a correct installation of CUPS (1.1.10 and before passing the job on memory usage. In that case, you leave the LLPR option to its windows won 't be frozen (its default Portrait setting, to take effect. Since LLPR is ...
...programs responsible for implementing them from the defaults, to the Adobe Document Structing Conventions. Legacy BSD lpr systems have a hard limitation on a Windows machine), you selected a number of different options, the length of the options may not print correctly. Some pages come out all If ...the length of my documents. correctly. I am using have a correct installation of CUPS (1.1.10 and before passing the job on memory usage. In that case, you leave the LLPR option to its windows won 't be frozen (its default Portrait setting, to take effect. Since LLPR is ...

User Manual (user Manual) (ver.1.00) (English)
Page 124
... may not appear depending on the printing system in use. 11 To exit, click OK. 12 When the window prompts that the printer port is successfully configured, click OK. 13 The Linux Printer Configuration window re-appears. If necessary, you can view the information about changing the printer configuration, see "Using the... tab and ensure that the new printer is set properly. If not proper, change the printer configuration. If necessary, you can change the device setting. 10 You can change the settings.
... may not appear depending on the printing system in use. 11 To exit, click OK. 12 When the window prompts that the printer port is successfully configured, click OK. 13 The Linux Printer Configuration window re-appears. If necessary, you can view the information about changing the printer configuration, see "Using the... tab and ensure that the new printer is set properly. If not proper, change the printer configuration. If necessary, you can change the device setting. 10 You can change the settings.

User Manual (user Manual) (ver.1.00) (English)
Page 129
To open , select Test Print from the Print menu. 7.10 APPENDIX You can fine tune the printer's properties by using the following: • Click the Startup Menu icon at the bottom of the screen and select Linux Printer and then Linux LPR. • If the Linux Printer Configuration window is currently open the LLPR Properties window: 1 From the application you are using, select the Print command. 2 When the Linux LPR window opens, click Properties. Changing LLPR Properties You can also open the LLPR window by opening the LLPR Properties window.
To open , select Test Print from the Print menu. 7.10 APPENDIX You can fine tune the printer's properties by using the following: • Click the Startup Menu icon at the bottom of the screen and select Linux Printer and then Linux LPR. • If the Linux Printer Configuration window is currently open the LLPR Properties window: 1 From the application you are using, select the Print command. 2 When the Linux LPR window opens, click Properties. Changing LLPR Properties You can also open the LLPR window by opening the LLPR Properties window.


