

User Manual (ENGLISH)
Page 3
... 2.4 Loading Paper 2.6 Changing the Paper Size in the Tray 2.8 Connecting a Printer Cable 2.10 For Local Printing 2.10 For Network Printing 2.12 Turning the Printer On 2.13 Printing a Demo Page 2.14 Changing the Display Language 2.14 Installing Printer Software 2.15 Printer Driver Features 2.16 Installing Printer Software in Windows 2.17 Installing the USB Driver in Windows 98/Me...
... 2.4 Loading Paper 2.6 Changing the Paper Size in the Tray 2.8 Connecting a Printer Cable 2.10 For Local Printing 2.10 For Network Printing 2.12 Turning the Printer On 2.13 Printing a Demo Page 2.14 Changing the Display Language 2.14 Installing Printer Software 2.15 Printer Driver Features 2.16 Installing Printer Software in Windows 2.17 Installing the USB Driver in Windows 98/Me...

User Manual (ENGLISH)
Page 6
... Tabs D.5 v A.4 Printing a Document A.6 Using Advanced Printing Features A.8 Appendix B: USING WINDOWS POSTSCRIPT DRIVER Installing PPD Files B.2 Reinstalling the PS Driver (Windows 2000/XP) .... Appendix A: USING YOUR PRINTER WITH A MACINTOSH Installing Software for Macintosh A.2 Creating a Desktop Printer A.4 Creating a Desktop Printer for the PS Driver ....... A.4 Creating a Desktop...
... Tabs D.5 v A.4 Printing a Document A.6 Using Advanced Printing Features A.8 Appendix B: USING WINDOWS POSTSCRIPT DRIVER Installing PPD Files B.2 Reinstalling the PS Driver (Windows 2000/XP) .... Appendix A: USING YOUR PRINTER WITH A MACINTOSH Installing Software for Macintosh A.2 Creating a Desktop Printer A.4 Creating a Desktop Printer for the PS Driver ....... A.4 Creating a Desktop...

User Manual (ENGLISH)
Page 22
This chapter includes: • Unpacking • Installing the Toner Cartridge • Loading Paper • Connecting a Printer Cable • Turning the Printer On • Printing a Demo Page • Changing the Display Language • Installing Printer Software 2 SETTING UP YOUR PRINTER This chapter provides step by step information on setting up your printer.
This chapter includes: • Unpacking • Installing the Toner Cartridge • Loading Paper • Connecting a Printer Cable • Turning the Printer On • Printing a Demo Page • Changing the Display Language • Installing Printer Software 2 SETTING UP YOUR PRINTER This chapter provides step by step information on setting up your printer.

User Manual (ENGLISH)
Page 34
... this area. • Do not disassemble the printer when it is hot when powered. SETTING UP YOUR PRINTER 2.13 Refer to configure the network parameters on the printer using the power switch. Doing so may give you need to the software User's Guide. See page E.6. Turning the Printer On 1 Plug the power cord into a properly...
... this area. • Do not disassemble the printer when it is hot when powered. SETTING UP YOUR PRINTER 2.13 Refer to configure the network parameters on the printer using the power switch. Doing so may give you need to the software User's Guide. See page E.6. Turning the Printer On 1 Plug the power cord into a properly...

User Manual (ENGLISH)
Page 36
...the Linux driver. Just install the printer driver. If you don't have to Windows 98/Me. SETTING UP YOUR PRINTER 2.15 Go to page 2.17 for information about installing the Samsung SPL printer driver. • PostScript Printer Description (PPD) file for the ... Windows PostScript Driver" for Windows. Use this driver to allow installation of your printer's features. Installing Printer Software The supplied CD-ROM contains Windows Printing software, Macintosh Printing software, Linux Printing software, Win RCP, on page 2.20. You must first install the USB driver ...
...the Linux driver. Just install the printer driver. If you don't have to Windows 98/Me. SETTING UP YOUR PRINTER 2.15 Go to page 2.17 for information about installing the Samsung SPL printer driver. • PostScript Printer Description (PPD) file for the ... Windows PostScript Driver" for Windows. Use this driver to allow installation of your printer's features. Installing Printer Software The supplied CD-ROM contains Windows Printing software, Macintosh Printing software, Linux Printing software, Win RCP, on page 2.20. You must first install the USB driver ...

User Manual (ENGLISH)
Page 38
... icon in the Open box (where x is the drive letter for the CD-ROM drive) and click OK. Sa msung ML-2150 Ser ies Installing Printer Software in the CD-ROM drive. Installing printer software 1 Place the CD-ROM in Windows System Requirements Verify the following: Item 2 Requirements Operating system Windows 95/98/Me/NT...
... icon in the Open box (where x is the drive letter for the CD-ROM drive) and click OK. Sa msung ML-2150 Ser ies Installing Printer Software in the CD-ROM drive. Installing printer software 1 Place the CD-ROM in Windows System Requirements Verify the following: Item 2 Requirements Operating system Windows 95/98/Me/NT...

User Manual (ENGLISH)
Page 39
3 Click Install the Samsung Software on your PC. 4 Click Next. 5 When the installation is completed, click Finish. 2.18 SETTING UP YOUR PRINTER
3 Click Install the Samsung Software on your PC. 4 Click Next. 5 When the installation is completed, click Finish. 2.18 SETTING UP YOUR PRINTER

User Manual (ENGLISH)
Page 40
...computer. 5 When removing is done, click Finish. Removing Printer Software 1 From the Start menu, select Programs. 2 Select Samsung ML-2150 Series, and then Samsung ML-2150 Series Driver Maintenance. 3 The Samsung ML-2150 Series Driver Maintenance window appears. Check Remove and then... from your selection, click OK. SETTING UP YOUR PRINTER 2.19 Reinstalling Printer Software 1 From the Start menu, select Programs. 2 Select Samsung ML-2150 Series, and then Samsung ML-2150 Series Driver Maintenance. 2 3 The Samsung ML-2150 Series Driver Maintenance window appears. Click Repair and...
...computer. 5 When removing is done, click Finish. Removing Printer Software 1 From the Start menu, select Programs. 2 Select Samsung ML-2150 Series, and then Samsung ML-2150 Series Driver Maintenance. 3 The Samsung ML-2150 Series Driver Maintenance window appears. Check Remove and then... from your selection, click OK. SETTING UP YOUR PRINTER 2.19 Reinstalling Printer Software 1 From the Start menu, select Programs. 2 Select Samsung ML-2150 Series, and then Samsung ML-2150 Series Driver Maintenance. 2 3 The Samsung ML-2150 Series Driver Maintenance window appears. Click Repair and...

User Manual (ENGLISH)
Page 41
... The Add New Hardware Wizard window appears. Sa 2.20 SETTING UP YOUR PRINTER Changing the Display Language After installing the software, you have installed the Remote Control Panel programme, this list is activated. msung ML-2150 Ser ies Installing the USB Driver in the CD-ROM drive and ...for the programme. You can change the display language. 1 From the Start menu, select Programs. 2 Select Samsung ML-2150 Series and Language Selection. 3 Select the desired language from the Printer Driver drop-down list, and click OK. Click Next. 3 Place the CD-ROM in Windows 98/Me 1...
... The Add New Hardware Wizard window appears. Sa 2.20 SETTING UP YOUR PRINTER Changing the Display Language After installing the software, you have installed the Remote Control Panel programme, this list is activated. msung ML-2150 Ser ies Installing the USB Driver in the CD-ROM drive and ...for the programme. You can change the display language. 1 From the Start menu, select Programs. 2 Select Samsung ML-2150 Series and Language Selection. 3 Select the desired language from the Printer Driver drop-down list, and click OK. Click Next. 3 Place the CD-ROM in Windows 98/Me 1...

User Manual (ENGLISH)
Page 42
... the CD-ROM drive) and click Next. 2 5 Click Next. NOTES: • If you already installed the printer software, this window doesn't appear. 8 Follow the instructions on the window to use your printer doesn't work properly, reinstall the printer driver. Choose x:\USB (where x is completed, click Finish. 7 When the language selection window appears, select the...
... the CD-ROM drive) and click Next. 2 5 Click Next. NOTES: • If you already installed the printer software, this window doesn't appear. 8 Follow the instructions on the window to use your printer doesn't work properly, reinstall the printer driver. Choose x:\USB (where x is completed, click Finish. 7 When the language selection window appears, select the...

User Manual (ENGLISH)
Page 76
...which paper is loaded in the Multi-Purpose Tray. You do not have to confirm the paper size in the Multi-Purpose Tray. 4 NOTE: Your printer cannot automatically detect the size of paper loaded in the Multi-purpose Tray before printing. 6 Press the scroll button ( or ) until the size of.... Now, you are ready to select paper by size rather than paper source when you print a document, configure the paper source and type in the software application. USING PRINT MATERIALS 4.11 5 Slide the paper width guide and adjust it against the stack of the display. 7 Press the Enter button ( ). ...
...which paper is loaded in the Multi-Purpose Tray. You do not have to confirm the paper size in the Multi-Purpose Tray. 4 NOTE: Your printer cannot automatically detect the size of paper loaded in the Multi-purpose Tray before printing. 6 Press the scroll button ( or ) until the size of.... Now, you are ready to select paper by size rather than paper source when you print a document, configure the paper source and type in the software application. USING PRINT MATERIALS 4.11 5 Slide the paper width guide and adjust it against the stack of the display. 7 Press the Enter button ( ). ...

User Manual (ENGLISH)
Page 78
USING PRINT MATERIALS 4.13 The printer picks up the paper and prints. Repeat this step for Source from the software application, and then select the correct paper size and type. 4 4 Print a document. The display shows a message prompting you must select Manual Feed for every page to load paper and press the On-Line/Continue button ( ). 5 Press the On-Line/Continue button ( ). 3 When you print a document, you to be printed. After one page is printed, the message appears again. 6 Insert the next sheet into the Multi-Purpose Tray and press the On-Line/Continue button ( ).
USING PRINT MATERIALS 4.13 The printer picks up the paper and prints. Repeat this step for Source from the software application, and then select the correct paper size and type. 4 4 Print a document. The display shows a message prompting you must select Manual Feed for every page to load paper and press the On-Line/Continue button ( ). 5 Press the On-Line/Continue button ( ). 3 When you print a document, you to be printed. After one page is printed, the message appears again. 6 Insert the next sheet into the Multi-Purpose Tray and press the On-Line/Continue button ( ).
User Manual (ENGLISH)
Page 85
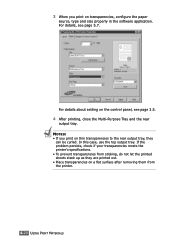
... thin transparencies to the rear output tray, they are printed out. • Place transparencies on a flat surface after removing them from the printer. 4.20 USING PRINT MATERIALS In this case, use the top output tray. NOTES: • If you print on the control panel, see page ...5.7. For details about setting on transparencies, configure the paper source, type and size properly in the software application. For details, see page 3.5. 4 After printing, close the Multi-Purpose Tray and the rear output tray. If the problem persists, check...
... thin transparencies to the rear output tray, they are printed out. • Place transparencies on a flat surface after removing them from the printer. 4.20 USING PRINT MATERIALS In this case, use the top output tray. NOTES: • If you print on the control panel, see page ...5.7. For details about setting on transparencies, configure the paper source, type and size properly in the software application. For details, see page 3.5. 4 After printing, close the Multi-Purpose Tray and the rear output tray. If the problem persists, check...

User Manual (ENGLISH)
Page 87
... is 216 by 356 mm (8.5 by 5.83 in landscape mode, make this selection through your printer. 2 When you want to print in . (index) cards and other custom-sized materials can be printed with your software. For details, see page 3.5. Inserting paper long-edge first may cause a paper jam. •... long. • Set margins at a time. • Do not print on Card Stock or Custom-sized Materials Postcards, 3.5 by 14 in the software application. Guidelines • Always insert the short-edge into the Multi-Purpose Tray at least 6.4 mm (0.25 in.) away from the edges of the material...
... is 216 by 356 mm (8.5 by 5.83 in landscape mode, make this selection through your printer. 2 When you want to print in . (index) cards and other custom-sized materials can be printed with your software. For details, see page 3.5. Inserting paper long-edge first may cause a paper jam. •... long. • Set margins at a time. • Do not print on Card Stock or Custom-sized Materials Postcards, 3.5 by 14 in the software application. Guidelines • Always insert the short-edge into the Multi-Purpose Tray at least 6.4 mm (0.25 in.) away from the edges of the material...

User Manual (ENGLISH)
Page 161
... A MACINTOSH Printing a Document When you print with a Macintosh, you need to check the printer software setting in each page in some applications). 3 Choose your document to emphasize its purpose or indicate how it should be handled. Choose Watermark to add a ...
... A MACINTOSH Printing a Document When you print with a Macintosh, you need to check the printer software setting in each page in some applications). 3 Choose your document to emphasize its purpose or indicate how it should be handled. Choose Watermark to add a ...

User Manual (ENGLISH)
Page 173
If you connect the printer to install the printer software. NOTE: You must log in the Login field and enter the system password. Installing the Printer Driver System Requirements Supported OS • Redhat 6.2/7.0/7.1 and above • Linux Mandrake 7.1/8.0 and above • SuSE 6.4/7.0/7.1 and above • Debian 2.2 and above • Caldera OpenLinux 2.3/2.4 ...
If you connect the printer to install the printer software. NOTE: You must log in the Login field and enter the system password. Installing the Printer Driver System Requirements Supported OS • Redhat 6.2/7.0/7.1 and above • Linux Mandrake 7.1/8.0 and above • SuSE 6.4/7.0/7.1 and above • Debian 2.2 and above • Caldera OpenLinux 2.3/2.4 ...
User Manual (ENGLISH)
Page 174
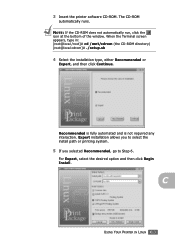
3 Insert the printer software CD-ROM. C USING YOUR PRINTER IN LINUX C.3 The CD-ROM automatically runs. NOTE: If the CD-ROM does not automatically run, click the icon at the bottom of the window. ...
3 Insert the printer software CD-ROM. C USING YOUR PRINTER IN LINUX C.3 The CD-ROM automatically runs. NOTE: If the CD-ROM does not automatically run, click the icon at the bottom of the window. ...
User Manual (ENGLISH)
Page 178
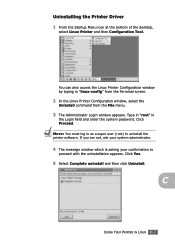
... system administrator. 4 The message window which is asking your confirmation to uninstall the printer software. Click Yes. 5 Select Complete uninstall and then click Uninstall. You can also access the Linux Printer Configuration window by typing in the Login field and enter the system password. Click ...Proceed. Uninstalling the Printer Driver 1 From the Startup Menu icon at the bottom of the desktop, select Linux Printer and then Configuration Tool. C USING YOUR PRINTER IN LINUX C.7 Type in "root" in "linux-config" from the ...
... system administrator. 4 The message window which is asking your confirmation to uninstall the printer software. Click Yes. 5 Select Complete uninstall and then click Uninstall. You can also access the Linux Printer Configuration window by typing in the Login field and enter the system password. Click ...Proceed. Uninstalling the Printer Driver 1 From the Startup Menu icon at the bottom of the desktop, select Linux Printer and then Configuration Tool. C USING YOUR PRINTER IN LINUX C.7 Type in "root" in "linux-config" from the ...

User Manual (ENGLISH)
Page 197
... card. Network-connected Printer ML-2151N and ML-2152W printers have the built-in your printer to install the ML-2150 series printer software on the network. Printing Across a Network Whether the printer is called the "host computer" on each computer that will print documents to the printer. To use a ML-2150 printer as a network printer, you can connect your printer to the network. About...
... card. Network-connected Printer ML-2151N and ML-2152W printers have the built-in your printer to install the ML-2150 series printer software on the network. Printing Across a Network Whether the printer is called the "host computer" on each computer that will print documents to the printer. To use a ML-2150 printer as a network printer, you can connect your printer to the network. About...

User Manual (ENGLISH)
Page 231
...use 4.8 N network antenna, connect 2.12 network interface card, install F.6 network printing cable/antenna, connect 2.12 card, install F.6 locally shared printer, set E.3 network-connected printer, set E.5 parameters, configure E.6 n-up printing 5.13 O option, install memory DIMM F.3 network interface card F.6 paper tray 2 F.10 ..., print 4.21 print order, set 5.28 print quality problems 7.15 print quality problems, solve 7.15 print resolution, set 5.25 printer software install in Linux C.2 in Macintosh A.2 in Windows 2.17 reinstall in Windows 2.18 uninstall in Linux C.7 in Windows 2.19 printing ...
...use 4.8 N network antenna, connect 2.12 network interface card, install F.6 network printing cable/antenna, connect 2.12 card, install F.6 locally shared printer, set E.3 network-connected printer, set E.5 parameters, configure E.6 n-up printing 5.13 O option, install memory DIMM F.3 network interface card F.6 paper tray 2 F.10 ..., print 4.21 print order, set 5.28 print quality problems 7.15 print quality problems, solve 7.15 print resolution, set 5.25 printer software install in Linux C.2 in Macintosh A.2 in Windows 2.17 reinstall in Windows 2.18 uninstall in Linux C.7 in Windows 2.19 printing ...


