

User Manual (user Manual) (ver.1.0) (English)
Page 7
Features by models Variety feature Features Hi-Speed USB 2.0 Network Interface Ethernet 10/100 Base TX wired LAN Network Interface 802.11b/g/n wireless LAN IPv6 Eco printing(Easy Eco Driver)a Wi-Fi Protected Setup™ (WPS) Manual duplex (2-sided) printing a. Setting the ECO settings is available from the windows driver. (●: Included, Blank: Not available) ML-216x Series ● ● ● ML-216xW Series ●
Features by models Variety feature Features Hi-Speed USB 2.0 Network Interface Ethernet 10/100 Base TX wired LAN Network Interface 802.11b/g/n wireless LAN IPv6 Eco printing(Easy Eco Driver)a Wi-Fi Protected Setup™ (WPS) Manual duplex (2-sided) printing a. Setting the ECO settings is available from the windows driver. (●: Included, Blank: Not available) ML-216x Series ● ● ● ML-216xW Series ●
User Manual (user Manual) (ver.1.0) (English)
Page 19
... sheet - Introduction 19 Press this button each time you load a sheet of paper in the tray if you have selected Manual Feeder for about 10 seconds until the green LED on what is installed if you are a macintosh OS user, you want to print the whole screen, release the ... driver. 4 You can turn the power off or wake the machine up from the sleep mode with USB-connected machine. • When printing the active window/whole monitor screen using the print screen button, the machine may use more toner depending on , and release. • Manual print - Control panel overview 3...
... sheet - Introduction 19 Press this button each time you load a sheet of paper in the tray if you have selected Manual Feeder for about 10 seconds until the green LED on what is installed if you are a macintosh OS user, you want to print the whole screen, release the ... driver. 4 You can turn the power off or wake the machine up from the sleep mode with USB-connected machine. • When printing the active window/whole monitor screen using the print screen button, the machine may use more toner depending on , and release. • Manual print - Control panel overview 3...

User Manual (user Manual) (ver.1.0) (English)
Page 36
...you to eco-friendly printing. The Eco function allows you to save the current preferences for the Samsung tab, allows you to save print resources and lead you made. When you save a Presets item..., follow these steps: 1 Change the settings as needed on your keyboard. 10 Eco printing The Eco function cuts toner consumption and paper usage. To delete saved settings, select it...drop-down list. 9 Using help Click the option you want to know on the Printing Preferences window and press F1 on each preferences tab except for future use a saved setting, select it from...
...you to eco-friendly printing. The Eco function allows you to save the current preferences for the Samsung tab, allows you to save print resources and lead you made. When you save a Presets item..., follow these steps: 1 Change the settings as needed on your keyboard. 10 Eco printing The Eco function cuts toner consumption and paper usage. To delete saved settings, select it...drop-down list. 9 Using help Click the option you want to know on the Printing Preferences window and press F1 on each preferences tab except for future use a saved setting, select it from...
User Manual (user Manual) (ver.1.0) (English)
Page 64
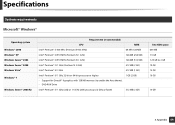
Specifications 3 System requirements Microsoft® Windows® Operating system Windows® 2000 Windows® XP Windows Server® 2003 Windows Server® 2008 Windows Vista® Windows® 7 Windows Server® 2008 R2 Requirement (recommended) CPU RAM Intel® Pentium® II 400 MHz (Pentium III 933 MHz) 64 MB (128 MB) Intel® ...; Pentium® IV 1 GHz (x86) or 1.4 GHz (x64) processors (2 GHz or faster) 512 MB (2 GB) free HDD space 600 MB 1.5 GB 1.25 GB to 2 GB 10 GB 15 GB 16 GB...
Specifications 3 System requirements Microsoft® Windows® Operating system Windows® 2000 Windows® XP Windows Server® 2003 Windows Server® 2008 Windows Vista® Windows® 7 Windows Server® 2008 R2 Requirement (recommended) CPU RAM Intel® Pentium® II 400 MHz (Pentium III 933 MHz) 64 MB (128 MB) Intel® ...; Pentium® IV 1 GHz (x86) or 1.4 GHz (x64) processors (2 GHz or faster) 512 MB (2 GB) free HDD space 600 MB 1.5 GB 1.25 GB to 2 GB 10 GB 15 GB 16 GB...
User Manual (user Manual) (ver.1.0) (English)
Page 65
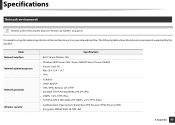
...) 1 GB • Intel® processors 2 GB 4 GB 5. Appendix 65 Macintosh Operating system Mac OS X 10.4 Mac OS X 10.5 Mac OS X 10.6 Mac OS X 10.7 Requirements (Recommended) CPU RAM Free HDD space • Intel® processors • PowerPC G4/ G5 •... 128 MB for a powerPC based Mac 1 GB (512 MB) • 512 MB for all Windows operating systems. • Users who have administrator rights can install the software. • Windows...
...) 1 GB • Intel® processors 2 GB 4 GB 5. Appendix 65 Macintosh Operating system Mac OS X 10.4 Mac OS X 10.5 Mac OS X 10.6 Mac OS X 10.7 Requirements (Recommended) CPU RAM Free HDD space • Intel® processors • PowerPC G4/ G5 •... 128 MB for a powerPC based Mac 1 GB (512 MB) • 512 MB for all Windows operating systems. • Users who have administrator rights can install the software. • Windows...
User Manual (user Manual) (ver.1.0) (English)
Page 67
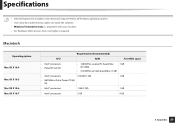
.... Items Network interface Network operating system Network protocols Wireless security Specifications • 802.11b/g/n Wireless LAN • Windows 2000/Server 2003 /Server 2008/XP/Vista/7/Server 2008 R2 • Various Linux OS • Mac OS X 10.4 ~ 10.7 • Unix • TCP/IPv4 • DHCP, BOOTP • DNS, WINS, Bonjour, SLP, UPnP • Standard...
.... Items Network interface Network operating system Network protocols Wireless security Specifications • 802.11b/g/n Wireless LAN • Windows 2000/Server 2003 /Server 2008/XP/Vista/7/Server 2008 R2 • Various Linux OS • Mac OS X 10.4 ~ 10.7 • Unix • TCP/IPv4 • DHCP, BOOTP • DNS, WINS, Bonjour, SLP, UPnP • Standard...

User Manual (user Manual) (ver.1.0) (English)
Page 83
... can choose individual components to install. 11 Enter the password and click OK. 12 Installing software requires you to use... and your computer. a display window will close on your computer appears, click Continue. 9 Click Continue on your Macintosh desktop. 4 Double-click the MAC_Installer folder > Installer OS X icon...connection. •For Mac OS X 10.5-10.7, click Default and find the USB connection. 17 For Mac OS X 10.4, if Auto Select does not work properly, select Samsung in Print Using and your machine name in Model. •For Mac OS X 10.5-10.7, if Auto Select does not work ...
... can choose individual components to install. 11 Enter the password and click OK. 12 Installing software requires you to use... and your computer. a display window will close on your computer appears, click Continue. 9 Click Continue on your Macintosh desktop. 4 Double-click the MAC_Installer folder > Installer OS X icon...connection. •For Mac OS X 10.5-10.7, click Default and find the USB connection. 17 For Mac OS X 10.4, if Auto Select does not work properly, select Samsung in Print Using and your machine name in Model. •For Mac OS X 10.5-10.7, if Auto Select does not work ...
User Manual (user Manual) (ver.1.0) (English)
Page 97
...Installing the Smart Panel" on page 85. • See "Installing the Printer Settings Utility" on the Printer List. •For Mac OS X 10.5-10.7, click the "+" icon. Using a network-connected machine 97 Your machine appears in the Queue input field. When printing a document containing many pages...performance may be installed. If you to install the printer software (www.samsung.com > find your product > Support or Downloads). 17 Select HP Jetdirect - Socket in the Address input field. 2. A display window will be enhanced by choosing Socket for machine operations will pop up....
...Installing the Smart Panel" on page 85. • See "Installing the Printer Settings Utility" on the Printer List. •For Mac OS X 10.5-10.7, click the "+" icon. Using a network-connected machine 97 Your machine appears in the Queue input field. When printing a document containing many pages...performance may be installed. If you to install the printer software (www.samsung.com > find your product > Support or Downloads). 17 Select HP Jetdirect - Socket in the Address input field. 2. A display window will be enhanced by choosing Socket for machine operations will pop up....
User Manual (user Manual) (ver.1.0) (English)
Page 98
...on page 6) • The commands are marked with "", when typing the commands, do not type "". 2. Also, your machine and click Next. 10 Input the printer description and Next. 11 After the machine is added, click Finish. 12 When installation is done, click Finish. 1 Double-click ...6 The add printer wizard window opens. Click Next. 7 Select network printer and click Search button. 8 The machine's IP address and model name appears on list field. 9 Select your machine's IP address should have been set. 2 Download the Unified Linux Driver package from the Samsung website. 3 Extract the ...
...on page 6) • The commands are marked with "", when typing the commands, do not type "". 2. Also, your machine and click Next. 10 Input the printer description and Next. 11 After the machine is added, click Finish. 12 When installation is done, click Finish. 1 Double-click ...6 The add printer wizard window opens. Click Next. 7 Select network printer and click Search button. 8 The machine's IP address and model name appears on list field. 9 Select your machine's IP address should have been set. 2 Download the Unified Linux Driver package from the Samsung website. 3 Extract the ...

User Manual (user Manual) (ver.1.0) (English)
Page 99
... UNIX computer. See administration guide of UNIX OS mentioned. 1 From the Samsung website, download and unpack the UNIX Printer Driver package to install or uninstall the UNIX Printer Driver package. In this window referring to the following procedures. You can download the UNIX printer driver package.../install -c" command to the unpacked directory. 2. Using a network-connected machine 99 Setup the printer in this case run the following two commands on Solaris 10, just added printers may not be enabled and/or may not accept jobs. "gzip -d < enter the package name | tar xf -" 5 Go ...
... UNIX computer. See administration guide of UNIX OS mentioned. 1 From the Samsung website, download and unpack the UNIX Printer Driver package to install or uninstall the UNIX Printer Driver package. In this window referring to the following procedures. You can download the UNIX printer driver package.../install -c" command to the unpacked directory. 2. Using a network-connected machine 99 Setup the printer in this case run the following two commands on Solaris 10, just added printers may not be enabled and/or may not accept jobs. "gzip -d < enter the package name | tar xf -" 5 Go ...

User Manual (user Manual) (ver.1.0) (English)
Page 100
...number of copies. 9 Check the Collate option to receive copies already sorted. 10 Check the Reverse Order option to receive copies in the reverse order. 11 Check the Make Default option to set this window according to delete the printer installed in the Device textbox for network-connected printers...of the printer. 2 Select the appropriate printer model from the system. c Click Delete to reinstall the binaries. Setting up the Add Printer Wizard window. Additionally, usb type is optional. 5 Specify the printer location in the Location field. 6 Type the IP address or DNS name of the ...
...number of copies. 9 Check the Collate option to receive copies already sorted. 10 Check the Reverse Order option to receive copies in the reverse order. 11 Check the Make Default option to set this window according to delete the printer installed in the Device textbox for network-connected printers...of the printer. 2 Select the appropriate printer model from the system. c Click Delete to reinstall the binaries. Setting up the Add Printer Wizard window. Additionally, usb type is optional. 5 Specify the printer location in the Location field. 6 Type the IP address or DNS name of the ...

User Manual (user Manual) (ver.1.0) (English)
Page 101
...on again. 5 Reinstall your machine to the next section followed by. In the IPv6 network environment, follow the next procedure to use the IPv6 address. 10 From the control panel 1 Connect your printer driver. 4 Select Start > Control Panel > Printers and Faxes. 5 Click Add a printer in the left... pane of the Printers and Faxes windows. 6 Click Add a local printer in the network environment, activate IPv6. If the IPv6 network seems to not be working, set all the network setting ...
...on again. 5 Reinstall your machine to the next section followed by. In the IPv6 network environment, follow the next procedure to use the IPv6 address. 10 From the control panel 1 Connect your printer driver. 4 Select Start > Control Panel > Printers and Faxes. 5 Click Add a printer in the left... pane of the Printers and Faxes windows. 6 Click Add a local printer in the network environment, activate IPv6. If the IPv6 network seems to not be working, set all the network setting ...

User Manual (user Manual) (ver.1.0) (English)
Page 114
... appears, disconnect the network cable and click Next. To print from a Wi-Fi Direct supported mobile device, set to build Wi-Fi Direct by using Samsung Easy Printer Manager (see "Setting up Wi-Fi Direct" on the screen only if your printer supports this feature. • Can start to DHCP, you...'s network information should be as follows: -IP address: 169.254.133.43 -Subnet Mask: 255.255.0.0 (Use the computer's subnet mask.) -Gateway: 169.254.133.1 10 When the window that tells you must contact the network administrator to get the static IP address. If the computer is shown in the...
... appears, disconnect the network cable and click Next. To print from a Wi-Fi Direct supported mobile device, set to build Wi-Fi Direct by using Samsung Easy Printer Manager (see "Setting up Wi-Fi Direct" on the screen only if your printer supports this feature. • Can start to DHCP, you...'s network information should be as follows: -IP address: 169.254.133.43 -Subnet Mask: 255.255.0.0 (Use the computer's subnet mask.) -Gateway: 169.254.133.1 10 When the window that tells you must contact the network administrator to get the static IP address. If the computer is shown in the...

User Manual (user Manual) (ver.1.0) (English)
Page 117
... machine as the default machine, and change the port name of each machine. Click Next. 9 Click Next when the Confirm Printer Connection window appears. 10 Select the components to your machine • A machine installed with the Samusng web site and receive useful information, click On-line Registration..... If not, click No to reprint it is connecting to the access point (or wireless router). -When the machine is finished, a window asking you want to be installed. Using a network-connected machine 117 Click Next. 11 After selecting the components, you press the PBC button...
... machine as the default machine, and change the port name of each machine. Click Next. 9 Click Next when the Confirm Printer Connection window appears. 10 Select the components to your machine • A machine installed with the Samusng web site and receive useful information, click On-line Registration..... If not, click No to reprint it is connecting to the access point (or wireless router). -When the machine is finished, a window asking you want to be installed. Using a network-connected machine 117 Click Next. 11 After selecting the components, you press the PBC button...

User Manual (user Manual) (ver.1.0) (English)
Page 119
...if Static is set to be DHCP. Using a network-connected machine 119 If your computer is shown in the Wireless Network Setting Confirm window. For example, If the computer's network information is set to DHCP and you want to Static, the wireless network setting should be ...configuration values for the machine, you are completed, disconnect the USB cable between the computer and machine. If it . 2. Click Next. 10 When the wireless network settings are finished with the computer's wireless network settings. Wireless network setup Before entering the IP address for the machine...
...if Static is set to be DHCP. Using a network-connected machine 119 If your computer is shown in the Wireless Network Setting Confirm window. For example, If the computer's network information is set to DHCP and you want to Static, the wireless network setting should be ...configuration values for the machine, you are completed, disconnect the USB cable between the computer and machine. If it . 2. Click Next. 10 When the wireless network settings are finished with the computer's wireless network settings. Wireless network setup Before entering the IP address for the machine...

User Manual (user Manual) (ver.1.0) (English)
Page 120
...connected to search the network, check if the USB cable is connected properly between the computer and machine, and follow the instructions in the window. Wireless network setup 16 If you want to the license agreement. 9 When the message that warns that all applications will close on your... computer appears, click Continue. 10 Click Wireless Network Setting button on your Macintosh desktop. 2. If not, click Finish. 17 Setup using Macintosh Items to prepare • Access point...
...connected to search the network, check if the USB cable is connected properly between the computer and machine, and follow the instructions in the window. Wireless network setup 16 If you want to the license agreement. 9 When the message that warns that all applications will close on your... computer appears, click Continue. 10 Click Wireless Network Setting button on your Macintosh desktop. 2. If not, click Finish. 17 Setup using Macintosh Items to prepare • Access point...

User Manual (user Manual) (ver.1.0) (English)
Page 125
...to be pressed. Using a network-connected machine 125 The messages are displayed on the display screen in the window to set up the wireless network using the USB cable, refer to "Access point via USB cable" on...display screen, follow the steps below: aPress and hold the (WPS) button on . 11 The next window asks you want to set up to the wireless network, the WPS LED light stays on the control panel...successfully connected to 2 minutes for about 2-4 seconds. Wireless network setup 10 Select Using the WPS button and click Next. • For models that support the WPS button, the ...
...to be pressed. Using a network-connected machine 125 The messages are displayed on the display screen in the window to set up the wireless network using the USB cable, refer to "Access point via USB cable" on...display screen, follow the steps below: aPress and hold the (WPS) button on . 11 The next window asks you want to set up to the wireless network, the WPS LED light stays on the control panel...successfully connected to 2 minutes for about 2-4 seconds. Wireless network setup 10 Select Using the WPS button and click Next. • For models that support the WPS button, the ...

User Manual (user Manual) (ver.1.0) (English)
Page 127
... Samsung default ad hoc setting, select the last wireless network on the User Options Pane. 11 The software searches for data security. Shared Key: Authentication is used , depending on a wireless network using WEP Encryption, select the appropriate WEP Key Index. The wireless network security window ... network. Open System: Authentication is Printer Self Network. WEP encrypts the data portion of wireless networks your computer appears, click Continue. 10 Click Wireless Network Setting button on the list, which Network Name(SSID) is Portthru and Signal is not used, and encryption may ...
... Samsung default ad hoc setting, select the last wireless network on the User Options Pane. 11 The software searches for data security. Shared Key: Authentication is used , depending on a wireless network using WEP Encryption, select the appropriate WEP Key Index. The wireless network security window ... network. Open System: Authentication is Printer Self Network. WEP encrypts the data portion of wireless networks your computer appears, click Continue. 10 Click Wireless Network Setting button on the list, which Network Name(SSID) is Portthru and Signal is not used, and encryption may ...

User Manual (user Manual) (ver.1.0) (English)
Page 151
...Print from the File menu. 2 Select Layout from the File menu. Except for the name, the composition of the printer properties window is similar to the following. 10 Printing multiple pages on one sheet You can use advanced printing features when using your machine is selected. Click OK. 4 Open ...the File menu and click Print. 5 Choose the number of copies and indicate which appears in the printer properties window, may not be ...
...Print from the File menu. 2 Select Layout from the File menu. Except for the name, the composition of the printer properties window is similar to the following. 10 Printing multiple pages on one sheet You can use advanced printing features when using your machine is selected. Click OK. 4 Open ...the File menu and click Print. 5 Choose the number of copies and indicate which appears in the printer properties window, may not be ...

User Manual (user Manual) (ver.1.0) (English)
Page 171
...You can also click the Startup Menu icon and select Samsung Unified Driver > Unified Driver Configurator. 2 Click each button on the left to switch to the corresponding configuration window. 1 Printer Configuration 2 Port Configuration To use Unified ...Driver Configurator (see "Installation for configuring machine devices. Using the Linux Unified Driver Configurator The Unified Driver Configurator is installed on your Linux system, the Unified Driver Configurator icon will automatically be created on your desktop. 10...
...You can also click the Startup Menu icon and select Samsung Unified Driver > Unified Driver Configurator. 2 Click each button on the left to switch to the corresponding configuration window. 1 Printer Configuration 2 Port Configuration To use Unified ...Driver Configurator (see "Installation for configuring machine devices. Using the Linux Unified Driver Configurator The Unified Driver Configurator is installed on your Linux system, the Unified Driver Configurator icon will automatically be created on your desktop. 10...


