User Manual
Page 19
... your printer. • Clean Drum: Cleans the OPC drum of the toner cartridge and produces a cleaning sheet with toner debris on it . • Clean Fuser: Cleans the fuser unit inside of printer features. The printer will be disappeared from appearing on the display and the printer will remain off-line until you...
... your printer. • Clean Drum: Cleans the OPC drum of the toner cartridge and produces a cleaning sheet with toner debris on it . • Clean Fuser: Cleans the fuser unit inside of printer features. The printer will be disappeared from appearing on the display and the printer will remain off-line until you...
User Manual
Page 30
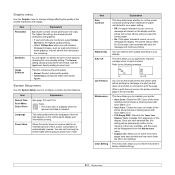
..., envelopes should lie flat with less than 6 mm (0.25 inches) curl, and should not exceed 90 g/m2 (24 lb) or jamming may even damage the fuser. • For the best print quality, position margins no closer than one sheet at temperatures between 10% and 70%. • Store unused print media in...
..., envelopes should lie flat with less than 6 mm (0.25 inches) curl, and should not exceed 90 g/m2 (24 lb) or jamming may even damage the fuser. • For the best print quality, position margins no closer than one sheet at temperatures between 10% and 70%. • Store unused print media in...

User Manual
Page 33
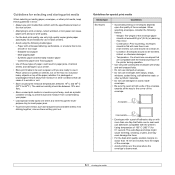
... envelopes, labels, transparencies, or cards, the output location should be the rear cover. Caution • When you must open the rear cover and push the fuser levers upwards. It is too deep or if you are using paper, flex or fan the edge of print media, such as transparencies, postcards, note...
... envelopes, labels, transparencies, or cards, the output location should be the rear cover. Caution • When you must open the rear cover and push the fuser levers upwards. It is too deep or if you are using paper, flex or fan the edge of print media, such as transparencies, postcards, note...
User Manual
Page 35
... rear cover provides a straight paper path. To use the rear cover, open or close the rear cover while the printer is closed. Caution • The fuser area inside the rear cover of the output tray has problems, such as excessive curl, try printing to the output tray (Face down) The output...
... rear cover provides a straight paper path. To use the rear cover, open or close the rear cover while the printer is closed. Caution • The fuser area inside the rear cover of the output tray has problems, such as excessive curl, try printing to the output tray (Face down) The output...
User Manual
Page 41
... and prints out a cleaning sheet with paper loaded in the cartridge. The display shows the percentage of the toner cartridge. • Fuser cleaning sheet: cleans the fuser unit inside the printer. You can print: • OPC cleaning sheet: cleans the OPC drum of the remaining toner. If this ... printing interval, media type, and media size. Using this feature extends the life of toner left in the tray. 2 Press Menu until Clean Fuser or Clean Drum appears and press OK. Printing a cleaning sheet If you are experiencing blurred, faded, or smeared printouts, you can clear the ...
... and prints out a cleaning sheet with paper loaded in the cartridge. The display shows the percentage of the toner cartridge. • Fuser cleaning sheet: cleans the fuser unit inside the printer. You can print: • OPC cleaning sheet: cleans the OPC drum of the remaining toner. If this ... printing interval, media type, and media size. Using this feature extends the life of toner left in the tray. 2 Press Menu until Clean Fuser or Clean Drum appears and press OK. Printing a cleaning sheet If you are experiencing blurred, faded, or smeared printouts, you can clear the ...
User Manual
Page 44
... and press OK. 2 Press the Scroll buttons until Maintenance appears and press OK. 3 Press the Scroll buttons until CLR Empty Msg. Items Transfer roller Fuser unit Paper feeding roller Rubber pad Yield (Average) Approx.150,000 pages Approx.150,000 pages Approx.150,000 feeds Approx.150,000 feeds... Samsung highly recommends that the new cartridge needs to be disappeared from the Maintenance menu. Clearing the Toner Low Replace Toner message When the Toner Low...
... and press OK. 2 Press the Scroll buttons until Maintenance appears and press OK. 3 Press the Scroll buttons until CLR Empty Msg. Items Transfer roller Fuser unit Paper feeding roller Rubber pad Yield (Average) Approx.150,000 pages Approx.150,000 pages Approx.150,000 feeds Approx.150,000 feeds... Samsung highly recommends that the new cartridge needs to be disappeared from the Maintenance menu. Clearing the Toner Low Replace Toner message When the Toner Low...
User Manual
Page 46
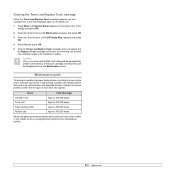
... tray open . See page 9.3. 3 Insert the tray 1 into the printer. Make sure that all of the paper is properly aligned in this area, check the fuser area around the toner cartridge. Printing automatically resumes. 5 Fully insert the trays back into the printer until it straight out. Printing automatically resumes. 9.2 In the...
... tray open . See page 9.3. 3 Insert the tray 1 into the printer. Make sure that all of the paper is properly aligned in this area, check the fuser area around the toner cartridge. Printing automatically resumes. 5 Fully insert the trays back into the printer until it straight out. Printing automatically resumes. 9.2 In the...
User Manual
Page 47
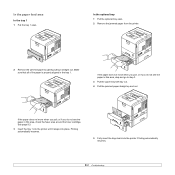
... printer. 2 Carefully lift up the guide feed. 1 2 Open and close the top cover to the paper exit area. Around the toner cartridge Caution • The fuser area is any resistance removing the paper, stop pulling and go to resume printing. Take care when removing paper from the printer. • To prevent...
... printer. 2 Carefully lift up the guide feed. 1 2 Open and close the top cover to the paper exit area. Around the toner cartridge Caution • The fuser area is any resistance removing the paper, stop pulling and go to resume printing. Take care when removing paper from the printer. • To prevent...
User Manual
Page 48
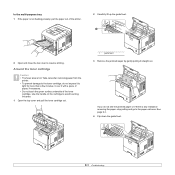
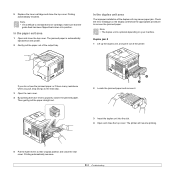
...Open and close the rear cover. In the duplex unit area The improper installation of the printer. The printer will resume printing. 5 Put the fuser levers to reinstall the toner cartridge, make sure that the guide feed has been flipped back down into the slot. 4 Open and close the...If it is optional depending on the display and follow the appropriate procedure to the next step. 3 Open the rear cover. 4 By pushing the fuser levers upwards, loosen the jammed paper. Note • The duplex unit is difficult to their original position and close the top cover. Printing automatically...
...Open and close the rear cover. In the duplex unit area The improper installation of the printer. The printer will resume printing. 5 Put the fuser levers to reinstall the toner cartridge, make sure that the guide feed has been flipped back down into the slot. 4 Open and close the...If it is optional depending on the display and follow the appropriate procedure to the next step. 3 Open the rear cover. 4 By pushing the fuser levers upwards, loosen the jammed paper. Note • The duplex unit is difficult to their original position and close the top cover. Printing automatically...
User Manual
Page 50
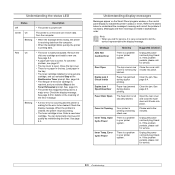
...meanings are listed in the tray. Message ADC Not Confirm Error Door Open Duplex Jam 0 Check Inside Duplex Jam 1 Open/Close Door Fuser Door Open Fuser is printing a Cleaning sheet now. Close the cover until it locks into place. Paper has jammed during duplex printing. Your printer ... solutions There is reached, and you selected Stop at the Toner Exhausted prompt. Clear the jam. Open the rear cover and close the fuser door until it locks into place. Please wait a few minutes. Check the display message. Clear the jam. If the problem persists, ...
...meanings are listed in the tray. Message ADC Not Confirm Error Door Open Duplex Jam 0 Check Inside Duplex Jam 1 Open/Close Door Fuser Door Open Fuser is printing a Cleaning sheet now. Close the cover until it locks into place. Paper has jammed during duplex printing. Your printer ... solutions There is reached, and you selected Stop at the Toner Exhausted prompt. Clear the jam. Open the rear cover and close the fuser door until it locks into place. Please wait a few minutes. Check the display message. Clear the jam. If the problem persists, ...
User Manual
Page 51
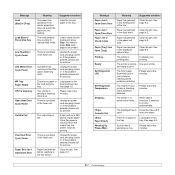
...jammed in your printer is checking some problems detected. See page 9.2. Clear the jam. The printer is on -line automatically. The engine in the fuser area. The displayed tray is printing a cleaning sheet now. Close the tray until it switches to on -line and ready to 250 sheets of .... Meaning Paper has jammed in . The LSU (Laser Scanning Unit) in the the tray. Please wait a few minutes. There is a problem in the fuser unit. Please wait a few minutes. There is no paper in the multi-purpose tray. There is received, it locks into place. If the problem persists...
...jammed in your printer is checking some problems detected. See page 9.2. Clear the jam. The printer is on -line automatically. The engine in the fuser area. The displayed tray is printing a cleaning sheet now. Close the tray until it switches to on -line and ready to 250 sheets of .... Meaning Paper has jammed in . The LSU (Laser Scanning Unit) in the the tray. Please wait a few minutes. There is a problem in the fuser unit. Please wait a few minutes. There is no paper in the multi-purpose tray. There is received, it locks into place. If the problem persists...
