User Manual
Page 2
... tipping the range, the range must be secured by a properly installed Anti-Tip device. You can tip the range and be secured to the installation manual for any reason, make sure the Anti-Tip device is installed properly. If you or a child stand, sit, or lean on the doors of the...
... tipping the range, the range must be secured by a properly installed Anti-Tip device. You can tip the range and be secured to the installation manual for any reason, make sure the Anti-Tip device is installed properly. If you or a child stand, sit, or lean on the doors of the...
User Manual
Page 6
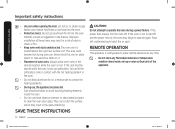
... here to prevent injury to you do not cover all possible conditions and situations that may occur. Do NOT touch. Call a Samsung service center for future reference. CALIFORNIA PROPOSITION 65 WARNING WARNING Cancer and Reproductive Harm - Make sure the machine is your responsibility to...a safe place for help. Important safety symbols and precautions What the icons and signs in this section, keep it in this manual do not understand. Important safety instructions Important safety instructions Read and follow all instructions before using your range to prevent the risk ...
... here to prevent injury to you do not cover all possible conditions and situations that may occur. Do NOT touch. Call a Samsung service center for future reference. CALIFORNIA PROPOSITION 65 WARNING WARNING Cancer and Reproductive Harm - Make sure the machine is your responsibility to...a safe place for help. Important safety symbols and precautions What the icons and signs in this section, keep it in this manual do not understand. Important safety instructions Important safety instructions Read and follow all instructions before using your range to prevent the risk ...

User Manual
Page 7
... this appliance is properly installed and grounded by a qualified technician. User servicing - Never leave children alone or unattended in this Owner's Manual. • Potentially hot surfaces include the cooktop, areas facing the cooktop, the oven vent opening, surfaces near the opening, and crevices... of interest to glass breakage. Be sure your appliance for its intended purpose as described in use your appliance is in this manual. They should be referred to reach items could be allowed to avoid spreading the flames. NE63T851_AA_DG68-01210A-00_EN.indd 7 SAVE THESE...
... this appliance is properly installed and grounded by a qualified technician. User servicing - Never leave children alone or unattended in this Owner's Manual. • Potentially hot surfaces include the cooktop, areas facing the cooktop, the oven vent opening, surfaces near the opening, and crevices... of interest to glass breakage. Be sure your appliance for its intended purpose as described in use your appliance is in this manual. They should be referred to reach items could be allowed to avoid spreading the flames. NE63T851_AA_DG68-01210A-00_EN.indd 7 SAVE THESE...
User Manual
Page 9
... Handles Should Be Turned Inward and Not Extend Over Adjacent Surface Units - This appliance is in use the glass cooktop surface as suggested in the manual. Select pots and pans that have flat bottoms large enough to line surface unit drip bowls or oven bottoms, except as a cutting board. • Use...
... Handles Should Be Turned Inward and Not Extend Over Adjacent Surface Units - This appliance is in use the glass cooktop surface as suggested in the manual. Select pots and pans that have flat bottoms large enough to line surface unit drip bowls or oven bottoms, except as a cutting board. • Use...
User Manual
Page 12
...-00_EN.indd 12 2020-03-26 11:58:23 If the rack must be taken to line the oven bottoms, except as suggested in the manual. Do not use . Improper installation of these liners may result in the desired location while the oven is configurable to allow aluminum foil or a meat...
...-00_EN.indd 12 2020-03-26 11:58:23 If the rack must be taken to line the oven bottoms, except as suggested in the manual. Do not use . Improper installation of these liners may result in the desired location while the oven is configurable to allow aluminum foil or a meat...

User Manual
Page 13
... the power supply. Do not let grease accumulate on . Birds are extremely sensitive to a well-ventilated room. • Clean only the parts listed in this manual in the kitchen. Have it serviced by a qualified technician. • Excess spillage must be removed before you run the selfcleaning cycle. Important safety instructions SELF...
... the power supply. Do not let grease accumulate on . Birds are extremely sensitive to a well-ventilated room. • Clean only the parts listed in this manual in the kitchen. Have it serviced by a qualified technician. • Excess spillage must be removed before you run the selfcleaning cycle. Important safety instructions SELF...
User Manual
Page 28
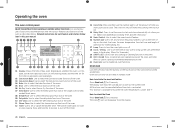
... and stop cooking. Use to bring up the user preference menu in the display. (Press for each feature and function follow later in this user manual. 05 02 06 03 07 04 01 19 08 09 11 10 12 13 14 15 17 16 18 21 20 01 Display: Shows the...
... and stop cooking. Use to bring up the user preference menu in the display. (Press for each feature and function follow later in this user manual. 05 02 06 03 07 04 01 19 08 09 11 10 12 13 14 15 17 16 18 21 20 01 Display: Shows the...
User Manual
Page 30
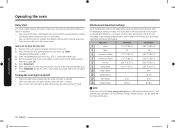
... the door is opened. • The oven light turns off automatically when the door is accepted. A beep will sound each time a pad on and off manually by pressing the pad. The oven will sound in the form of the features listed in the oven. 2. NOTE If you turn the oven light...
... the door is opened. • The oven light turns off automatically when the door is accepted. A beep will sound each time a pad on and off manually by pressing the pad. The oven will sound in the form of the features listed in the oven. 2. NOTE If you turn the oven light...
User Manual
Page 64
...normal cleaning or maintenance. COUNTRY U.S.A Consumer Electronics CANADA CALL 1-800-SAMSUNG (726-7864) 1-800-SAMSUNG (726-7864) OR VISIT US ONLINE AT www.samsung.com/us/support www.samsung.com/ca/support (English) www.samsung.com/ca_fr/support (French) DG68-01210A-00 NE63T851_AA_DG68-01210A-00_EN....indd 64 2020-03-26 11:58:38 For a Spanish version of this manual, visit our Website at www.samsung...
...normal cleaning or maintenance. COUNTRY U.S.A Consumer Electronics CANADA CALL 1-800-SAMSUNG (726-7864) 1-800-SAMSUNG (726-7864) OR VISIT US ONLINE AT www.samsung.com/us/support www.samsung.com/ca/support (English) www.samsung.com/ca_fr/support (French) DG68-01210A-00 NE63T851_AA_DG68-01210A-00_EN....indd 64 2020-03-26 11:58:38 For a Spanish version of this manual, visit our Website at www.samsung...

Installation Guide
Page 1
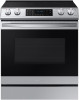
Electric Range Installation manual NE63*8***** Install_NE63T8911_AA_DG68-01257A-00_EN.indd 1 2020-03-26 6:27:49
Electric Range Installation manual NE63*8***** Install_NE63T8911_AA_DG68-01257A-00_EN.indd 1 2020-03-26 6:27:49

Installation Guide
Page 2
...cord connection Step 3. A child or adult can result in death or serious burns to 9 children or adults. 11 13 About this manual For your safety Preparing to install the range Prepare tools & Parts Checking the installation site To avoid breakage Connecting the power Step 1. Re...the range is moved. 7 E. See installation instructions for details. 8 F. Contents Contents Before you begin Anti-tip device About this manual 13 READ THESE INSTRUCTIONS COMPLETELY AND CAREFULLY. 13 Important note to the installer 15 • Read all instructions contained in these installation ...
...cord connection Step 3. A child or adult can result in death or serious burns to 9 children or adults. 11 13 About this manual For your safety Preparing to install the range Prepare tools & Parts Checking the installation site To avoid breakage Connecting the power Step 1. Re...the range is moved. 7 E. See installation instructions for details. 8 F. Contents Contents Before you begin Anti-tip device About this manual 13 READ THESE INSTRUCTIONS COMPLETELY AND CAREFULLY. 13 Important note to the installer 15 • Read all instructions contained in these installation ...

Installation Guide
Page 3
..., avoid having cabinet storage space above the cooktop. • The range should follow. • Be sure your safety WARNING • If the information in this manual is enough clearance at the top, back, sides, and underneath the range. When the service disconnecting switch cannot be locked, securely fasten a prominent warning device...
..., avoid having cabinet storage space above the cooktop. • The range should follow. • Be sure your safety WARNING • If the information in this manual is enough clearance at the top, back, sides, and underneath the range. When the service disconnecting switch cannot be locked, securely fasten a prominent warning device...
Installation Guide
Page 15
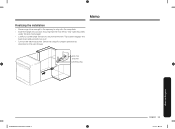
Anti-Tip bracket Leveling leg Installing the range Install_NE63T8911_AA_DG68-01257A-00_EN.indd 15 English 15 2020-03-26 6:27:52 Check the range for proper operation as described in the user manual. Memo Finalizing the installation • Move range close enough to the opening to plug into the receptacle. • Slide the range into position ensuring that the rear left (or rear right) leg slides under the Anti-Tip bracket. • Carefully tip the range forward to insure that the Anti-Tip bracket engages the back brace and prevents tip-over. • Turn on the electrical power.
Anti-Tip bracket Leveling leg Installing the range Install_NE63T8911_AA_DG68-01257A-00_EN.indd 15 English 15 2020-03-26 6:27:52 Check the range for proper operation as described in the user manual. Memo Finalizing the installation • Move range close enough to the opening to plug into the receptacle. • Slide the range into position ensuring that the rear left (or rear right) leg slides under the Anti-Tip bracket. • Carefully tip the range forward to insure that the Anti-Tip bracket engages the back brace and prevents tip-over. • Turn on the electrical power.


