User Manual
Page 4
... surface burner 26 Changing the oven light 67 Flame size selection 26 Removing and replacing the oven door 67 Gas surface burners and control knobs Cookware usage Center burner grate Wok grate (NX58*565*** Only) Using the griddle 26 Removing and replacing the warming drawer 27...Removing and replacing the storage drawer (Model NX58*560***, NX58*751***) 70 28 Self-cleaning oven 71 29 Operating the oven Oven control panels and displays Setting the clock 30 Troubleshooting 74 Troubleshooting 74 30 Troubleshooting and information codes 80 33 Setting the timer on/off 34 ...
... surface burner 26 Changing the oven light 67 Flame size selection 26 Removing and replacing the oven door 67 Gas surface burners and control knobs Cookware usage Center burner grate Wok grate (NX58*565*** Only) Using the griddle 26 Removing and replacing the warming drawer 27...Removing and replacing the storage drawer (Model NX58*560***, NX58*751***) 70 28 Self-cleaning oven 71 29 Operating the oven Oven control panels and displays Setting the clock 30 Troubleshooting 74 Troubleshooting 74 30 Troubleshooting and information codes 80 33 Setting the timer on/off 34 ...
User Manual
Page 16
... vents (air openings) of the oven door, and under the lower warming or storage drawer. Air openings are located behind the range, under the oven control panel, at the top and bottom of the range.
... vents (air openings) of the oven door, and under the lower warming or storage drawer. Air openings are located behind the range, under the oven control panel, at the top and bottom of the range.
User Manual
Page 23
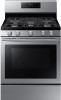
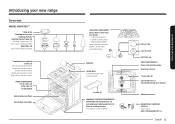
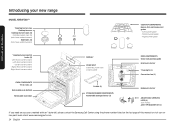
Center burner control - Left-rear burner control - DISPLAY OVEN VENT (centered under oven control panel) Griddle (1) WARMING DRAWER COMPONENTS Removable warming drawer (1) Full-extension roller guide rails (2) Electric heating element (not shown ... (5) Cooktop burner cups (5) (not shown under burners) Electrodes (5) (not shown under burners) * Cooktop burner control knobs (5) - Right-rear burner control - Introducing your new range Right-front burner control OVEN COMPONENTS * Oven racks (2) Glide rack (1) (as equipped) Removable oven floor Removable oven door COOKTOP COMPONENTS ...
Center burner control - Left-rear burner control - DISPLAY OVEN VENT (centered under oven control panel) Griddle (1) WARMING DRAWER COMPONENTS Removable warming drawer (1) Full-extension roller guide rails (2) Electric heating element (not shown ... (5) Cooktop burner cups (5) (not shown under burners) Electrodes (5) (not shown under burners) * Cooktop burner control knobs (5) - Right-rear burner control - Introducing your new range Right-front burner control OVEN COMPONENTS * Oven racks (2) Glide rack (1) (as equipped) Removable oven floor Removable oven door COOKTOP COMPONENTS ...
User Manual
Page 24
...NX58*560*** *Cooktop burner caps Cooktop burners Cooktop burner heads (5) Cooktop burner cups (5) (not shown under burners) Electrodes (5) (not shown under oven control panel) OVEN COMPONENTS Oven rack position guide Broil oven burner *Oven light (1) Convection fan (1) OVEN COMPONENTS *Oven racks (2) Removable oven bottom Removable oven ... LEGS (4) (not shown) ANTI-TIP BRACKET KIT (1) If you need an accessory marked with an * (asterisk), please contact the Samsung Call Center using the phone number listed on the last page of this manual or visit our online parts web site at www.samsungparts....
...NX58*560*** *Cooktop burner caps Cooktop burners Cooktop burner heads (5) Cooktop burner cups (5) (not shown under burners) Electrodes (5) (not shown under oven control panel) OVEN COMPONENTS Oven rack position guide Broil oven burner *Oven light (1) Convection fan (1) OVEN COMPONENTS *Oven racks (2) Removable oven bottom Removable oven ... LEGS (4) (not shown) ANTI-TIP BRACKET KIT (1) If you need an accessory marked with an * (asterisk), please contact the Samsung Call Center using the phone number listed on the last page of this manual or visit our online parts web site at www.samsungparts....
User Manual
Page 25
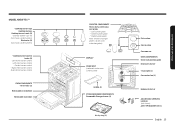
... Cooktop burners Cooktop burner heads (5) Cooktop burner cups (5) (not shown under burners) Electrodes (5) (not shown under oven control panel) Griddle (1) STORAGE DRAWER COMPONENTS Removable Storage drawer (1) Air fry tray (1) Flat surface Concave line Common use OVEN COMPONENTS Oven...(1) Bake oven burner ADJUSTABLE LEVELING LEGS (4) (not shown) ANTI-TIP BRACKET KIT (1) English 25 Introducing your new range Right-front burner control OVEN COMPONENTS *Oven racks (2) Removable oven bottom Removable oven door COOKTOP COMPONENTS Heavy duty, continuous cast grates - * Left burner grate - ...
... Cooktop burners Cooktop burner heads (5) Cooktop burner cups (5) (not shown under burners) Electrodes (5) (not shown under oven control panel) Griddle (1) STORAGE DRAWER COMPONENTS Removable Storage drawer (1) Air fry tray (1) Flat surface Concave line Common use OVEN COMPONENTS Oven...(1) Bake oven burner ADJUSTABLE LEVELING LEGS (4) (not shown) ANTI-TIP BRACKET KIT (1) English 25 Introducing your new range Right-front burner control OVEN COMPONENTS *Oven racks (2) Removable oven bottom Removable oven door COOKTOP COMPONENTS Heavy duty, continuous cast grates - * Left burner grate - ...
User Manual
Page 30
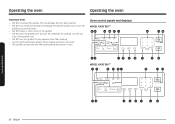
... the non-fixed coating. • DO NOT use metal utensils that can become hot when surrounding burners are in use the griddle for cooking. Oven control panels and displays MODEL NX58*565*** 01 02 03 04 05 11 09 07 08 12 10 13 15 14 16 MODEL NX58*560*** 01 02...
... the non-fixed coating. • DO NOT use metal utensils that can become hot when surrounding burners are in use the griddle for cooking. Oven control panels and displays MODEL NX58*565*** 01 02 03 04 05 11 09 07 08 12 10 13 15 14 16 MODEL NX58*560*** 01 02...
User Manual
Page 31
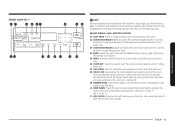
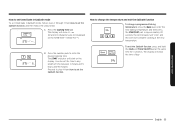
... the convection roast function. Use this pad to 93 °C). 11 SELF CLEAN: Activates the self-cleaning oven function. Special feature, oven, and time controls 01 EASY COOK: Press to recall the Easy cook recipe setting of baked goods on multiple shelves at 150 °F to 200 °F (66 °... digital display. Use the following pads to program and operate all oven operations except the clock and timer. 08 HOLD 3 SEC: Deactivates the control panel touch pads to cook large amounts of the oven. 02 CONVECTION BAKE( ): Activates the convection bake function. English 31
... the convection roast function. Use this pad to 93 °C). 11 SELF CLEAN: Activates the self-cleaning oven function. Special feature, oven, and time controls 01 EASY COOK: Press to recall the Easy cook recipe setting of baked goods on multiple shelves at 150 °F to 200 °F (66 °... digital display. Use the following pads to program and operate all oven operations except the clock and timer. 08 HOLD 3 SEC: Deactivates the control panel touch pads to cook large amounts of the oven. 02 CONVECTION BAKE( ): Activates the convection bake function. English 31

User Manual
Page 37
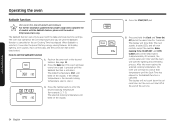
... circulation prevents oven burner combustion problems and ensures good cooking results. The oven has a light that is located under the oven control panel. The oven vent is located on the oven control panel. Hot steam could fall. The light can become hot, use a 40-watt appliance bulb when replacing the oven light. Operating the...
... circulation prevents oven burner combustion problems and ensures good cooking results. The oven has a light that is located under the oven control panel. The oven vent is located on the oven control panel. Hot steam could fall. The light can become hot, use a 40-watt appliance bulb when replacing the oven light. Operating the...
User Manual
Page 54
... will blink on the display. See page 35. 2. Press the START/SET pad. 5. The oven signals, display LEDs, and all oven controls except the number, Bake, Cooking Time, START/SET, and OFF/ CLEAR pads will start the lighting and preheating process. The selected cooking temperature... at that temperature until the Sabbath function is activated. The default temperature, 350°, will show SAb. In approximately 20 seconds, the control panel will "click" and the oven will be deactivated. If the default temperature is cancelled. When Sabbath is selected, it overrides the preset...
... will blink on the display. See page 35. 2. Press the START/SET pad. 5. The oven signals, display LEDs, and all oven controls except the number, Bake, Cooking Time, START/SET, and OFF/ CLEAR pads will start the lighting and preheating process. The selected cooking temperature... at that temperature until the Sabbath function is activated. The default temperature, 350°, will show SAb. In approximately 20 seconds, the control panel will "click" and the oven will be deactivated. If the default temperature is cancelled. When Sabbath is selected, it overrides the preset...
User Manual
Page 55
... change a programmed baking temperature, press the Bake pad, enter the new baking temperature, and then press the START/SET pad. In approximately 20 seconds, the control panel will "click" and the oven will show the time of time between 1 minute and 9 hours and 99 minutes. Press the number pads to set the...
... change a programmed baking temperature, press the Bake pad, enter the new baking temperature, and then press the START/SET pad. In approximately 20 seconds, the control panel will "click" and the oven will show the time of time between 1 minute and 9 hours and 99 minutes. Press the number pads to set the...
User Manual
Page 59
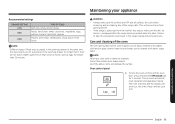
... and cleaning of the above items can be easily cleaned with warm, soapy water. All of the oven The oven and surface burner control panels can be cleaned with a damp cloth and/or glass cleaner. WARNING • Always make sure the anti-tip device is reengaged after... the range has been pushed back into place. Oven control panel 1. Maintaining your appliance Recommended settings DRAWER SETTING LOW MED HIGH TYPE OF FOOD* Soft rolls, empty dinner plates Roasts (beef, pork, lamb),...
... and cleaning of the above items can be easily cleaned with warm, soapy water. All of the oven The oven and surface burner control panels can be cleaned with a damp cloth and/or glass cleaner. WARNING • Always make sure the anti-tip device is reengaged after... the range has been pushed back into place. Oven control panel 1. Maintaining your appliance Recommended settings DRAWER SETTING LOW MED HIGH TYPE OF FOOD* Soft rolls, empty dinner plates Roasts (beef, pork, lamb),...
User Manual
Page 63
... page 60. Oven door WARNING Do not allow moisture to get inside of the door assembly. Do not move or clean gasket. Clean the control knobs in a dishwasher. The gasket on page 60. Do not get the gasket wet or allow moisture to clean other surfaces. Do not ... and dry thoroughly with hot, soapy water and a soapy plastic scouring pad. Moisture entering the door assembly and or getting on the surface burner control panel. Maintaining your appliance The oven door has multiple surfaces that require different cleaning techniques. The gasket is made of the cooktop Surface burner...
... page 60. Oven door WARNING Do not allow moisture to get inside of the door assembly. Do not move or clean gasket. Clean the control knobs in a dishwasher. The gasket on page 60. Do not get the gasket wet or allow moisture to clean other surfaces. Do not ... and dry thoroughly with hot, soapy water and a soapy plastic scouring pad. Moisture entering the door assembly and or getting on the surface burner control panel. Maintaining your appliance The oven door has multiple surfaces that require different cleaning techniques. The gasket is made of the cooktop Surface burner...
User Manual
Page 67
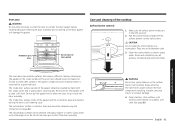
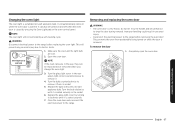
... the oven and the light bulb are in personal injury. • Disconnect the electrical power to remove it from accidentally being turned on the oven control panel. Oven light cover and bulb NOTE If the oven racks are cool. 2. Do not lift it by turning it clockwise until it is opened. This...
... the oven and the light bulb are in personal injury. • Disconnect the electrical power to remove it from accidentally being turned on the oven control panel. Oven light cover and bulb NOTE If the oven racks are cool. 2. Do not lift it by turning it clockwise until it is opened. This...
User Manual
Page 72
... icon will blink until the cycle is over and the oven temperature is on. When the time elapses, the oven will stay on the oven control panel. Press the OFF/CLEAR pad. Press the pad once for a 2-hour cleaning cycle, twice for a 3-hour cleaning cycle, or three times for 3 seconds to ...start the cycle. Press the START/SET pad to unlock the oven controls. Press and hold the preset self-clean temperature for self-cleaning 1. The display will show in minutes and hours. How to showing the time of...
... icon will blink until the cycle is over and the oven temperature is on. When the time elapses, the oven will stay on the oven control panel. Press the OFF/CLEAR pad. Press the pad once for a 2-hour cleaning cycle, twice for a 3-hour cleaning cycle, or three times for 3 seconds to ...start the cycle. Press the START/SET pad to unlock the oven controls. Press and hold the preset self-clean temperature for self-cleaning 1. The display will show in minutes and hours. How to showing the time of...
User Manual
Page 73
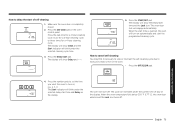
... below 350 °F (177 °C), the oven door unlocks and the Lock icon turns off . How to delay the start of day on the oven control panel. Make sure the oven door is reached, the oven will turn on the display.
... below 350 °F (177 °C), the oven door unlocks and the Lock icon turns off . How to delay the start of day on the oven control panel. Make sure the oven door is reached, the oven will turn on the display.
User Manual
Page 78
... can be necessary to completely clean the oven. More steam is normal. The cycle was not long enough to clear the smoke from under the control panel. The oven vent is normal. Steam or smoke coming from the room. Multiple self-cleaning cycles may be wiped clean with a damp cloth. POSSIBLE CAUSE...
... can be necessary to completely clean the oven. More steam is normal. The cycle was not long enough to clear the smoke from under the control panel. The oven vent is normal. Steam or smoke coming from the room. Multiple self-cleaning cycles may be wiped clean with a damp cloth. POSSIBLE CAUSE...

Installation Guide
Page 8
... or outside weather conditions. Do not attempt to make sure no range parts have any openings in the wall behind the range, under the oven control panel, at the top and bottom of the authority having jurisdiction. Do not use an extension cord with the manufacturers instructions and all codes and requirements...
... or outside weather conditions. Do not attempt to make sure no range parts have any openings in the wall behind the range, under the oven control panel, at the top and bottom of the authority having jurisdiction. Do not use an extension cord with the manufacturers instructions and all codes and requirements...
Installation Guide
Page 13
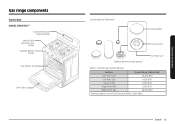
Gas range components Overview MODEL NX58*565*** Control Panel And Digital Display Heavy-Duty continous cast Grates Cooktop Burner Knobs Oven Racks (3) Oven Door Cooktop Burner Placement Flat surface Concave line Cooktop Burners (under grates) Common use Burner Locations and Output Ratings Location Output Rating (Natural Gas) Left-Front (LF) 15,000 BTU Left-Rear (LR) 9,500 BTU Center (CTR) 9,500 BTU Right-Rear (RR) 5,000 BTU Right-Front (RF) 18,000 BTU Warming Drawer (with Full Extension Roller Guide Rails) English 13 Gas range components
Gas range components Overview MODEL NX58*565*** Control Panel And Digital Display Heavy-Duty continous cast Grates Cooktop Burner Knobs Oven Racks (3) Oven Door Cooktop Burner Placement Flat surface Concave line Cooktop Burners (under grates) Common use Burner Locations and Output Ratings Location Output Rating (Natural Gas) Left-Front (LF) 15,000 BTU Left-Rear (LR) 9,500 BTU Center (CTR) 9,500 BTU Right-Rear (RR) 5,000 BTU Right-Front (RF) 18,000 BTU Warming Drawer (with Full Extension Roller Guide Rails) English 13 Gas range components
Installation Guide
Page 14
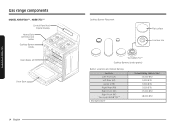
Gas range components Gas range components MODEL NX58*560*** , NX58*751*** Control Panel And Digital Display Heavy-Duty continous cast Grates Cooktop Burner Knobs Oven Racks (2) Oven Door 14 English Cooktop Burner Placement Flat surface Concave line * for NX58*751*** Cooktop Burners (under grates) Burner Locations and Output Ratings Location Left-Front (LF) Left-Rear (LR) Center (CTR) Right-Rear (RR) Right-Front (RF) Right-Front (RF) * For model NX58*751*** Storage Drawer Output Rating (Natural Gas) 15,000 BTU 9,500 BTU 9,500 BTU 5,000 BTU 17,000 BTU 18,000 BTU
Gas range components Gas range components MODEL NX58*560*** , NX58*751*** Control Panel And Digital Display Heavy-Duty continous cast Grates Cooktop Burner Knobs Oven Racks (2) Oven Door 14 English Cooktop Burner Placement Flat surface Concave line * for NX58*751*** Cooktop Burners (under grates) Burner Locations and Output Ratings Location Left-Front (LF) Left-Rear (LR) Center (CTR) Right-Rear (RR) Right-Front (RF) Right-Front (RF) * For model NX58*751*** Storage Drawer Output Rating (Natural Gas) 15,000 BTU 9,500 BTU 9,500 BTU 5,000 BTU 17,000 BTU 18,000 BTU


